Wednesday, September 9, 2015

Heartfelt Creations Enchanted Mum Collection

Heartfelt Creations is pleased to present its newest September release the Enchanted Mum Collection.  This is what HC has to say about this beautiful collection:  

"Swing open the decorative wrought iron gates and escape to serene and alluring garden surroundings with the Heartfelt Creations Enchanted Mum Collection.  Take in the beauty of shimmering dragonflies as they glide through warm and gentle breezes, landing to perch on beautiful bouquets of chrysanthemums dancing in the sunlight.  Graceful flowing floral images and exquisite die cuts along with soft hues of pinks, purples, greens and yellows are sure to bring about a sense of peace and calm to your soul.  Create your very own impeccable garden themed designs with the assortment of light and airy mums taking centre stage in five gloriously illustrated stamp sets along with swirling vines and beautifully detailed dragonflies, all of which mirror the stunning images found within this enchanting paper collection.  Create authentic, true to life blossoms and embellishments with three coordinating dies, perfect to grace your scrapbook layouts and original card creations.  Whether you are celebrating special occasions or  preserving precious family memories, an enchanting time of creativity awaits you with the Enchanting Mum Collection."  

I created two cards this week with this beautiful collection.  For complete instructions see the bottom of this blog post.  

MY EVERYTHING PINK MUM CARD


JOY AND PROMISE MUM CARD


For more wonderful projects made with the new Enchanted Mum Collection, please visit the Heartfelt Creations Blog.  Have a great day!

post signature

My Everything Pink Mum Card

Heartfelt Creations Products & Products Carried by HC:

Other Products:  Bazzill Cardstock; Tim Holtz Distress Ink - Bundled Sage, Worn Lipstick, Spun Sugar, Squeezed Lemonade; Art Glitter Ultrafine Transparent Glitter - Mellow Yellow; Want2Scrap Rhinestones - 72 Count - Light Green Rhinestones; Paper Distressor; Corner Rounder

Instructions:  Create a 6" x 6" card base out of green Bazzill cardstock.  Next using the Cut Mat Create 2A Die, die cut out the center of a 6" x 6" card front from the Enchanted Mum Paper.  With a paper distressing tool, distress the edges of the card front and then distress the edges with Bundled Sage Distress Ink.  Adhere card front to card base.  Die cut a pink Bazzil cardstock with the Raindrops on Roses Die and then cut the die cut it in thirds, adhering the top half  to the top of the card front, the bottom half to the bottom of the card front and cut the center portion in half, adhering each to the sides.  With Dries Clear Adhesive add Baby's Breath Glitter to the flower and dragonfly on the die cut card front.  Adhere the die cut card front to the card base with pop dots.  With Worn Lipstick Distress Ink stamp the Enchanted Mum Stamp Set on pink Enchanted Mum Paper and then die cut with the Enchanted Mum Die.  Add Spun Sugar and Squeezed Lemonade to the petals with a sponge dauber.  Shape the mums petals with the Deluxe Flower Shaping Kit and then cut the largest mum in half.  Layer the two halves of the larges mum, the medium mum and the smallest mum and add to the flower in the image.  With Dries Clear Adhesive add Baby's Breath Glitter to the petals and Spring Bling Prills to the center of the mum.  Cut the "You Are My Everything" sentiment from the design paper and round the corners with a corner rounder.  Distress the edges with a paper distressor and then dip the edges in Dries Clear Adhesive and then Mellow Yellow Glitter.  Once dry add to card front with pop dots.  Add Light Green Rhinestones to the Raindrops on Roses die cut as shown.

Joy and Promise Mum Card

Heartfelt Creations Products & Products Carried by HC:
HCDP1-258 Enchanted Mum Paper Collection
HCD2-749 Cut Mat Create 1A Die
HCD2-750 - Cut Mat Create 1B Die
TSMP900 Memento Dye Ink Pad - Tuxedo Black
159723 Art Institute Glue - Dries Clear
352854 Metal Glue Tip - Art Institute
101 Baby's Breath Ultrafine Transparent Glitter
85-glitter Crystal Ultrafine Transparent Glitter

Other Products:  Bazzill Cardstock; Curious Iridescent - Cryogen White; Copics - G20, G24, G28, RV52, RV55, V12, V15, V17; Art Glitter Ultrafine Transparent Glitter - Bonnie Blue; Want2Scrap 72 Count - Lavender Pearls, Pink Pearls and Purple Pearls; Want2Scrap 72 Count - Iridescent Rhinestones

Instructions:  Begin by creating a 6" x 6" card base out of green Bazzill cardstock and then adhere the 6" x 6" card front from the Mum Paper Collection.  With Dries Clear Adhesive using the Metal Glue Tip add Crystal Glitter to the dragonflies and the cream mum on the design paper, add Baby's Breath Glitter to the pink mums and Bonnie Blue Glitter to the purple mums on the design paper. Die cut a piece of the Cryogen White Paper using the Cut Mat Create 1B die and then with Tuxedo Black Ink stamp the image from the Single Enchanted Mum Set.  Color image with Copics and then add Crystal Glitter to the leaves in the colored image.  Die cut a piece of purple design paper with the Cut Mate Create 1A Die and add both the purple paper and the colored image to the card front as shown with pop dots.  In the upper right corner of the purple die cut add an Iridescent Rhinestone.  In the upper right corner and the bottom left corners add Pink, Lavender and Purple Pearls as shown.


Pin It!

Friday, September 4, 2015

Farmers Market Olives and Jugs Card

Today I am sharing my Farmers Market Olive and Jugs Card.  This card features Heartfelt Creations Farmers Market Collection.  


I love how even with this collection you can make an garlic bulb look sparkly and beautiful!


Have a great day!
post signature


Olives and Jugs Card


Other Products:  Bazzill Cardstock; Curious Iridescent - Cryogen White; Tim Holtz Distress Ink - Gathered Twigs; Copics BG70, BG72, E31, E33, E40, E43, E44, E47, E70, E71, E74, E81, E84, E87, W00, W1, W3, YG0000, YG01, YG67, YG91, YG93, YG99, G94, G99, R20, V12, Y23, Y26; Art Glitter Ultrafine Transparent Glitter - Flax and Green Brier; Flower Soft - Lilac; May Arts Twine; Button

Instructions:  Create a 6" x 6" side folding card out of Bazzill Cardstock.  Next cut a 6" x 6" card front from the Farmers Market Paper Collection and using the Cut Mat Create 2A Die, die cut out the center image (discard) and adhere outer card front to the card base with pop dots.  Die cut a piece of Cryogen White Paper using the same Cut Mate Create 2A Die and then stamp the vintage jugs image from the Jars and Accents Stamp Set using Tuxedo Black Ink.  Also stamp the "Handmade with Love" image from the Jug of Herbs Cling Stamp Set at the top of the die cut.  Color images with Copics.  With Dries Clear Adhesive add Crystal Glitter and Flax Glitter to the garlic bulb, Green Brier Glitter to the olive leaves and Lilac Flower Soft to the flowers.  Adhere colored image onto card base with Dries Clear Adhesive, making sure it shows evenly in the die cut card front opening.  Next on Cryogen White Paper with Memento Ink stamp garlic bulb from Jug of Herbs Stamp Set and two olive branches from Jars and Accents Stamp Set and color with Copics.  Die cut the olive branches with the coordinating Farmers Market Die and hand detail cut the garlic bulb, add glitter and adhere to card front with pop dots as shown.  Die cut a piece of brown Farmers Market paper using the Ornate Gateway Die, add Gathered Twigs Distress Ink and add it above the colored image with Dries Clear Adhesive.  Finish by adding twine and button creating a bow to the left side of the card.
Pin It!

Wednesday, September 2, 2015

Just Picked Apple Card

Today I want to share with you my Just Picked Apple Card featuring Heartfelt Creations HCPC-3690 Apple Harvest Cling Stamp Set.


I colored the image with Copics.  I think the apples look good enough to eat!


For more inspirations from the Heartfelt Creations Design Team, please go to the Heartfelt Creations Blog.  Have a great day!

post signature


Just Picked Apple Card

71035 ColorBox Fluid Chalk Ink Pad - Dark Brown

Other Products:  Spellbinders Labels Thirty Nine and Labels 39 Decorative Elements; Copics E40, YG91, YG93, YG95, YG97, R32, R35, R37, R39; May Arts Ribbon; Jenni Bowlin Studio - Pearl and Rhinestone Pins; Want2Scrap Swirls Finesse - Silver Rhinestones

Instructions:  Create a 5" x 7" card base.  Cut a 5" x 7" piece of design paper from the Farmers Market Paper Collection and wrap a green ribbon around the center before adhering it to the card base.  Next cut out the "Just Picked" image from the design paper and distress the edges with Dark Brown Chalk Ink before adhering it to the top of the right hand corner of the card front.  With Tuxedo Black Memento Ink stamp the vines image from the Jars and Vines Stamp Set and die cut it with the coordinating Jars and Vines Die.  Cut off several leaves and glue them to the apples in the "Just Picked" image.  Add Silver Rhinestones Swirls Finesse to the top and bottom of the card cutting to fit as needed.  On Cryogen White Paper stamp the apple image from the Apple Harvest Stamp Set with Tuxedo Black Ink and color with Copics.  Die cut with Labels Thirty Nine Die, keeping out the leaf on the left hand side.  With Dries Clear Adhesive add Crystal Glitter to the leaves in the colored image and to the "Just Picked" printed image.  Matte colored image on red design paper that has been die cut with Labels 39 Decorative Elements and adhere to card front with pop dots.  Create bow and add it to the right side of ribbon and insert Pearl and Rhinestones Pins in bow.

Pin It!

Wednesday, August 26, 2015

Home Grown and Country Apple Cards with Heartfelt Creations

Hello everyone!  A few more cards this week with Heartfelt Creations Farmers Market Collection!

HOME GROWN WITH LOVE CARD


COUNTRY APPLE CARD


For more creative ideas and inspiration, please visit the Heartfelt Creations Blog.  Have a great week!

post signature


HOME GROWN WITH LOVE CARD

HCPC-3687 Jug of Herbs Cling Stamp Set
HCPC-3685 Jars and Vines Cling Stamp Set
HCD1-767 Jars and Vines Die
HCDP1-257 Farmers Market Paper Collection
TSMP900 Memento Dye Ink Pad - Tuxedo Black
71035 ColorBox Fluid Chalk Ink - Dark Brown159723 Art Institute Glue - Dries Clear

Other Products:  Spellbinders Classic Ovals SM and Classic Scalloped Ovals LG; Bazzill Cardstock; Curious Iridescent - Cryogen White; Copics C00, C1, C3, C5, W00, W1, W3, E40, E43, E44, E50, E53, E81, E84, G20, G21, YG0000, YG95, YR12, YR14, YR18, RV95, RV99, V09;  Tim Holtz Distress Ink - Antique Linen;  Art Glitter Ultrafine Transparent Glitter - Plum Loco & Lichen; Art Glitter Ultrafine Opaque glitter - Linen; Flower Soft - Ivory; Want2Scrap - 72 Count - Sage Green Pearls; Want2Scrap - 72 Count - Gun Metal Pearls

Instructions:  Create a 6" x 6" side fold card base out of Bazzill Cardstock and then adhere the diamond pattern 6" x 6" card front cut from the Farmers Market Paper Collection to the card base.  Next cut another 6" square piece of Bazzill cardstock and adhere the second 6" x 6" card front from the paper collection and then adhere the entire piece as shown to the card base.  Next on Cryogen White Paper that has been die cut with Spellbinders Classic Ovals SM with Tuxedo Black Ink stamp the image from the Jug of Herbs Set and color with Copics.  Distress the the edges with Antique Linen Distress Ink.  With Dries Clear Adhesive add Ivory Flower Soft to the flowers in the jug, add Linen Glitter to the flowers at the bottom of the image, and add Plum Loco Glitter to the purple onion.  Adhere image to blue design paper that has been die cut with Spellbinders Classic Ovals LG and then add to card front with pop dots.  Using the Jars and Vines Die, die cut a jar from the design paper and add it to the card front with pop dots.  On green design paper with Dark Brown Chalk Ink stamp vines using Jars and Vines Cling Stamp Set and then die cut with coordinating Jars and Vines Die.  Shape vines with Flower Shaping Tools and add Lichen Glitter with Dries Clear Adhesive to leaves on design paper and die cut vines.  Add vines and pearls to card front as shown.


COUNTRY APPLE CARD

HCPC 3690 - Apple Harvest Cling Stamp Set
HCDP1-257 Farmers Market Paper Collection
HCD2-752 Cut Mat Create 2B Die
245125 3-D Crystal Lacquer
TSMP900 Memento Dye Ink Pad - Tuxedo Black
159723 Art Institute Glue - Dries Clear

Other Products:  Spellbinders Scalloped Squares; Bazzill Cardstock; Curious Iridescent - Cryogen White; Copics W00, W1, W3, W5, BG0000, BG000, BG10, BG11, BG34, E31, E335, E37, E39, E42, E81, E84, YG91, YG93, YG95, R22, R24, R27, R29; Art Glitter Ultrafine Transparent Glitter - Lichen; Want2Scrap - 72 Count - Sage Green Pearls; May Arts Ribbon; Canvas Corp Burlap Mini Shapes - Rectangles

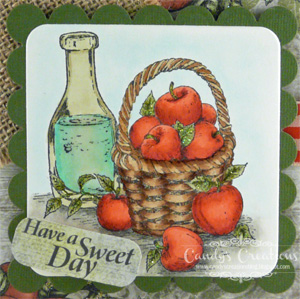
Instructions:  Create a 6" x 6" card base.  Wrap the ribbon around the 6" x 6" card front cut from the Farmers Market Paper Collection and then adhere it to the card base.  With Dries Clear Adhesive add Lichen Glitter to the leaves on the design paper.  Next adhere Burlap Rectangle and Sage Green Pearl as shown.  On Cryogen White Paper that has been die cut with Cut Mat Create 2B Die with Tuxedo Black Ink stamp image and color with Copics.  With Dries Clear Adhesive add Lichen Glitter to the apple leaves.  Adhere colored image on green Bazzill cardstock that has been die cut with Spellbinders Scalloped Squares die and then add to card front with pop dots.  From the design paper cut the "Have a Sweet Day" sentiment, round corners and add to image with a pop dot.  Add 3-D Crystal Lacquer to the water in the jug and allow to dry completely.


Pin It!

Wednesday, August 19, 2015

Heartfelt Creations Farmers Market Collection

I am excited to share some cards created with the Heartfelt Creations Farmers Market Collection! This beautiful collection features stamps and dies celebrating the bountiful harvest season.  

My first card "Sow Kindness" features the beautiful Farmers Market Paper Collection.

I added Ivory Flower Soft to the herbs in the jar, Lion's Mane Art Glitter to the carrot and Crystal Stickles to the garlic in the image. I finished embellishing the image by adding Want2Scrap Orange Rhinestones and a Sage Green Pearl. 


For my Sweet Apple Card I embellished the A2 card front from the Farmers Market Paper Collection by adding the stamped leaves from the HCPC 3651 Botanical Rose Cling Stamp Set, coloring them with Copics and die cutting them with the coordinating HCD1-758 Botanical Wings Die.


And finally for my "Berry" Happy Birthday Card, I stamped additional berry clusters using the stamp from HCPC 3689 - Berries and Peaches Cling Stamp Set, colored them with Copics and die cut it with the coordinating HCD1-777 Farmers Market Fruit Die.

I added them to the card front with pop dots for extra dimension.

For more great ideas and inspirations, please visit the Heartfelt Creations Blog.  Have a great day!
post signature


Sow Kindness Card

Heartfelt Creations Products & Products Carried by HC:
HCDP1-257 Farmers Market Paper Collection
196 Lion's Mane Glitter
159723 Art Institute Glue - Dries Clear
Double Dots 100pc. - 3D Foam Squares

Other Products:  Spellbinders Classic Circles SM; Spellbinders Petite Scalloped Circles LG; Bazzill Cardstock; Want2Scrap 72 Count - Orange Rhinestones; Want2Scrap 72 Count - Sage Green Pearls; Ranger Stickles - Crystal; Flower Soft - Ivory

Instructions:  Create a A2 Card base out of white cardstock. Next cut the A2 card front from the Farmers Market Paper Collection and die cut out the center image using the coordinating Spellbinders Classic Circles SM die.  Matte the image on green Bazzill cardstock that has been die cut with Spellbinders Petite Scalloped Circles LG die.  With Dries Clear Adhesive add Ivory flower soft to the flowers in the vase and around the base of the glass jar.  With Dries Clear Adhesive add Lion's Mane glitter to the carrot and then add Crystal Stickles to the small garlic in the image.  Add Orange Rhinestones and a Sage Green Pearl to the circle as shown.  Adhere the A2 card front to the card base and then add the Scalloped Circle die cut image to the card front with pop dots.  Cut "Sow Kindness" sentiment from design paper and round corners.  Add to card front with pop dots, as shown.


Sweet Apple Card

Heartfelt Creations Products & Products Carried by HC:
HCDP1-257 Farmers Market Paper Collection
HCPC 3651 Botanical Rose Cling Stamp Set
HCD1-758 Botanical Wings Die
TSMP900 Memento Dye Ink Pad - Tuxedo Black

159723 Art Institute Glue - Dries Clear
Double Dots 100pc. - 3D Foam Squares
386265 Getaway Dew Drops

Other Products:  Curious Iridescent - Cryogen White; Copics YG93, YG95, YG97;Canvas Corp Chocolate Cord

Instructions:  Create a A2 side fold card base and then adhere the A2 card front from the Farmers Market Paper Collection.  On Cryogen White Paper with Tuxedo Black Ink stamp the leaves using the Botanical Rose Cling Set.  Color with Copics and then die cut with the coordinating Botanical wings die. Adhere leaves to the image with Dries Clear Adhesive and pop dots.  Add Crystal Glitter to the leaves in the image and the die cut leaves.  With Dries Clear Adhesive add Dew Drops to the upper right corner of the image.  Cut the "Have a Sweet Day" sentiment from the design paper and add to the card front with pop dots.  Add chocolate cord around the side of the card front finishing with a bow.

"Berry" Happy Birthday Card

Heartfelt Creations Products & Products Carried by HC:
HCPC 3689 - Berries and Peaches Cling Stamp Set
HCD1-777 Farmers Market Fruit Die
HCDP1-257 Farmers Market Paper Collection
TSMP900 Memento Dye Ink Pad - Tuxedo Black
Double Dots 100pc. - 3D Foam Squares
159723 Art Institute Glue - Dries Clear

Other Products:  Curious Iridescent - Cryogen White; Copics RV93, RV95, RV99, YG93, YG95, YG97; The Robin's Nest Dew Drops - Whilshire and Hyacinth

Instructions:  Create a 6" x 6" side fold card base and then adhere a 6" x 6" card front cut from the Farmers Market Paper Collection.  Next with Tuxedo Black Ink on Cryogen White Paper stamp two raspberry clusters from the Berries and Peaches Stamp Set and color with Copics.  Die cut raspberries with coordinating Farmers Market Fruit Die and then add to printed image on card front with pop dots.  With Dries Clear Adhesive and the Metal Glue Tip add Crystal Glitter to the leaves on both the printed card front and the die cut images.  Cut the "Have a 'berry' Happy Birthday" sentiment from the Paper Collection and round the corners before adhering it to the card front with pop dots.  With Dries Clear Adhesive add Hyacinth Dew Drops and Whilshire Diamond Dew Drops under the sentiment.

Pin It!

Saturday, August 8, 2015

Panda Bear Card

Today I have a super cute Birthday card to share that features Want2Scrap's Inspire Swirls in Silver Rhinestones with Spellbinders Scruffy Panda and Bamboo Party dies.  The design paper on this 6" x 6" card is from Quick Quotes Dream Big Paper Collection.


I die cut the Panda out of black and white Bazzill cardstock and then added  Silver Baby Bling Rhinestones for the Panda's eyes.  I used the Quick Quotes paper to die cut the bamboo using the Bamboo Party dies and adhered it to the card front using Dries Clear Adhesive as needed.


Next I added the Inspire Swirls in Silver Rhinestones.  I used Caribbean Blue PowderPuff Chalking Inks on the edges of the Happy Birthday quote from Quick Quotes Bundle - Sentiments before adhering it to the card front with pop dots.  Finally, I adhered a couple Black Rhinestones and a Silver/Clear Rhinestone to the right hand side of the card.


Have a great day!


Want2Scrap Products:

72 Count - Silver/Clear Rhinestones - Self Adhesive
72 Count - Black Rhinestones - Self Adhesive
Inspire Swirls by Nina Brackett - Silver Rhinestones
Baby Bling Rhinestones - Silver - 100 count

Preferred Partner Products:

Spellbinders IN-045 Scruffy Panda
Spellbinders In-044 Bamboo Party

Cross Promotional Partners:

Quick Quotes Dream Big Paper
Caribbean Blue PowderPuff Chalking Inks
Quick Quotes Bundle - Sentiments

Other Products:

Bazzill Cardstock
Pin It!

Friday, August 7, 2015

Christmas Prayer Tag with Heartfelt Creations

This week on the Heartfelt Creations Blog I am sharing a tag I created featuring a beautiful "Christmas Prayer" from the Sparkling Poinsettia Paper Collection


It also features the new Peacock Paisley Die.


Have a good day!
post signature


Christmas Prayer Tag


Heartfelt Creations Products & Products Carried by HC:


Other Products:  #10 Manila Tag (4 1/8" x 8 1/2")' Bazzill Cardstock; Spellbinders Card Creator Diamond Effects; Spellbinders Card Creater A2 Matting Basics A; Want2Scrap 72 Count - Cranberry Pearls; Want2Scrap - 72 Count - Teardrop Bling - Silver; Navy Seam Binding; Want2Scrap - 72 Count - Iridescent Rhinestones; Art Glitter Ultrafine Transparent Glitter - Antique White; Versamark Watermark Ink; Vanilla Sparkle Embossing Powder.

Instructions:  Begin by tracing the shape of the tag on the Sparkling Poinsettia Paper and then cutting it to fit and adhering the paper to the tag with Dries Clear Adhesive.  Use the hole dies from the Luggage and Tags Die and burgundy Poinsettia paper to die cut holes and add it to the hole in the tag with Dries Clear Adhesive and then insert navy seam binding in the hole on the tag.  Next cut out the "Christmas Prayer" from the design paper and matte it on Navy Bazzill cardstock that has been die cut with Spellbinders Card Creator Diamond Effects die.  Add it to the tag with 3D Foam Squares and then put an Iridescent Rhinestones in the corner of the matted Christmas Prayer.  On burgundy and cream Poinsettia Paper and blue Christmas Card Paper with Galaxy Gold Ink stamp the Sparkling Poinsettia Stamp Set and then add Gold Embossing Powder.  Tap off excess and heat set.  Die cut poinsettias using the Sparkling Poinsettia Die.  On green Poinsettia Paper with Galaxy Gold Ink stamp the leaves from the Large Sparkling Poinsettia Set and the Holly Berry Stamp Set and then add Gold Embossing Powder.  Tap off excess and heat set.  Die cut the leaves with the coordinating Large Sparkling Poinsettia Die and the Ornamental Add On Die.  Shape poinsettias and leaves with Deluxe Flower Shaping Kit and layer as shown. Add Cranberry Pearls to the Holly Berry Leaves. For the center of the burgundy and blue poinsettia add golden Rock n' Roll Prills with Dries Clear Adhesive and for the center of the cream poinsettia add blue Rock n' Roll Prills with Dries Clear Adhesive.   On burgundy and blue paper stamp the peacock feather from the Feathery Peacock set with Versamark Ink and add Vanilla Sparkle Embossing Powder.  Tap off excess and heat set.  Die cut feather with coordinating Peacock Paisley Die and then add Teardrop Bling in Silver to the center of each feather. With Dries Clear Adhesive and the Metal Glue Tip add Antique White Glitter to the poinsettias.  Adhere poinsettias, leaves and feathers to the tag as shown.

Pin It!
Related Posts Plugin for WordPress, Blogger...