Showing posts with label Crafters Companion. Show all posts

Friday, November 28, 2014

HEARTFELT CREATIONS ROMANTIQUE GARDEN COLLECTION

Happy Black Friday!  Heartfelt Creations is pleased to release its Romantique Garden Collection.  This is what Heartfelt Creations says about their newest release:
"Love is in full bloom with the Romantique Garden collection from Heartfelt Creations. A romantic symphony composed in subtle shades of pink, fuchsia, green, cream and charcoal harmonizes beautifully with picturesque images of dainty hummingbirds, devoted love birds, graceful swans and delicate bleeding heart bushes. Ornate ironwork backgrounds are in perfect harmony with layered elements of vintage sheet music, lace, flowing handwriting, scrollwork, florals, stripes and flourishes. Six hand drawn stamp sets capture the idyllic beauty of a peaceful garden where swans glide across the surface of a glassy lake, nesting lovebirds are wreathed in flowers, and hummingbirds sip nectar from blossom laden branches of exquisite beauty. The coordinating die cuts feature elegant swirled stems, a graduated set of bleeding heart blossoms and a majestic pair of swimming swans. Dreamy and idyllic, uplifting and inspiring, romantic and moving as a masterfully scored concerto, this enchanting collection is a celebration of love and life amidst the extraordinary beauty of nature."
First, I created a Vintage Best Wishes Tag featuring the beautiful Romantique Garden Paper Collection.


This tag uses the Romantique Wings PreCut Set and also the bleeding hearts stamp from the Heartthrob PreCut Set and the coordinating Romantique Garden Die.


For my next project, I created a card features the Home is Where the Heart is PreCut Set colored with Copics.


For more inspiration from the other Design Team member go to the Heartfelt Creations Blog and also for some great Black Friday Deals!

post signature


Vintage Best Wishes Tag

Heartfelt Creations Products & Products Carried by HC:


Other Products:  Paper:  #8 Manila Tag; Curious Iridescent - Cryogen White & Bazzill; Spellbinders Dies:  Classic Ovals & Gold Ovals One; Ink:  VersaMark Watermark, Tim Holtz Distress Ink - Antique Linen, Memento - Tuxedo Black; Copics: RV91, RV93, RV95, RV99, Y00, Y02; Embellishments: Wow Embossing Powder - Earthtone Olive Regular; Want2Scrap Pearls 72 - LeCreme;  Want2Scrap Swirls Finesse - LeCreme Pearls - Self Adhesive; Art Glitter Ultrafine Transparent Glitter - Flax; Vintage Seam Binding; Crafter's Companion Spray & Sparkle - Pink Iridescent

Instructions:  To create this 3 1/2" x 7 1/2" tag begin with a #8 Manila tag and adhere the striped Romantique Garden Paper cutting to fit the tag.  Then use a hole punch to create a hole in the design paper and add the vintage seam binding.  Next cut a piece of Romantique Garden Paper with the Raindrops on roses die and add to the bottom of the tag with Dries Clear Adhesive and also add LeCreme Pearls to the die cut.  At the top of the tag adhere the LeCreme Pearls Swirls Finesse and add a large LeCreme Pearl.  Die cut a piece of Cryogen White Paper with the Spellbinders Classic Ovals Die and then stamp the "Best Wishes" image from Romantique Wings PreCut Set with Watermark Ink and use Olive Embossing Powder.  Heat set.  Distress image with Antique Linen Distress Ink and spray with Pink Iridescent Spray & Sparkle Spray.  Matte image with pop dots on green Romantique Garden paper that has been die cut with Gold Ovals One and then adhere that on pink Bazzill cardstock that has been die cut with Classic Ovals Die.  Add LeCreme Pearls.  Next on Cryogen White Paper with Memento Ink stamp Bleeding Hearts from Heartthrob PreCut Set and color with Copics.  Die cut with Romantique Garden Die and adhere 2 small and one large directly to Best Wishes image with Dries Clear Adhesive.  On the large Bleeding Heart, add another one on top with a pop dot.  Add Flax Glitter with Dries Clear Adhesive to the center of large Bleeding Heart.


Your Special Day Card

Heartfelt Creations Products & Products Carried by HC:


Other Products: Curious Iridescent - Cryogen White; Ink: Memento - Tuxedo Black; Copics: RV91, RV93, RV95, RV99, Y00, Y02, E40, E42, E43, R81, R83, R85, R89, C00, C01, C03, YG61, YG63, YG67, YG94, YG99, E23, E25, E27; Embellishments:  Want2Scrap Rhinestones 72 count - Black; Want2Scrap Swirls Finesse - Black Rhinestones - Self Adhesive; Art Glitter Ultrafine Transparent Glitter - Flax; May Arts Ribbon


Instructions:  Begin by making a 5" x 7" card base.  Next adhere the card panel from the Romantique Garden Paper Collection.  Next wrap the ribbon around the the center of the card front, securing in the middle of the front.  On Cryogen White Paper with Memento Ink stamp the image from the Home Is Where the Heart is Set and color with Copics.  Also on Cryogen White Paper stamp some Bleeding Hearts from the Heartthrob Set, color with Copics and die cut with the Romantique Garden Die.  Add Bleeding Hearts to colored image with pop dots.  Add Flax Glitter to the bleeding hearts, Shell White Glitter to the bird and cancelled stamp marks and add Bark Elements to the bird nest all with Dries Clear Adhesive.  At three of the corners add a Black Rhinestone and at the other corner add the Swirls Finesse - Black Rhinestones.  With pop dots add the tag that was die cut with the Luggage and Tags Die from the Romantique Garden Paper.

Pin It!

Friday, May 30, 2014

TEA PARTY LAYOUT


Today I am sharing a layout with you that features Marion Smith Designs Mad Tea Party design paper.  I absolutely love this beautiful collection.  The sweet picture is from Tim Holtz's pack of Found Relatives.


I heavily distressed the edges of the floral side of Marion Smith's Mad Tea Party - Spot of Tea with Tim Holtz Distress Tool and  Tim Holtz Distress Ink in Antique Linen before adhering it to another sheet of the Spot of Tea design paper using the reverse side.  I added the teapot and cup brads from BoBunny Little Miss Brads so that they peaked out between the tears on the distressed paper.  The "Yesterday" fancy chipboard embellishment is from Want2Scrap and I painted it with DecoArt Metallic Lustre in Iced Espresso.


I used Spellbinders Grand Decorative Circles One die cut another piece of of the pink side of the Spot of Tea design paper to create the base for my photo and embellishments.  Underneath the left corner I tucked the Alice paper dolls from the Marion Smith Cut & Create design paper.  The ephemera is from KaiserCraft Sweet Nothing Collectibles Die Cut Shapes, which I added Art Glitter Ultrafine Transparent Glitter in Crystal for some extra sparkle, and the resin accent is from Webster Pages.  I added the little spoon from the Eyelet Outlet to the sweet little doily from Maya Road.  To create the leaves I stamped them with Tim Holtz Forest Moss Distress Ink using Heartfelt Creations HCPC 3547 - Bold Leaf PreCut Set stamp and die cut the leaves with Heartfelt Creations HCD 736 - Classic Leaf Die.  The flowers are from Prima.


To continue with my tea party theme I used the Want2Scrap® Chipboard Teacup and painted it with DecoArt Metallic Lustre in Gold and then sprayed it with Crafter's Companion Iridescent Spray & Sparkle Spray.  With Tuxedo Black Memento Ink I stamped the clock image from Marion Smith Designs Stamp Collection - Curious on the teacup.  To create the look of steam from the teacup I used Want2Scrap® Swirls Finesse LeCreme Pearls.


I am entering my layout in the following challenges:
ENTRIES CLOSE 23.55 EST SATURDAY 31 MAY 2014

Have a great day!


post signature


SUPPLIES:

Dies:  Heartfelt Creations HCD 736 - Classic Leaf Die; Spellbinders Grand Decorative Circles One
Tools:  Spellbinders Grand Caliber; Tim Holtz Distress Tool
Inks/Paints/Sprays:  Tim Holtz Distress Ink - Antique Linen & Forest Moss;  Memento - Tuxedo Black; DecoArt Metallic Lustre - Iced Espresso & Gold Rush; Crafter's Companion Spray & Sparkle Spray - Gold
Embellishments:  Maya Road Vintage Findings - Mama's Doilies;  Eyelet Outlet - Utensil Brads; Webster's Pages Perfect Accents Resin Accents - Girl Land Collection; BoBunny Little Miss Brads; Want2Scrap® "Yesterday" Fancy Chipboard Word; Want2Scrap® Teacups - Chipboard Embellishments; Art Glitter Ultrafine Transparent Glitter - Crystal; Want2Scrap® Swirls Finesse LeCreme Pearls.

Pin It!

Friday, May 16, 2014

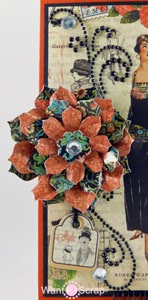
LOVELY LADY GRAPHIC 45 CARD


Candy here from Candy's Creations and today I am sharing with you my Lovely Lady Card that features the Graphic 45® Couture Collection and Want2Scrap® Bling.  I created the 5" x 7" cardbase out of Bazzill cardstock and then matted the Graphic 45® Couture Collection - Chic design paper to create the card.


Along the left side of the card I added Swirls Finesse - Black Rhinestones  and a large Silver/Clear Rhinestone at each end of the Swirls Finesse.   I created the flower by layering and shaping pieces from Graphic 45® Couture Collection - Flowers.   I sprayed the entire flower with  Gold Crafters Companion Spray & Sparkle and added a Silver/Clear Rhinestone to the flower center.  With black May Arts Twine I attached the "Style" Graphic 45® Couture Chipboard Element.

Have a great day!
post signature


Want2Scrap® Products:


Cross Promotional Partner Products:


Other Products:

  • Other Paper:  Bazzill
  • Embellishments:  May Arts Twine;  Crafters Companion Spray & Sparkle - Gold
Pin It!

Friday, February 21, 2014

VINTAGE VALENTINE WITH WANT2SCRAP® & AUTHENTIQUE

Good morning!  I hope you are having a great week!   Today I have a sweet card that I made featuring Want2Scrap® Nestaboard and Nestabling.  I used design papers from Authentique's Lovely Collection, distressed the edges with a distress tool and Tim Holtz Distress Ink in Antique Linen and Spun Sugar and used vintage seam binding to create the vintage looking Valentine.


On cardstock die cut with Spellbinders Fancy Tags Two, with Tuxedo Black Memento Ink,  I stamped the "Love" sentiment from Theresa Collins before adhering it to the Nestaboard Fancy Tags Two .  I then sprayed the tag with Iridescent Crafter's Companion Spray & Sparkle for some extra sparkle before adhering the Nestabling Fancy Tags Two - Pink Pearls and then added it to the card front with pop dots.  I added coordinating Pink Pearls to the bottom corners of the card front to complete the card.


Have a great day!
post signature


Want2Scrap Products:


Preferred Partner Products:


Cross Promotional Products:


Other Products:
  • Other Paper:  Bazzill
  • Ink:  Memento - Tuxedo Black; Tim Holtz Distress Ink - Antique Linen and Spun Sugar
  • Stamps:  Theresa Collins Vintage Finds Stamps #1
  • Embellishments:  Seam Binding; Crafter's Companion Spray & Sparkle - Iridescent


Pin It!

Wednesday, September 25, 2013

HAPPY BIRTHDAY WITH CRAFTWORK CARDS CANDI

Today I made a Birthday Card featuring Craftwork Cards Ice Cream Parlour Paper Collection Downloads


This paper can be downloaded directly from Craftwork Cards website and printed off on your own printer. How convenient is that!  With Espresso Truffle Memento Ink on Cryogen White Paper I stamped the graphic Birthday image from Taylored Expressions Big Bold Birthday stamp set and then I colored the word "Day" with Copics.  To make it sparkle I added Crafter's Companion Spray and Sparkle spray in iridescent before I matted it on the Spellbinders Scalloped Rectangles.
 

I wrapped some twine around the top of the card and added a FabScraps wooden button.
 

I finished the card by adding some Craftwork Cards Toy Box Candi with Candi Fix.
 

Have a great day!

 
Pin It!

Monday, September 9, 2013

SUSAN K WECKESSER & WANT2SCRAP® WEEK


Susan K Weckesser & Want2Scrap are joining together this week to bring you some amazing projects featuring their wonderful products!  Using Susan K Weckesser's Unity Stamp Autumn Grunge I made this Autumn Card. The Autumn Grunge stamp set includes four different shaped leaves. I stamped the various leaves on a 4 3/4" square piece of cream cardstock using Tim Holtz Distress Ink in Bundled Sage, Forest Moss, Brushed Corduroy and Tea Dye.


I then sprayed the cardstock with Crafters Companion Spray & Sparkle in Gold. I matted it on the card base created from cream Bazzill cardstock, dark brown Bazzill cardstock and then a 5 1/2" piece of square Authentique Seasons "Autumn Three" design paper. Then using Spellbinders Labels 22 I diecut a piece of Bazzill Two Scoops - Moose Track cardstock. I then took the "Give Thanks" sticker from Authentique "Autumn" Components sheet and adhered it to the Labels 22. Next I added Want2Scrap® Nestabling Labels 22 White Pearl and then added the entire Label 22 to the card front with pop dots.


Then finally I added Want2Scrap® 72 Count - White Pearls - Self Adhesive to the bottom corner to finish the card.


This card was really quick and easy to make, but the finished card is a very elegant looking Autumn card! Have a great day!


Want2Scrap Products:
Preferred Partner Products:
Cross Promotional Products:
Other Products:
  • Paper: Bazzill; Bazzill Two Scoops - Moose Track
  • Ink: Tim Holtz Distress Ink - Bundled Sage, Forest Moss, Brushed Corduroy and Tea Dye
  • Embellishment: Crafters Companion Spray & Sparkle in Gold


Pin It!

Wednesday, October 17, 2012

HEARTFELT CREATIONS VINTAGE FLORET COLLECTION

Good morning!  Today is my Mom's Birthday so she and my dad are coming over for supper tonight.  I am going to surprise her with her favorite dessert pumpkin whoopie pies.  The girls are so busy with marching band practice that they will have about one hour window of time between band practice and youth group at church to celebrate with Grandma, but we will make the most of it!
 
I have two more projects to share with you this week featuring the Heartfelt Creations' beautiful new Design Paper the Vintage Floret Collection.  My first project features another vintage portrait I purchased at the local antique mall.  I hand made all the flowers with the new HC Vintage Floret stamps and dies and also a few with the HC Delicate Asters stamps and dies.  I stamped and die cut them using the HC Vintage Floret Design Paper.
 
VINTAGE WEDDING LAYOUT
 
 
For my second project I cut out the a door from the Vintage Floret Collection Design Paper and added some embellishments to make a quick card for a special someone!
 
THE DOOR OF MY HEART CARD


Please check out the other great projects the Design Team created this week and posted on the HC Blog.  Have a good week!


VINTAGE WEDDING LAYOUT

Heartfelt Creations Products & Products Carried by HC:
HCPC 3494 - Delicate Asters PreCut Set
HCPC 3500 - Open Vintage Floret PreCut Set
HCPC 3502 - Mini Vintage Floret PreCut Set
HCD 726 - Delicate Asters Die
HCD 727 - Vintage Floret Die
HCDP1 727 - Vintage Floret Collection
Labels 4 Grand Nestabilities
Spellbinders Grand Calibur
Paper Blossoms Molding Mat
Paper Blossoms Tool Kit
Brown Gala Glitz
Gold Pearl Brads
Art Institute Glue - Dries Clear
Double Dots

Other Products:
Other Paper:  Bazzill
Other Spellbinders:  Moroccan Accents
Ink:  Ranger Distress Ink - Frayed Burlap
Embellishments:  Kaiser Self Adhesive Pearls - Latte; Zva Creative - Self Adhesive Pearls & Embellishments; Stickles - Cinnamon; Crafters Companion Sparkle & Spray - Gold

Instructions:
12" x 12" Layout
Begin with a 12" X 12" piece of  HC Vintage Floret Design Paper.  With Frayed Burlap Distress Ink stamp various sizes of Delicate Asters,  Open Vintage Florets and Mini Vintage Florets on Vintage Floret Design Paper and then die cut with Vintage Floret Die and Delicate Asters Die.  Shape petals with Paper Blossoms Tool Kit and Molding Mat.  To create several layers of  petals adhere flower centers with Dries Clear Glue building layers and shaping as desired.  Spray some flowers with Gold Sparkle & Spray.  Add Brown Gala Glitz, Cinnamon Stickles, Self Adhesive Pearls and Gold Pearl Brads to flower centers as desired. Adhere flowers to page with Dries Clear Glue. Out of cream Bazzill cardstock die cut larger Grand Labels Four and out of green Bazzill cardstock die cut large Grand Labels Four.  Matte vintage picture on Grand Labels and then adhere to page.  Cut "The Best . . . " sentiment from HC Vintage Floret Paper and adhere to page and add accents die cut from Spellbinders Moroccan Accents.  Add Self Adhesive Pearls and Embellishments to page as desired.

THE DOOR OF MY HEART CARD

Heartfelt Creations Products & Products Carried by HC:
HCPC 3449 - Door to My Heart PreCut Set
HCDP1 227 - Vintage Floret Paper Collection
Antique Rose Pee Wee Kit
Art Institute Glue - Dries Clear
Metal Glue Tip - Art Institute

Other Products:
Other Paper: Bazzill; Curious Iridescent - Cryogen White
Ink: Memento - Espresso Truffle; Tim Holtz Distress Ink - Antique Linen
Spellbinders: Petite Ovals SM; Petite Scalloped Ovals LG
Embellishments: Craftworks Cards Candi - Mr. & Mrs.; KaiserCraft Pearl Brads - Latte; Michaels Ribbon; Want2Scrap Self Adhesive Bling Finesse Swirls - LeCreme

Instructions:
6" X 6" Card
Begin with a 12" x 6" piece of blue cardstock and score on the 6" mark to create a 6" square card base. Next Adhere a 6" piece of Vintage Floret Paper and wrap a piece of ribbon around center of paper. Adhere piece to card front. Next cut a 4 1/4" x 4 3/4" piece of HC paper that contains door and matte on 4 1/2" x 5" blue cardstock and adhere to card. With Metal Glue Tip and Dries Clear Glue add glitter from Antique Rose Kit on accents around door. Add Finesse Swirls Bling, cutting to fit as necessary and add Candi with pop dots to upper right corner. On Cryogen White Paper die cut with Petite Ovals SM with Memento Ink stamp "The door of my . . . " sentiment from Door to My Heart Set and then distress edges with Antique Linen Distress Ink. Matte on blue paper die cut with Petite Scalloped Ovals LG. Attach to card with pop dots. Make bow and add a Pearl Brad to center, adhere to card.
Pin It!
Related Posts Plugin for WordPress, Blogger...