Wednesday, April 11, 2018

Pretty Butterflies Card

Today Heartfelt Creations is pleased to announce the release of its Butterfly Dreams Collection.  I just love the bright colors of this paper collection.


For more inspiration and ideas, please visit the Heartfelt Creations Blog.  Have a great day!


Heartfelt Creations Products and Products Carried by HC:

TSMP400 Memento Dye Ink Pad - Rose Bud
TSMP602 Memento Dye Ink Pad - Teal Zeal
TSMP200 Memento Dye Ink Pad - Tangelo
247027 Fantastix

Other Products:  Glue Gun;VersaColor Pigment Ink - Opera Pink;  Angel Pink Memento Ink; Art Glitter Ultrafine Transparent - Lettuce and Pink Azalea; Sunshine Yellow Flower Soft; Want2Scrap 72 Count Turquoise Rhinestones; Want2Scrap 72 Count Orange Rhinestones

Instructions:  Create a 6" x 6" card base out of white card stock. Cut a 6" x 6" card front from the Butterfly Dreams Paper Collection and sponge edge of card front with Teal Zeal Memento Ink.  Adhere 6” x 6” card front directly to card base with Dries Clear Adhesive. On White Cardstock with Opera Pink VersaMark Ink stamp the petals from the Small Sweet Peony Cling Stamp Set and stamp the small peony blossom from the Peony Bud and Blossom Cling Stamp Set.  On White Cardstock with Leaf Green Ranger Archival Ink  stamp the leaves from the Small Sweet Peony Cling Stamp Set; with Rose Bud Memento Ink stamp the butterfly from the Fluttering Butterfly Cling Stamp Set; and using Nautical Blue Memento Ink stamp the butterfly floral image from the Butterfly Dreams Border Cling Stamp Set. Cut all with coordinating dies. Using the Stack and Store Daubers color the leaves using New Sprout; color the peonies with Tangelo and Cantaloupe Memento Inks; color the large butterfly wings with Cantaloupe Memento Ink and add Angel Pink Memento Ink to the body; to color the small butterfly floral image use Danube Blue and Teal Zeal Memento Inks on the butterfly, New Sprout and Bamboo Leaves Memento Inks on the swirls and Rose Bud and Cantaloupe Inks on the flowers. Use the Deluxe Flower Shaping Kit to shape all. Assemble the peony as shown using hot glue gun and adhere to peony and leaves to card. Cut butterfly floral image and adhere it and large butterfly to card front with Dries Clear Adhesive.  With Dries Clear Adhesive add Pink Azalea Glitter to the large butterfly, to the die cut peony and the peonies on the design paper; Lettuce Glitter to the die cut leaves and swirls and leaves on the design paper and and Blue Rain Glitter to all the blue butterflies. With Dries Clear Adhesive add Sunshine Yellow Flower Soft to the flowers on the die cut and Go Man Go Prills to the center of the peony, as shown. Finally adhere the Turquoise and Orange Rhinestones to the upper right hand corner as shown.
SaveSave
Pin It!

Wednesday, April 4, 2018

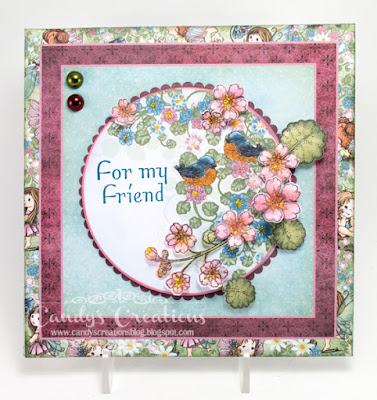
For My Friend Wildwood Cottage Card


Today I am sharing my For My Friend card featuring the Heartfelt Creations Wildwood Cottage Collection.

Have a great day!
post signature


Heartfelt Creations Products and Products Carried by HC:

Other Products:  Canvas Corp Navy on Ivory 12" x 12" Cardstock; VersaMagic Pink Petunia Chalk Ink; Ranger Stickles - Yellow; Flower Soft Ultrafine - Toffee; Want2Scrap 72 Count - Sage Green Pearls; Want2Scrap 72 Count - Cranberry Pearls

Instructions: Create a 6" x 6" card base out of the Navy on Ivory Cardstock.  Cut the 6" x 6" card front from the Wildwood Cottage Paper and die cut the center using the coordinating Circles Basic Large Die and sponge edges of die cut circle image with Pink Petunia Chalk Ink.  Using Nautical Blue Memento Ink stamp "For My Friend" from the Encourage You Stamp Set on the die cut circle image, as shown. Sponge outside of 6" x 6" card front with Olive Grove Memento Ink and adhere directly to card base with Dries Clear Adhesive.  Adhere die cut circle to card front using pop dots.   On White Cardstock with Tuxedo Black Ink stamp the floral image from Wildwood Cottage Accents Set and stamp the small blossom set, the large blossom set and a set of large leaves from the Wildwood Florals Set.  Die cut all using their coordinating dies.  Color the flowers using a sponge dauber with Pink Petunia Chalk Ink and add Cantaloupe Ink to the centers using a Fantastix.  Color the leaves with a sponge dauber with Pistachio Ink and add Olive Grove Ink to the stems and centers of leaves with a Fantastix.   Shape the flowers, blossoms and leaves with the Deluxe Flower Shaping Kit.  Adhere all to the card front as shown using Dries Clear Adhesive, cutting the leaves as needed.  With Dries Clear Adhesive add Baby's Breath Glitter to the die cut flowers and flowers on the design paper. Add Yellow Stickles to all the flower centers and to the beaks of the birds.  Add Toffee Flower Soft to the bird's bellies with Dries Clear Adhesive.  Adhere Sage Green and Cranberry Pearl to upper left corner, as shown.


Pin It!

Wednesday, March 28, 2018

Peony Treat Tin


Today I am sharing my Peony Treat Tin featuring Heartfelt Creations Sweet Peony Collection.  This 2 1/2" round tin would be perfect to fill with Easter candy for a special treat.


I decorated this the tin and design paper with bling from Want2Scrap!
 

For more ideas and inspiration, please visit the Heartfelt Creations Blog.  Have a great day!
post signature
PEONY TREAT TIN

Heartfelt Creations Products and Products Carried by HC:

Other Products:  White Cardstock; 2 1/2" round tin; Glue Gun; ; VersaColor Pigment Ink - Burgundy and Opera Pink; Memento Ink - Pink Angel; Art Glitter Ultrafine Transparent - Lettuce and Pink Azalea; Want2Scrap Nestabling Heart Circles - Hot Pink Rhinestones

Instructions:    Die cut dark pink Sweet Peony design paper using the eyelet circle die from the Eyelet Circle and Basics Small Die Set.  Die cut green Sweet Peony design paper using the Circles Basics Large Die, sponge edge with New Sprout Memento Ink.  Matte green die cut circle onto dark pink eyelet circle and then adhere round tin to center of circle. On White Cardstock with Burgundy VersaMark Ink stamp the largest and medium petals from the Small Sweet Peony Cling Stamp Set and stamp the smallest peony blossom from the Peony Bud and Blossom Cling Stamp Set, and stamp three of the small peony blossoms from the Peony Bud and Blossom Cling Stamp Set.  On White Cardstock with Leaf Green Ranger Archival Ink stamp the leaves from the Large Sweet Peony Cling Stamp Set. Cut all with coordinating dies. Cut additional slits in between the petals of the small peony blossoms to create more depth on the bottom layer of petals.  Using the Stack and Store Daubers color the leaves using New Sprout and add Bamboo Leaves Memento Ink to the edges of the leaves; color the peonies with Cantaloupe Memento Ink in the center of each petal, then add Angel Pink to the outer edges of each petal, and finish by adding Pink Opera VersaColor Ink to the tips of each petal. Lay the peony petals stamped side up in the Floral Basics Shaping Floral Mold. Mist lightly with water and run through the die cutting machine to shape petals quickly. Use the Deluxe Flower Shaping Kit to further shape the peony petals.  Assemble peony using hot glue gun and adhere peony and leaves to top of tin as shown. With Dries Clear Adhesive add Go Man Go Prills to the center of the peony; add  Pink Azalea Glitter to the peony petals; and add Lettuce Glitter to the leaves. Finally adhere a Hot Pink Rhinestones to die cut circle and tin as shown.
Pin It!

Wednesday, March 14, 2018

Praying for You Peony Card

Heartfelt Creations is pleased to announce its newest release, the Sweet Peony Collection.  Today I am sharing my Praying for You Peony Card.


For more inspiration and ideas, please visit the Heartfelt Creations Blog.  Have a great day!

post signature


Heartfelt Creations Products and Products Carried by HC:

Other Products:  Glue Gun; Green Cardstock; VersaColor Pigment Ink - Burgundy; ColorBox Chalk Ink - Dahlia; Art Glitter Ultrafine Transparent - Lettuce and Baby's Breath; Want2Scrap 72 Count Pink Pearls

Instructions:  Create a 6" x 6" card base out of white card stock. Cut a 6" x 6" card front from the Sweet Peony Paper Collection and sponge edge of card front with Toffee Crunch Memento Ink.  Die cut center using coordinating Die from the Circle Basics Large Die Set. Adhere 6” x 6” card front directly to card base with Dries Clear Adhesive. Die cut green cardstock using the eyelet circle die from the Eyelet Circle and Basics Small Die Set.  Matte die cut circle onto eyelet circle and adhere to card front with pop dots. On White Cardstock with Tuxedo Black Ink stamp the Praying for You image Banners of Love Cling Stamp Set.  On White Cardstock with Burgundy VersaMark Ink stamp the petals from the Small Sweet Peony Cling Stamp Set and stamp the small peony blossom from the Peony Bud and Blossom Cling Stamp Set.  On White Cardstock with Leaf Green Ranger Archival Ink and Olive Green StazOn Ink stamp the leaves in various sizes from the Small Sweet Peony Cling Stamp Set and Large Sweet Peony Cling Stamp Set. Cut all with coordinating dies. Using the Stack and Store Daubers color all the leaves using New Sprout and on the leaves that have been stamped with Olive Green Ink add a touch of Fern Green Ranger Archival Ink; color the peonies with a light touch of Dahlia Chalk Ink and add the Dahlia Ink to the tips of the petals also. Color the praying for you sentiment with Toffee Crunch Memento Ink. Lay the peony petals stamped side up in the Floral Basics Shaping Floral Mold. Mist lightly with water and run through the die cutting machine to shape petals quickly. Use the Deluxe Flower Shaping Kit to further shape the peony petals, also lightly shape the peony blossom, leaves and sentiment. Adhere the sentiment as shown with pop dots. Assemble peony as shown using hot glue gun and adhere to peony and leaves to card as shown. With Dries Clear Adhesive add Baby's Breath Glitter to all the peonies, Lettuce Glitter to all the leaves and Crystal Glitter to the sentiment. Finally adhere a Pink Pearl to upper right hand corner as shown.
Pin It!

Monday, March 12, 2018

Cooking Chipboard Embellishments

Hi everyone!  Today I am highlighting Want2Scrap's Cooking Chipboard Embellishments.  It is amazing how with embossing powder it is possible to really change the look of chipboard embellishments.


The Cooking Set of chipboard embellishments arrives like this.  I first carefully punched out each embellishment and with a file smoothed each embellishment, as needed, at the points where each embellishment was attached to the sheet.


I inked the rolling pin from the Cooking Chipboard Embellishment Set with Tree Branch Wendy Vecchi Archival Ink, added the coordinating Tree Branch Embossing Powder, tapped off the excess and heat set it.  I then sponged the handled of the rolling pin with a little ink to create the slightly darker color. For the measuring cup set I inked the cups with Tea Rose Wendy Vecchi Archival Ink, added the coordinating Tea Rose Embossing Powder, tapped off the excess and heat set.  I added Polar White Flower Soft to the top of each measuring cup.


I pinned the Silverware Charm in Antique Silver onto the Rectangle Burlap Mini Shape and then adhered the 7gypsies Vintage Recipe Cards to the burlap.  I then added the Brown Rhinestones Swirls Finesse and a couple Light Green Rhinestones onto the recipe card.  For the measuring spoons from the Cooking Chipboard Embellishment Set, I added Inkssentials Emboss It in Clear, then sprinkled on Silver Ranger Embossing Powder, tapped off the excess and heat set it.  I added some White Pearls Swirls Finesse, cutting to fit as needed.


Finally for the whisk and rubber spatula handles I inked them with Sky Blue Wendy Vecchi Archival Ink, added the coordinating embossing powder in Sky Blue, tapped off the excess and heat set it.  For the rubber spatula head I inked it Clear Inkssentials Emboss It, sprinkled on Wow Embossing Powder Opaque Bright White Regular, tapped off the excess and heat set.  For the whisk I added Inkssentials Emboss It in Clear, then sprinkled on Silver Ranger Embossing Powder, tapped off the excess and heat set it. 


Heat embossing the chipboard embellishments can really add some nice color to the chipboard and these cooking utensils would work wonderful on cooking themed layouts.  Have a great day!


Want2Scrap Products:
Other Products:  Jillibean Soup Paper; Spellbinders Grand Circles and Spellbinders Grand Decorative Circles; 7gypsies Recipe Cards Vintage; Canvas Corp Brand Burlap Mini Shapes - Rectangle; 7gypsies Vintage Pin - Antique Silver; Inkssentials Emboss It - Clear; Wow Embossing Powder Opaque Bright White Regular; Ranger Embossing Powder - Silver; Wendy Vecchi Embossing Powder - Tea Rose, Sky Blue and Tree Brand; Wendy Vecchi Archival Ink - Tree Branch, Tea Rose and Sky Blue ; Flower Soft - Polar White

Pin It!

Friday, March 2, 2018

Graphic 45 Easter Tag

Today I am sharing with you an Easter Tag I created using beautiful design paper from Graphic 45 and Want2Scrap Wild Plum Pearls Swirls Finesse. I covered the Manila Tag using Graphic 45 Sweet Sentiments - Heart Song Paper and added the vintage image and sentiment from Graphic 45 Sweet Sentiments - Heart Song Paper.  I added Art Glitter Ensalada Glitter with Art Glitter Dries Clear Adhesive to the image. 


Then I adhered a LeCreme Pearl and added the Wild Plum Pearls Swirls Finesse, cutting to fit as needed.


At the top of the tag I used LeCreme Pearls and Sage Green Pearls and added seam binding to the hole.

Very quickly you have a beautiful vintage tag to add to your Easter basket.  Have a great day!


Want2Scrap Products:

72 Count - LeCreme Pearls - Self Adhesive
72 Count - Sage Green Pearls - Self Adhesive
Swirls Finesse - Wild Plum Pearls - Self Adhesive

Other Products:  Manila Tag; Seam Binding; Graphic 45 Sweet Sentiments - Easter Greetings Paper and Heart Song Paper; Art Glitter Ultrafine Transprent Glitter - Ensalada
Pin It!

Wednesday, February 28, 2018

Everything Lilacs Card

Today I am sharing my Everything Lilacs card featuring Heartfelt Creations Lush Lilac Collection.


For more inspiration, please visit the Heartfelt Creations Blog.  Have a great day!


post signature


Heartfelt Creations Products and Products Carried by HC:
Other Products:  ColorBox Chalk Ink - Warm Violet; Memento Dye Ink Pad - Grape Jelly; Want2Scrap Baby Bling - Silver Rhinestones

Instructions:  Create a A2 card base out of white card stock. Cut a A2 card front from the Lush Lilac Paper Collection and sponge edge of card front with Warm Violet Chalk Ink.  Die cut center using coordinating Die from the Eyelet Oval and Basics Small Die Set. Adhere A2 card front to card base with pop dots. Sponge die cut oval with Warm Violet Chalk Ink and adhere directly to card base with Dries Clear Adhesive. Cut sentiment from design paper and die cut with die from Simply Classic Die Set. Sponge edges with Warm Violet Chalk Ink and adhere to card as shown. On White Cardstock with Tuxedo Black Ink stamp the lilac petals and two small lilac swirl images with the Lush Lilac Cling Stamp Set.  Cut all with coordinating dies. Using the Stack and Store Daubers and Fantastix as needed, color all the leaves using New Sprout and Bamboo Memento Inks; color lilacs on the swirl images with Lulu Lavender and Sweet Plum Memento Inks. Color half of the lilac petals with Lulu Lavender and Grape Jelly Memento Inks and color the other half of the lilac petals with Lulu Lavender Ink and Sweet Plum Memento Ink. Lay the lilac petals colored side down in the Lush Lilac Shaping Mold. Mist lightly with water and run through the die cutting machine to shape petals quickly. Cut one of the stamped die cut lilac swirl images, as needed to fit on the card as shown around the sentiment.  Use the Deluxe Flower Shaping Kit to shape the lilac die cuts and adhere petals as shown.  With Dries Clear Adhesive add Blue Rain Glitter to all the lilacs and butterfly on the design paper and add Lichen Glitter to all the greenery and leaves. Finish by adding a Apple Green Crystal Drop to the center of each lilac petal. Finally adhere a Silver Rhinestones to upper right corner as shown.
Pin It!

Wednesday, February 21, 2018

Praying for You Lilac Card

Today is Heartfelt Creations Wednesday and this is my Praying for You Lilac Card that I created with the Lush Lilac Collection.


This collection also pairs nicely with the carnations created with the Small Camelia Carnation Cling Stamp Set and coordinating Small Camelia Carnation Die.


For more inspiration from the Heartfelt Creations Design Team, please visit the Heartfelt Creations Blog.  Have a great day!

post signature
Heartfelt Creations Products and Products Carried by HC:
Other Products:  Memento Dye Ink Pad - Grape Jelly; Want2Scrap 72 Count – LeCreme Pearls; Want2Scrap 72 Count - Lavender Pearls

Instructions:  Create a 6" x 6" card base out of white card stock. Cut a 6" x 6" card front from the Lush Lilac Paper Collection and sponge edge of card front with New Sprout Memento Ink.  Die cut center using coordinating Die from the Circle Basics Large Die Set. Adhere 6” x 6” card front directly to card base with Dries Clear Adhesive. Die cut green design paper using the eyelet circle die from the Eyelet Circle and Basics Small Die Set.  On die cut circle image with Memento Grape Jelly Ink stamp the Praying for You sentiment from the Sweet Lilac Stamps and Scrolls Stamp Set onto the scroll image on the design paper.  Matte die cut circle onto the die cut green eyelet circle and adhere to card front with pop dots. On White Cardstock with Tuxedo Black Ink stamp the lilac petals with the Lush Lilac Cling Stamp Set; stamp the floral swirl image from the Lush Lilac and Umbrella Spray Stamp Set; and stamp several different sizes of the carnation petals using the Small Camelia Carnation Stamp Set.  Cut all with coordinating dies. Using the Stack and Store Daubers and Fantastix as needed, color all the leaves using New Sprout and Bamboo Memento Inks; color lilac images and carnation image with Lulu Lavender and Grape Jelly Memento Inks. Color half of the lilac petals with Lulu Lavender and Grape Jelly Memento Inks and color the other half of the lilac petals with Lulu Lavender Ink and Lilac Posies Memento Ink. Lay the lilac petals colored side down in the Lush Lilac Shaping Mold and the carnation petals colored side down in the Floral Basics Shaping Floral Mold. Mist lightly with water and run through the die cutting machine to shape petals quickly. Cut the stamped die cut lilac swirl images, as needed to fit on the card as shown.  Use the Deluxe Flower Shaping Kit to shape the lilac die cuts and adhere petals as desired to design paper. Assemble Carnation as shown and adhere to carnation image on swirl image and adhere to card as shown. With Dries Clear Adhesive add Blue Rain Glitter to all the lilacs, carnations and butterfly and add Lichen Glitter to all the greenery and leaves. Finish by adding Lemon Chiffon Prills to the center of each lilac petal. Finally adhere a Lavender Pearls and a LeCreme Pearl around the circle die cut, as shown.

Pin It!

Saturday, February 17, 2018

Tutorial and Heartfelt Creations Give Away!

Today is Random Acts of Kindness Day and to celebrate Heartfelt Creations is having a wonderful give away.  Also today on the Heartfelt Creations Blog I have a tutorial for my Shadow Box Trinket Holder.


It could also be used to hold Post-It notes.


Heartfelt Creations is having a huge giveaway today. For a chance to add to your crafty stash 15 of the main items from the tutorial of my Shadow Box Trinket Holder, make sure you enter the giveaway before 11:59pm EST 17th February 2018. For a chance to win enter here http://hcgo.co/raok-giveaway-2018  The winner will be announced on our Facebook Page on February 19th 2018. This generous prize package from Heartfelt Creations is valued at $322!


The winner will receive one each of the following!
HCFP1-434-2 Pocket and Flipfold Inserts B - White
HCLC1-454-2 6" x 6" Layered Circles Card-White
HCBC1-456-2 Card Shadow Box Set-White
HCDP1-287 Lush Lilac Paper Collection
HCD1-7161 Sweetheart Borders Die
HCPC-3810 Songs of Spring Cling Stamp Set
HCD1-7168 Songs of Spring Die
HCPC-3811 Rain Boots & Blossoms Stamp Set
HCD1-7169 Rain Boots and Blossoms Die
HCPC-3816 Lush Lilac Cling Stamp Set
HCD1-7170 Lush Lilac Die
HCPC-3817 Lush Lilac & Umbrella Spray Cling Stamp Set
HCD1-7171 Lush Lilac & Umbrella Spray Die
HCPC-3818 Sweet Lilac Scroll & Notes Cling Stamp Set
HCD1-7172 Sweet Lilac Scroll & Cage Die


So go on over to the Heartfelt Creations Blog for a complete list of  supplies and detailed instructions on how to create my Shadow Box Trinket Holder.  And as an added bonus for today only  Heartfelt Creations is giving away a FREE Frosting Powder ($12.99 value) with every purchase today only! All you need to do is add it to your cart before you checkout your cart here http://hcgo.co/RAKGiveaway2018. This offer is only available today February 17th 2018 so make sure you get your freebie now.

post signature

Pin It!
Related Posts Plugin for WordPress, Blogger...