Showing posts with label Karen Foster. Show all posts

Monday, October 19, 2015

You Inspire Me with Want2Scrap

Today I am sharing a card with you that features the beautiful Want2Scrap Rhinestones and paper, stamps and dies are from Heartfelt Creations All Geared Up Collection.  This collection is on Heartfelt Creations discontinued list, so it is only available until December 12, 2015, or while supplies last.


To accent each gear I added Brown Rhinestones, Orange Rhinestones and Amber Rhinestones.


For complete detailed instructions to create this card, check at the end of this blog post.  Have a great day!


Want2Scrap Products:
Want2Scrap 72 Count - Brown Rhinestones - Self Adhesive
Want2Scrap 72 Count - Orange Rhinestones - Self Adhesive
Want2Scrap 72 Count - Amber Rhinestones - Self Adhesive

Preferred Partner Products
  • Spellbinders 5 x 7 Matting Basics A Dies
  • Spellbinders 5 x 7 Detailed Scallops Dies
Cross Promotional Partner Products:

Heartfelt Creations Products & Products Carried by HC:
Art Institute Glue - Dries Clear
Metal Glue Tip - Art Institute
Art Glitter Ultrafine Transparent - Crystal

Other Supplies:
  • Other Paper:  Curious Iridescent - Cryogen White; Bazzill
  • Ink/Paint:  Memento - Tuxedo Black; ColorBox Chalk Ink - Chestnut; VersaMark - Watermark; Viva Decor Inka-Gold Silver
  • Copics:  C00, C01, C3, C5, C7, BG93, E11, E13, E35, E37, E39, E43, E44, E81, E84
  • Embellishments:  Crafters Companion Spray & Sparkle - Gold Glitter; Wow Embossing Powder - Blue Lagoon; Tim Holtz Memo Pin; Karen Foster Big Time Brads
Instructions:  Begin with a 12" x 6" piece of Bazzill cardstock and score on the 6" mark to create a 6" square card base.  Next with VersaMark Watermark Ink using HCPC 3636 - Cogs and Gears Set stamp the image on a 6" x 6" piece of All Geared Up Paper and add Blue Lagoon Wow Embossing Powder, removing excess and then heat setting.  Adhere paper to the card front.l  Next adhere a green piece of the All Geared Up Paper to the card front leaving the left upper corner free so that it may be folded over to reveal the embossed image.  Then adhere a 1 1/4" x 6" piece of peach colored All Geared Up Paper to the card front.  Next add Chestnut Chalk Ink to all edges of card front.  Then using the All Geared Up Paper, die cut the gears/cogs as shown using the All Geared Up Die and color with Copper and Walnut Brown 3D Stamp Paint and Inka Gold Silver.  Cut the center of the copper and brown cog out and swap with the other center.  Adhere all to the card front as shown with Dries Clear Adhesive and Metal Glue Tip.  Add Brown, Orange and Amber Rhinestones to the centers of the gears and cogs. Next on Cryogen White paper that has been die cut with Spellbinders 5 x 7 Matting Basics A with Memento Ink stamp floral image from HCPC 3632 - Plates and Gears Set and color with Copics.   With Memento Ink stamp "You Inspire Me" image from Plates and Gears Set on All Geared Up Paper and then die cut with coordinating die from the All Geared Up Die Set. Spray image with Gold Glitter Spray & Sparkle Spray.  Then attach with Memo Pin and insert into floral image before matting image on brown All Geared Up Paper that has been die cut with 5 x 7 Detailed Scallops Die.  adhere to card front.  Next  add Crystal Ultrafine Transparent Glitter with Dries Clear Adhesive to the peach colored leaves in the image and a brown Rhinestones to the center of the cog.  Next using the All Geared Up Paper die cut two leaves and two small gears.  Using the Deluxe Flower Shaping Kit shape the two small gears to create a flower.  Add Crystal Ultrafine Transparent Glitter with Dries Clear Adhesive to the petals and Prills to the center of the flower before adhering to the cog in the colored image. Cut bottoms off of both leaves and adhere to leaves on colored image.  Finish by adding the Big Time Brad to the folded corner.


Pin It!

Wednesday, November 5, 2014

HEARTFELT CREATIONS WEDNESDAY

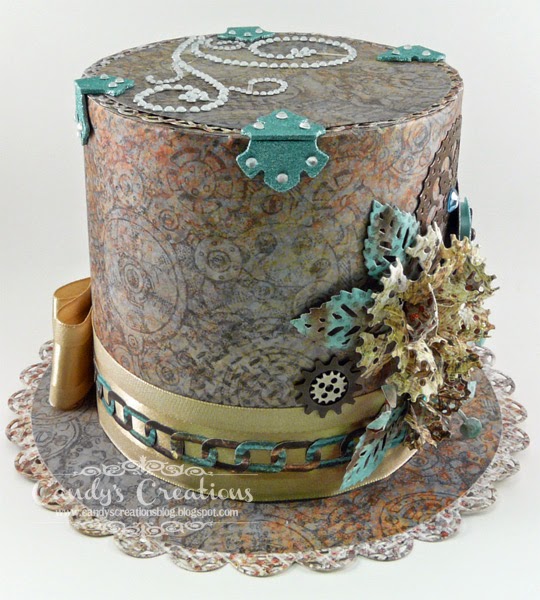
Hello everyone!  Today  Heartfelt Creations is sharing on their Blog several of the Semi-Finalist projects, including my Steampunk Top Hat project.

My Top Hat features the All Geared Up Die and Paper Collection. To add to the Steampunk feel I also made a pocket watch using Heartfelt Creations Once Upon a Die and Numeral Clocks Set and added it to my top hat.


I used Spellbinders Grand Circles, Grand Decorative Circles One and Grand Stately Circles dies to create the actual Top Hat (complete step-by-step instructions are at the bottom of this post).  I used the All Geared Up Die to create the flowers and leaves.  I also used the leaves die from the Sweet Juliet Die.  I added some bling and chipboard hinges from Want2Scrap.  I created the chain links from the All Geared Up Die and used Art Glitter Dries Clear Adhesive to adhere it to the May Arts Ribbon.


Again, I want to thank all of you who voted for me.  I am so excited to be back on the Heartfelt Creations Design Team and I look forward to sharing my creations with you on Wednesdays on the Heartfelt Creations Blog and here on my blog.  

Make sure you stop by the Heartfelt Creations Blog to see all the wonderful new inspiration from the other Designers.  Have a great day!

post signature

STEAMPUNK TOP HAT

Heartfelt Creations Products & Products Carried by HC:
HCD 754 - All Geared Up Die
HCDP1 248 - All Geared Up Paper Collection
HCPC 3593 - Numeral Clocks PreCut Set
HCD 744 - Once Upon a Time Die
HCD 740 - Sweet Juliet Die
Grand Calibur
Scor-Pal Measuring & Scoring Board
Paper Blossoms Tool Kit
Paper Blossoms Molding Mat
Art Institute Glue - Dries Clear
Metal Glue Tip - Art Institute
Lime Green Metallic 3D Stamp Paint
Walnut Brown Metallic 3D Stamp Paint
Double Dots

Other Products:
Other Spellbinder Dies:  Grand Circles; Grand Decorative Circles One; Grand Stately Circles
Copics:  C00, C1, C3, C5, BG53
Other Adhesives:  Scor-Tape; Helmar 450 Quick Dry Adhesive;
Embellishments: Want2Scrap - 72 Count - Red Rhinestones, Silver Rhinestones, Turquoise Rhinestones, Iridescent Rhinestones & Baby Blue Rhinestones; Want2Scrap - Chipboard Small Hinges; Want2Scrap Swirl Rhinestones - Silver; May Arts Ribbon; Karen Foster Big Time Brads; Crafters Companion Spray & Sparkle - Silver Glitter; Art Glitter Ultrafine Transparent - Flax; Art Glitter Ultrafine Transparent - Crystal; Ranger Glossy Accents; Tim Holtz Game Spinners; Tim Holtz Sprockets & Gears; Karen Foster Charm Pin Up Brads

Instructions:
5 1/4" Tall x 8" Wide at Brim


Begin by adhering two pieces of the same All Geared Up Paper together at one end with Scor-Tape to create a piece 6" wide x 17 1/4" long.  Next on each 17 1/4" long side score 1/2" from the edge and then make slits approximately every 1/4" - 1/2"  along each side up to the scored mark. For the top of the hat fold the scored and slit edges in towards the center on one side and then for the bottom of the hat fold the scored and slit edges out.  To create the brim of the hat using the same paper die cut the largest circle from Spellbinders Grand Circles.  Next with contrasting paper die cut the largest circle from the Grand Decorative Circles One.  Lay the two circles together securing the edges with a little bit of washi tape and then take a smaller size circle from the Grand Circle and die cut out the center to make a hole (save this smaller circles for the top of the hat).   Form the paper that has been slit and scored into a tube and insert into the hole of the brim and sandwich the slit edges between the Grand Decorative Circles One and the Grand Circles adhering as you go around the circle and adjust the slits as needed.  Secure side seam of hat with score tape adjusting as necessary.  Next with contrasting paper cut a Grand Stately Circle to fit the top of the hat.  Again sandwich the slit edges of the paper of the top of the hat between the leftover circle from the Grand Circles Die and the Grand Stately Circle adhering and adjusting the slits as necessary to make a nice circle.  Then adhere the circle that was cut out from the center of the brim of the hat to the top of the hat.  Paint Chipboard Hinges with Lime 3D Stamp Paint and then adhere to top of hat with Dries Clear Adhesive.  Add Iridescent Rhinestones to holes on Chipboard Hinges.  Add Silver Swirls Rhinestones to top of hat. Next using All Geared Up Paper die cut chain links from All Geared Up Die.  Slit each link to be able to connect them and then using Dries Clear Adhesive glue them onto the 1 1/2" ribbon.  Adhere ribbon around top hat using Helmar 450 Quick Dry Adhesive.  Make a bow and add a Big Time Brad to the center of the bow and then adhere to back of top hat using Helmar 450 Quick Dry Adhesive.  Next to decorate the front of the top hat using All Geared Up Paper die cut leaves and gears using the All Geared Up Dies.  Using the Paper Blossoms Tool Kit and Molding Mat shape gears to create flowers.  Add Art Glitter with Dries Clear Adhesive to the flowers and  Rhinestones to the center of each flower.  In addition die cut a few more leaves using the leaf die from the Sweet Juliet Die.  Die cut a cog using the All Geared Up Die with the All Geared Up Paper and then paint it with Walnut Brown 3D Stamp Paint.  Also stamp the pocket watch and face with Memento Ink on Cryogen White Paper using the Numerical Clocks Set and color it with Copics.  Die cut the pocket watch and face image with the Once Upon a Time Die.  Spray the pocket watch with Crafters Companion Silver Glitter Spray & Sparkle.   Apply Glossy Accents to the watch face.  Once dry add a Tim Holtz Game Spinner to the center with a brad and adhere to pocket watch with a pop dot.  Add some of the die cut chain links to the pocket watch and finish by adding a Charm Pin Up Brad to the end of the chain.  Add all flowers, leaves, cog, pocket watch and chain, and Tim Holtz Gear & Sprocket to the front of the top hat as shown using Dries Clear Adhesive.


Pin It!

Monday, October 20, 2014

STEAMPUNK TOP HAT - HEARTFELT CREATIONS SEMI-FINALTIST PROJECT

Hi everyone!  Today I am excited to share my Steampunk Top Hat that I created as one of my Semi-Finalist projects for the Heartfelt Creations Design Team Call.   I was sent the All Geared Up Die and Paper Collection to create a couple projects with.  After giving it some thought, I knew I wanted to create a top hat with this collection.  To add to the Steampunk feel I also made a pocket watch using Heartfelt Creations Once Upon a Die and Numeral Clocks Set and added it to my top hat.


I used Spellbinders Grand Circles, Grand Decorative Circles One and Grand Stately Circles dies to create the Top Hat (complete step-by-step instructions are at the bottom of this post).  I used the All Geared Up Die to create the flowers and leaves.  I also used the leaves die from the Sweet Juliet Die.  I added some bling and chipboard hinges from Want2Scrap.  I created the chain links from the All Geared Up Die and used Art Glitter Dries Clear Adhesive to adhere it to the May Arts Ribbon.


I had fun creating this project! Heartfelt Creations will make an announcement on their blog on October 29th as to who was chosen to join their Design Team and hopefully you will see my name!


post signature

STEAMPUNK TOP HAT

Heartfelt Creations Products & Products Carried by HC:
HCD 754 - All Geared Up Die
HCDP1 248 - All Geared Up Paper Collection
HCPC 3593 - Numeral Clocks PreCut Set
HCD 744 - Once Upon a Time Die
HCD 740 - Sweet Juliet Die
Grand Calibur
Scor-Pal Measuring & Scoring Board
Paper Blossoms Tool Kit
Paper Blossoms Molding Mat
Art Institute Glue - Dries Clear
Metal Glue Tip - Art Institute
Lime Green Metallic 3D Stamp Paint
Walnut Brown Metallic 3D Stamp Paint
Double Dots

Other Products:
Other Spellbinder Dies:  Grand Circles; Grand Decorative Circles One; Grand Stately Circles
Copics:  C00, C1, C3, C5, BG53
Other Adhesives:  Scor-Tape; Helmar 450 Quick Dry Adhesive;
Embellishments: Want2Scrap - 72 Count - Red Rhinestones, Silver Rhinestones, Turquoise Rhinestones, Iridescent Rhinestones & Baby Blue Rhinestones; Want2Scrap - Chipboard Small Hinges; Want2Scrap Swirl Rhinestones - Silver; May Arts Ribbon; Karen Foster Big Time Brads; Crafters Companion Spray & Sparkle - Silver Glitter; Art Glitter Ultrafine Transparent - Flax; Art Glitter Ultrafine Transparent - Crystal; Ranger Glossy Accents; Tim Holtz Game Spinners; Tim Holtz Sprockets & Gears; Karen Foster Charm Pin Up Brads

Instructions:
5 1/4" Tall x 8" Wide at Brim
Begin by adhering two pieces of the same All Geared Up Paper together at one end with Scor-Tape to create a piece 6" wide x 17 1/4" long.  Next on each 17 1/4" long side score 1/2" from the edge and then make slits approximately every 1/4" - 1/2"  along each side up to the scored mark. For the top of the hat fold the scored and slit edges in towards the center on one side and then for the bottom of the hat fold the scored and slit edges out.  To create the brim of the hat using the same paper die cut the largest circle from Spellbinders Grand Circles.  Next with contrasting paper die cut the largest circle from the Grand Decorative Circles One.  Lay the two circles together securing the edges with a little bit of washi tape and then take a smaller size circle from the Grand Circle and die cut out the center to make a hole (save this smaller circles for the top of the hat).   Form the paper that has been slit and scored into a tube and insert into the hole of the brim and sandwich the slit edges between the Grand Decorative Circles One and the Grand Circles adhering as you go around the circle and adjust the slits as needed.  Secure side seam of hat with score tape adjusting as necessary.  Next with contrasting paper cut a Grand Stately Circle to fit the top of the hat.  Again sandwich the slit edges of the paper of the top of the hat between the leftover circle from the Grand Circles Die and the Grand Stately Circle adhering and adjusting the slits as necessary to make a nice circle.  Then adhere the circle that was cut out from the center of the brim of the hat to the top of the hat.  Paint Chipboard Hinges with Lime 3D Stamp Paint and then adhere to top of hat with Dries Clear Adhesive.  Add Iridescent Rhinestones to holes on Chipboard Hinges.  Add Silver Swirls Rhinestones to top of hat. Next using All Geared Up Paper die cut chain links from All Geared Up Die.  Slit each link to be able to connect them and then using Dries Clear Adhesive glue them onto the 1 1/2" ribbon.  Adhere ribbon around top hat using Helmar 450 Quick Dry Adhesive.  Make a bow and add a Big Time Brad to the center of the bow and then adhere to back of top hat using Helmar 450 Quick Dry Adhesive.  Next to decorate the front of the top hat using All Geared Up Paper die cut leaves and gears using the All Geared Up Dies.  Using the Paper Blossoms Tool Kit and Molding Mat shape gears to create flowers.  Add Art Glitter with Dries Clear Adhesive to the flowers and  Rhinestones to the center of each flower.  In addition die cut a few more leaves using the leaf die from the Sweet Juliet Die.  Die cut a cog using the All Geared Up Die with the All Geared Up Paper and then paint it with Walnut Brown 3D Stamp Paint.  Also stamp the pocket watch and face with Memento Ink on Cryogen White Paper using the Numerical Clocks Set and color it with Copics.  Die cut the pocket watch and face image with the Once Upon a Time Die.  Spray the pocket watch with Crafters Companion Silver Glitter Spray & Sparkle.   Apply Glossy Accents to the watch face.  Once dry add a Tim Holtz Game Spinner to the center with a brad and adhere to pocket watch with a pop dot.  Add some of the die cut chain links to the pocket watch and finish by adding a Charm Pin Up Brad to the end of the chain.  Add all flowers, leaves, cog, pocket watch and chain, and Tim Holtz Gear & Sprocket to the front of the top hat as shown using Dries Clear Adhesive.

Pin It!
Related Posts Plugin for WordPress, Blogger...