Showing posts with label Easter. Show all posts

Friday, March 26, 2021

Heartfelt Creations March Alumni Design Team Blog Hop

Today I am joining the Heartfelt Creations Alumni Design Team Blog Hop.  The hop starts at 8 AM EST on Friday, March 26th, 2021 and closes Monday, March 29th at 11:55 PM EST. The Winner will be announced on the HC Facebook page on Wednesday, March 31st, 2021.


Please comment on my blog post and each of the other participating ladies in the blog hop for a chance to win.  A randomly chosen comment from a mystery blog will receive a $25 gift certificate to shop at Heartfelt Creations. If you are the winner, to claim your prize please email Heartfelt Creations at socialmedia@heartfeltcreations.us with "Winner of the March Hop" in the subject line.  

Today I am sharing my Easter card I created featuring Heartfelt Creations Delightful Daffodil Collection.


I colored the die cut images using Copic markers.


The ladies participating in the hop this month are as follows:
Good Luck!
                                                    post signature


Heartfelt Creations and Products Carried by HC:
Delightful Daffodil & Butterfly Die HCD1-7341

Other Products:
White Cardstock; Yellow Cardstock; Curious Iridescent - Cryogen White Cardstock; Copics V12, V15, V17, Y11, Y13, Y15, RV00, RV21, RV23, YG01, YG03, YG17; Art Glitter Ultrafine Transparent - Crystal and Banana
Pin It!

Wednesday, February 27, 2019

DIVINITY DESIGNS GUEST DESIGNER FEBRUARY RELEASE WEEK 3

Today I have a couple more projects featuring stamps and dies from the February release from Divinity Designs (formerly Our Daily Bread Designs).

My first project is a card featuring the Glorious Easter Stamp Set along with design paper from the new Spring Flowers Collection 2019.


My second project this week is an Easter gift bag featuring the new John 3:16 Stamp Set and the Cross Embossing Folder.


Please visit the Divinity Design Blog to see some other great projects.  Join me again next Wednesday for a couple more projects from Divinity Designs.
post signature

Pin It!

Wednesday, February 20, 2019

Divinity Designs Guest Designer February Release Week 2

Today I have a couple more cards featuring stamps and dies from Divinity Designs (formerly Our Daily Bread Designs).

My first card features the Miracle of Easter stamp set.


STAMP SET:  Miracle of Easter
CUSTOM DIES:  Scalloped Ovals Dies, Ovals Dies
PAPER COLLECTION:  Spring Flowers Collection

My second card features the Glorious Easter stamp set colored with Copics.

STAMP SET:  Glorious Easter
CUSTOM DIES:  Scalloped Ovals Dies, Ovals Dies, Pierced Circles Dies
PAPER COLLECTION:  Spring Flowers Collection

Please visit the Divinity Design Blog to see some other great projects.  Join me again next Wednesday for a couple more projects from Divinity Designs.

post signature


Pin It!

Thursday, February 14, 2019

Divinity Designs Guest Designer February Release Week 1

Today I am back with a couple more projects using Divinity Designs (formerly, Our Daily Bread Designs).  

My Cross Easter Card features the new CROSS (EMBOSSING FOLDER/DIE DUO) and the sentiment from the Glorious Easter Stamp Set.


STAMP SET:  Glorious Easter
CUSTOM DIES:  Scalloped Ovals Dies, Layered Lacy Ovals Dies, Pierced Circle Dies, CROSS (EMBOSSING FOLDER/DIE DUO)
PAPER COLLECTION:  Spring Flowers Collection

My Alleluia Easter Card features the Miracle of Easter stamp set.


STAMP SET:  Miracle of Easter
CUSTOM DIES:  Scalloped Rectangles Dies, Rectangles Dies

Please visit the Divinity Design Blog to see some other great projects.  Join me again next Wednesday for a couple more projects from Divinity Designs.


Pin It!

Wednesday, March 28, 2018

Peony Treat Tin


Today I am sharing my Peony Treat Tin featuring Heartfelt Creations Sweet Peony Collection.  This 2 1/2" round tin would be perfect to fill with Easter candy for a special treat.


I decorated this the tin and design paper with bling from Want2Scrap!
 

For more ideas and inspiration, please visit the Heartfelt Creations Blog.  Have a great day!
post signature
PEONY TREAT TIN

Heartfelt Creations Products and Products Carried by HC:

Other Products:  White Cardstock; 2 1/2" round tin; Glue Gun; ; VersaColor Pigment Ink - Burgundy and Opera Pink; Memento Ink - Pink Angel; Art Glitter Ultrafine Transparent - Lettuce and Pink Azalea; Want2Scrap Nestabling Heart Circles - Hot Pink Rhinestones

Instructions:    Die cut dark pink Sweet Peony design paper using the eyelet circle die from the Eyelet Circle and Basics Small Die Set.  Die cut green Sweet Peony design paper using the Circles Basics Large Die, sponge edge with New Sprout Memento Ink.  Matte green die cut circle onto dark pink eyelet circle and then adhere round tin to center of circle. On White Cardstock with Burgundy VersaMark Ink stamp the largest and medium petals from the Small Sweet Peony Cling Stamp Set and stamp the smallest peony blossom from the Peony Bud and Blossom Cling Stamp Set, and stamp three of the small peony blossoms from the Peony Bud and Blossom Cling Stamp Set.  On White Cardstock with Leaf Green Ranger Archival Ink stamp the leaves from the Large Sweet Peony Cling Stamp Set. Cut all with coordinating dies. Cut additional slits in between the petals of the small peony blossoms to create more depth on the bottom layer of petals.  Using the Stack and Store Daubers color the leaves using New Sprout and add Bamboo Leaves Memento Ink to the edges of the leaves; color the peonies with Cantaloupe Memento Ink in the center of each petal, then add Angel Pink to the outer edges of each petal, and finish by adding Pink Opera VersaColor Ink to the tips of each petal. Lay the peony petals stamped side up in the Floral Basics Shaping Floral Mold. Mist lightly with water and run through the die cutting machine to shape petals quickly. Use the Deluxe Flower Shaping Kit to further shape the peony petals.  Assemble peony using hot glue gun and adhere peony and leaves to top of tin as shown. With Dries Clear Adhesive add Go Man Go Prills to the center of the peony; add  Pink Azalea Glitter to the peony petals; and add Lettuce Glitter to the leaves. Finally adhere a Hot Pink Rhinestones to die cut circle and tin as shown.
Pin It!

Friday, March 2, 2018

Graphic 45 Easter Tag

Today I am sharing with you an Easter Tag I created using beautiful design paper from Graphic 45 and Want2Scrap Wild Plum Pearls Swirls Finesse. I covered the Manila Tag using Graphic 45 Sweet Sentiments - Heart Song Paper and added the vintage image and sentiment from Graphic 45 Sweet Sentiments - Heart Song Paper.  I added Art Glitter Ensalada Glitter with Art Glitter Dries Clear Adhesive to the image. 


Then I adhered a LeCreme Pearl and added the Wild Plum Pearls Swirls Finesse, cutting to fit as needed.


At the top of the tag I used LeCreme Pearls and Sage Green Pearls and added seam binding to the hole.

Very quickly you have a beautiful vintage tag to add to your Easter basket.  Have a great day!


Want2Scrap Products:

72 Count - LeCreme Pearls - Self Adhesive
72 Count - Sage Green Pearls - Self Adhesive
Swirls Finesse - Wild Plum Pearls - Self Adhesive

Other Products:  Manila Tag; Seam Binding; Graphic 45 Sweet Sentiments - Easter Greetings Paper and Heart Song Paper; Art Glitter Ultrafine Transprent Glitter - Ensalada
Pin It!

Saturday, March 4, 2017

Spring is in the Air Card

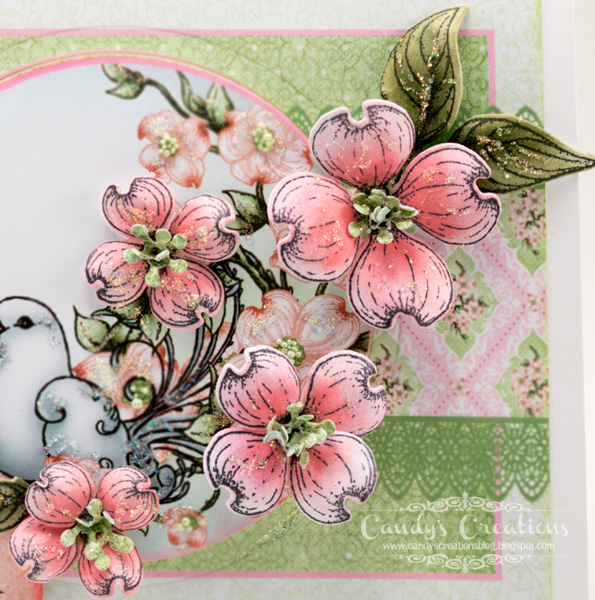
Spring is right around the corner so today I am sharing my Spring is in the Air Card featuring Heartfelt Creations Flowering Dogwood Collection.


Heartfelt Creations Flowering Dogwood Die includes this great stamen die cut in two sizes.


Have a great day!
post signature

SPRING IS IN THE AIR CARD

Heartfelt Creations Products & Products Carried by HC:
HCPC-3773  Flowering Dogwood Cling Stamp Set
TSMP704 Memento Dye Ink Pad - New Sprout
71006 ColorBox Fluid Chalk Ink Pad - Rose Coral
ANC814 Lettuce Entertain You Prills
HCST401 Deluxe Flower Shaping Kit
247027 Fantastix Blending Tools

DDOTS Double Dots 100 pcs - 3D Foam Squares

Other Products:  Spellbinders Circles Die; White Cardstock; Memento Dye Ink Pad - Angel Pink; Art Glitter Ultrafine Transparent - Water Lily and Misty; Want2Scrap 72 Count - White Pearls 

Instructions:  Create an A2 cardbase out of white cardstock.  Cut an A2 card front from the Flowering Dogwood Paper and die cut the center using the Spellbinders Circle Die.  Sponge outer edge of card front with New Sprout Ink and adhere directly to card base.  Sponge center die cut circle with Angel Pink Ink and adhere to card with pop dots.  On White Cardstock with Tuxedo Black Ink stamp the  and stamp several flowers and leaves from the Flowering Dogwood Stamp Set.  Die cut with coordinating dies.  Using sponge daubers and Fantastix to color flower petals with Angel Pink and Rose Coral Inks, color center of flowers with New Sprout Ink, and color leaves with New Sprout and Bamboo Inks.  Die cut stamens using green design paper.  Shape flowers, stamens and leaves with Deluxe Flower Shaping Kit. Adhere flowers and leaves as shown.  Using Dries Clear Adhesive add stamens to die cut flowers and add Lettuce Prills to centers of flowers on the design paper.  Add Misty Glitter to the dove and Water Lily Glitter to the dogwood flowers and leaves.  Use a corner rounder on the sentiment and then sponge edges with Rose Coral Chalk Ink before adhering it to the card with pop dots.  Adhere White Pearl to corner as shown.
Pin It!

Wednesday, February 22, 2017

Green Easter Wishes Card

Today I am sharing with you my Easter Wishes Card featuring Heartfelt Creations Flowering Dogwood Collection.


I colored this beautiful dove with Pearlescent Orchid Brilliance Ink, Pearlescent Purple Brilliance Ink and Platinum Planet Brilliance Ink.


Just a reminder today is the last day to place your vote for Current Design Team Members.  So if you would like to see me continue on the Heartfelt Creations Design Team for another year, please follow this link to place your vote:  http://hcgo.co/DesignTeamVote2017. 

Have a great day!
post signature


GREEN EASTER WISHES CARD

Heartfelt Creations Products & Products Carried by HC:


Other Products:  Spellbinders Circles Die; White Cardstock; Memento Dye Ink Pad - Dandelion; Brilliance Ink - Platinum Planet; Art Glitter Ultrafine Transparent - Water Lily and Misty; Want2Scrap 72 Count - Lavender Pearls

Instructions:  Create a 6" x 6" card base out of white cardstock.  Cut a 6" x 6" card front from the Flowering Dogwood Paper Collection and die cut the center image using the coordinating Spellbinders Circles Die.  Sponge edge of card front with Olive Grove Ink and adhere to card base with pop dots. Adhere circle die cut directly to card base with Dries Clear Adhesive.   On White Cardstock with Tuxedo Black Ink stamp the Flowering Dogwood Branch from the Flowering Dogwood Branches Stamp Set and stamp a couple flowers and leaves from the Flowering Dogwood Stamp Set.  Die cut with coordinating dies.  Using sponge daubers and Fantastix color center of flowers with New Sprout Ink, color branches with Toffee Crunch Ink and color leaves with Bamboo and Olive Grove Inks.  Shape flowers and branch with Deluxe Flower Shaping Kit.  Cut branch as needed and adhere to card front as shown.  Using Dries Clear Adhesive add Lettuce Prills to centers of all flowers.  On White Cardstock with Tuxedo Black Ink stamp dove from the Flowering Dogwood and Doves Stamp Set and die cut with coordinating die.  Color dove with Fantastix and sponge daubers using Dandelion Ink on the beak and feet, Platinum Planet Brilliance Ink on the entire dove, Pearlescent Orchid Ink on the dove's belly and Pearlescent Orchid and Pearlescent Purple on the dove's tail.  Shape dove and adhere to card as shown with pop dots.  Add Misty Glitter to the dove and Water Lily Glitter to the dogwood flowers and leaves.  Cut sentiment from the design paper and sponge edges with Olive Grove Ink and adhere to card, tucking dove's feet under sentiment as shown.  Adhere Lavender Pearl to corner as shown.
Pin It!

Wednesday, February 8, 2017

Celebrate Spring Card and Design Team Vote

Heartfelt Creations is pleased to release its Flowering Dogwood Collection.  This is Heartfelt Creations has to say about its newest release:

"Heartfelt Creations invites you to usher in the spring season with the new Flowering Dogwood Collection! Immerse yourself in this newest springtime assembling of designer papers, divinely detailed cling stamps and coordinating dies steeped with beautiful meanings and symbolism perfect for the Easter Season! The dogwood tree is surrounded by a mesmerizing legend within the Christian faith…once the size of a mighty oak tree it was chosen to be used to construct the cross on which Jesus was to be crucified. The tree became unhappy with its purpose and would never again grow large enough to ever build another cross. Its branches would become narrow and crooked and no longer suitable for construction. The delicate dogwood flower itself is a wonderful symbol of the Easter season…four petals that resemble the shape of a cross, the center laid as a crown of thorns, at the tip of each petal an indent resembling nail punctures, and a reddish hue around those indents resembling the blood of Jesus. Soft and pastel in coloring, this newest paper collection reveals beautiful springtime shades of pinks, peaches, and greens which set stunning backdrops for scripted lettering and graceful swirls, while darker hints of blues and blacks bring out the gorgeous detail and coloring of the showy dogwood florals. Bountiful blossom filled branches, peaceful white doves and hillside chapels are just a few of the beautiful illustrations found within the cling stamp sets! Assemble the perfect dimensional dogwood flower using the varying sized petals within the Flowering Dogwood Cling Stamps Set and die cut using the coordinating dies. The ideal collection to send out springtime and Easter wishes to friends and family!"

I created my Celebrate Spring Card featuring the Flowering Dogwood Collection.


 I colored the dogwoods with Memento Inks, Sponge Daubers and Fantastix Blending Tools.  On the smaller blooms rather than using the die cut stamens, Lettuce Entertain You Prills work nicely.


It is also that time again to vote for your favorite design team members.  If you want to see me continue on the Heartfelt Creations Design Team, please vote for me!

Vote for your favorite design team members: When we announce a new design team call that also means that we have a tough time deciding which of the current designers continue on the design team. We are giving you the opportunity to get involved and vote for 5 or more of your current favorite design team members: http://hcgo.co/DesignTeamVote2017. You can only vote one time and you have to select 5 or more to be eligible to participate. Voting ends on February 22nd, 2017.
For more inspirations, please visit the Heartfelt Creations Blog.  Remember to cast your votes, I would love to stay on the Heartfelt Creations Design Team.  Have a good day!

post signature

CELEBRATE SPRING CARD

Heartfelt Creations Products & Products Carried by HC: HCPC-3773  Flowering Dogwood Cling Stamp Set
HCPC-3774  Flowering Dogwood Branches Cling Stamp Set
HCD1-7129  Flowering Dogwood Die
HCD1-7130  Flowering Dogwood Branches Die
HCDP1-275  Flowering Dogwood Paper Collection
HCD2-751 Cut Mat Create 2A Die
HCD1-761 Everyday Heroes Die
TSMP900 Memento Dye Ink Pad - Tuxedo Black

TSMP805 Memento Dye Ink Pad - Toffee Crunch
TSMP707 Memento Dye Ink Pad - Bamboo Leaves
TSMP704 Memento Dye Ink Pad - New Sprout
TSMP605 Memento Dye Ink Pad - Summer Sky
TSMP400 Memento Dye Ink Pad - Rose Bud
ANC814 Lettuce Entertain You Prills
HCST401 Deluxe Flower Shaping Kit
247027 Fantastix Blending Tools

DDOTS Double Dots 100 pcs - 3D Foam Squares

Other Products:  White Cardstock; Memento Dye Ink Pad - Angel Pink; Art Glitter Ultrafine Transparent - Water Lily and Misty; Want2Scrap 72 Count - Light Blue Rhinestones - Self Adhesive

Instructions:  Create a 6" x 6" cardbase out of white cardstock.  Cut a 6" x 6" card front from the Flowering Dogwood Paper and die cut the center using the coordinating Cut Mat Create 2A Die.  Sponge outer edge of card front with Summer Sky Ink and adhere directly to card base.  Sponge center die cut image with Angel Pink Ink and adhere to card with pop dots.  On White Cardstock with Tuxedo Black Ink stamp the Flowering Dogwood Branch from the Flowering Dogwood Branches Stamp Set and stamp a couple flowers from the Flowering Dogwood Stamp Set.  Die cut with coordinating dies.  Using sponge daubers and Fantastix color flower petals with Angel Pink and Rose Bud Inks, color center of flowers with New Sprout Ink, color branches with Toffee Crunch Ink and color leaves with New Sprout and Bamboo Inks.  Die cut stamens using green design paper.  Shape flowers, stamens and branch with Deluxe Flower Shaping Kit.  Cut branch as needed and adhere to card front as shown.  Using Dries Clear Adhesive add stamens to die cut flowers and add Lettuce Prills to centers of all other flowers.  Add Misty Glitter to the dove and Water Lily Glitter to the dogwood flowers and leaves.  Die cut the sentiment using the arrow from the Everyday Heroes Die and sponge edges of arrow with Summer Sky Ink before adhering it to the card with pop dots.  Adhere Blue Rhinestone to corner as shown.
Pin It!

Wednesday, February 17, 2016

Happy Birthday Hat Card

Today I am sharing my Happy Birthday Hat Card featuring Heartfelt Creations Sunrise Lily Collection and HCPC 3723 Sunrise Lily Bouquet Cling Stamp Set.


I colored the image with Copics.


Their is still time to vote for who will continue on the Heartfelt Creations Design Team.  So if you would like to see me continue, please follow this link to vote: http://hcgo.co/DesignTeamVoting2016.  As a thank you your name will be entered into a drawing for a $50 Gift Certificate!   Voting ends on Friday, February 19, 2016. I would love to stay another year and I would appreciate your vote!

post signature


Happy Birthday Hat Card

Heartfelt Creations Products & Products Carried by HC:
HCPC 3724 Sunrise Lily Flute Cling Stamp Set
HCPC 3722 Sunrise Lily Swirls Cling Stamp Set
HCDP1-263 Sunrise Lily Paper Collection
HCD1-788 Sunrise Lily Swirls Die
TSMP900 Memento Dye Ink Pad - Tuxedo Black

Other Products:  Canvas Corp Ivory Cardstock; Curious Iridescent - Cryogen White Paper; Spellbinders Classic Ovals; Spellbinders Oval Majesty; ColorBox Chalk Ink Pad - Yellow Ochre; Tim Holtz Distress Ink - Tattered Rose;  Art Glitter Ultrafine Transparent Glitter - Antique White; Ranger Stickles - Yellow;  Want2Scrap 72 Count - White Pearls - Self Adhesive; Want2Scrap 72 Count - Pink Pearls - Self Adhesive; Copics E40, E42, E43, E44, E47, E49, RV10, RV11, RV21, RV23, YG91, YG93, YG95, YG97, Y17

Instructions:  Create a 6" x 6" side folding card base out of Ivory Cardstock.  Next cut the 6" x 6" design paper from the Sunrise Lily Paper Collection and then sponge edges with Rose Coral Chalk Ink.  On yellow design paper that has been die cut with arrow die from Everyday Heroes Die set, with Dark Brown Chalk Ink stamp "Happy Birthday" sentiment from Lily Flute Stamp Set.  Sponge edges of arrow with Yellow Ochre Chalk Ink and then add Antique White Glitter to edges of arrow with Dries Clear Adhesive.  Adhere arrow and card front to card base as shown.  On Cryogen White Paper, that has been die cut with Spellbinders Classic Ovals, with Tuxedo Black Ink stamp hat image from Lily Bouquet Stamp Set and color with Copics.  Matte image on pink design paper that has been die cut with Spellbinders Oval Majesty die and then sponged with Tattered Rose Distress Ink. Adhere to card front with pop dots.  With Tuxedo Black Ink on Cryogen White Paper stamp lily swirls image from Lily Swirls Set, color with Copics and then die cut with coordinating Sunrise Lily Swirls Die.  Add to card as shown.  Add Antique White Glitter to lilies on design paper and colored images.  Add Yellow Stickles to centers of all lilies.  Finally add Pink and White Pearls to lower right corner of the card front.
Pin It!
Related Posts Plugin for WordPress, Blogger...