Just a few more poppy cards to share with you today! Can you tell I absolutely love the Heartfelt Creations Blazing Poppy Collection!
Just for You Poppy Step Card
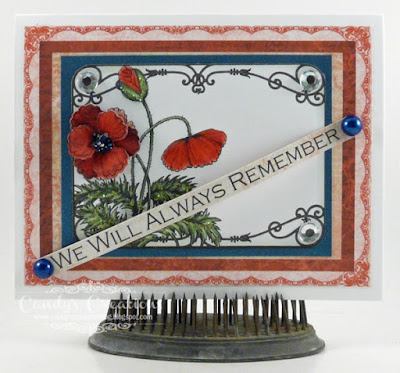
4th of July - Always Remember Card
Just for You Poppy Step Card
Other Products: Cream Bazzill Paper; Curious Iridescent - Cryogen White; Spellbinders Filigree Vase; R20, R22, R24, YG91, YG93, YG95, YG97, E40) Curious Iridescent - Cryogen White; Copics; Art Glitter Ultrafine Transparent - Ensalada; Martha Steward Black Licorice Glitter; Tim Holtz Memo Pin
Instructions: To create a 6" x 6" step card begin with a 12" x 6" piece of cream Bazzill cardstock. Line cardstock up in paper trimmer so that top edge of (6" side) is at top in paper trimmer and (12") side of cardstock is at the 1 1/4" mark and position cutting blade at 1 1/4" mark. Cut from 1 1/4" mark to 7 1/4" mark. Flip card over and cut the same on the other side. Place card sideways in Scor-Pal and score on the 1 1/4" cut side at 1 1/4", 2 1/2" and 7 1/4" marks. Repeat on opposite 1 1/4" cut side of card. On the 3 3/8" center between cuts score at the 6" mark. Fold at the score lines to create a 6" Center Step Card. For the side panels cut 2 pieces of Blazing Poppy Paper 1 1/4" x 4 3/4". For center panel trace the shape on the desired Blazing Poppy Paper and then cut out and adhere to the center panel. Cut out the red lace trim from the design paper and adhere it to the bottom of the center panel. With Memento Ink on Cryogen White Paper stamp the blazing poppy cluster image from the Blazing Poppy Vase Stamp Set and color with Copics. Detail cut out the bouquet and with Dries Clear Adhesive add Crystal Glitter to the leaves and Black Gala Glitz to the center of the poppy. Using the red and black design paper from the Blazing Poppy Paper Collection die cut with the Spellbinders Filigree Vase and adhere together to create a vase. Add colored bouquet to die cut vase and adhere to center of step card with pop dots. Die cut the tag using the Luggage and Tags Die, add Black Licorice Glitter to the center of the poppy on the tag and add to the bouquet with a Tim Holtz Memo Pin. Then on Cryogen White Paper with Tuxedo Black Ink stamp two poppy clusters from the Blazing Poppy Fillers Stamp Set. Color with Copics and detail cut out. Add Black Gala Glitz to the center of the poppies and adhere one to each side of the bottom of the card front with Dries Clear Adhesive.
4th of July - Always Remember Card
Heartfelt Creations Products & Products Carried by HC:
Other Products: Recollections Blue and White Cardstock; Art Glitter Ultrafine Transparent - Ensalada; Want2Scrap 72 Count - Royal Blue Pearls - Self Adhesive; Want2Scrap 72 Count - Silver/Clear Rhinestones - Self Adhesive; Art Anthology Velvet Dimensional Paint - Desire
Instructions: Begin by creating a A2 card base out of white cardstock. Next take the A2 card front cut from the Blazing Poppy Paper Collection and die cut the center image using the coordinating Cut Mat Create 1A Die. Adhere the A2 Blazing Poppy card front to the white card base. Adhere die cut image to blue cardstock and then adhere to card front. On red design paper from the Blazing Poppy Paper with Tuxedo Black Memento Ink stamp the Blazing Poppy Petals Stamp and die cut with the coordinating Blazing Poppy die. Paint poppies with Desire Art Anthology Velvet Dimensional Paint. With flower shaping tools and a mat, shape the poppies. Layer three poppies together to create one flower and add Blue Gala Glitz to center of poppy with Dries Clear Adhesive. Add Art Glitter Ensalada Glitter to leaves on design paper with Dries Clear Adhesive. Add the sentiment across the image as shown, adhering the ends of the sentiment only and then add a Blue Want2Scrap Pearl with Dries Clear Adhesive to each end. With Dries Clear Adhesive add Silver Want2Scrap Rhinestones to three of the corners as shown.


No comments:
Post a Comment
I appreciate comments. Thanks for stopping by my blog today!