Wednesday, July 29, 2015

Sparkling Poinsettia Decorated Lamp Post

Today I am sharing with you my Sparkling Poinsettia Decorated Lamp Post that I created using a lamp post I found at a thrift store. I painted it with DecoArt Metallic Glaze before decorating it with design paper, stamps and dies from the beautiful Heartfelt Creations Sparkling Poinsettia Collection.


The gold trim and brooch are from MonAmiGabby and the Cranberry Pearls are from Want2Scrap.  I purchased a Sage Green/Gold Damask LCD candle from Pier One to complete the lantern.

For more ideas and inspirations, please visit the Heartfelt Creations Blog.  Have a great day!
post signature


Decorated Lamp Post


Heartfelt Creations Products & Products Carried by HC:

ANC850 Spring Bling Prills

Other Products:  Wooden Lamp Post (thrift store find); DecoArt Dazzling Metallics Metallic Glaze - Renaissance Brown; Hot Glue Gun;  Ranger Embossing Powder - Gold; Tsukineko Archival Brilliance Galaxy Gold Pigment Ink Pad; Tattered Angels Glitter Mist - Iridescent Gold; Want2Scrap 72 Count - Cranberry Pearls; The Robin's Nest - Lemoncello Mini Dew Drops; MonAmiGabby Diamond Mesh Collection - GoldMonAmiGabby Brooch; May Arts Ribbon; Pier One Sage Green/Gold Damask LCD Votive Candle


Instructions:   Paint wooden lamp post with Renaissance Brown DecoArt Dazzling Metallics Metallic Glaze.  With Dries Clear Adhesive add MonAmiGabby Diamond Mesh Collection in Gold to the lamp post.  To add height to where the base of the candle sits, I painted a round lid with the Renaissance Brown Paint and adhered it to the lantern part of the lamp post with hot glue.  Create a bow with satin ribbon and with hot glue add the MonAmiGabby Brooch to the center of the bow and then add bow to the lamp post with hot glue.  Then on cream and burgundy colored Poinsettia Paper with Galaxy Gold Ink stamp the large poinsettia from the Large Sparkling Poinsettia Stamp Set and the poinsettias from the Sparkling Poinsettias Stamp Set and on green Poinsettia paper stamp the leaves from the Large Sparkling Poinsettia Stamp Set and from the Holly Berry Cling Stamp Set and add Gold Ranger Embossing Powder to all. Tap off excess and heat set.  Die cut the poinsettias and leaves with the coordinating Sparkling Poinsettia Die, Large Sparkling Poinsettia Die and Ornamental Add On Die.  Spray the poinsettia centers with Tattered Angels Glitter Mist in Iridescent Gold and then with Dries Clear Adhesive add Crystal Glitter.  With the Deluxe Flower Shaping Kit, shape the leaves and poinsettias, layering poinsettias as shown and using the centers from the burgundy die cuts in the cream poinsettias and the centers from the cream die cuts in the burgundy poinsettias.   On the smallest burgundy poinsettia near the candle add Prills to the center with Dries Clear Adhesive.  Add Cranberry Pearls to the Holly Berry Leaves with Dries Clear Adhesive. With Dries Clear Adhesive add Crystal Glitter to the poinsettias.    Add Poinsettias and leaves as shown to the lamp post with a hot glue gun.  On the largest poinsettia at the base of the post add Lemoncello Mini Dew Drops with Dries Clear adhesive to the center of the poinsettia.  Sit Sage Green/Gold Damask LCD Votive Candle in center of lantern on lamp post.


Pin It!

Wednesday, July 22, 2015

Peacock Christmas Card

It is Heartfelt Creations Wednesday and today we have some great news!

Special Announcement from Heartfelt Creations: In March of this year, the Peacock Paisley Collection was released. So many crafters asked “Please, we need a die to match the peacock stamp!” I mean, hey, who actually loves scissor cutting... 

As of NOW, you have access to the just-made-available Peacock Paisley die. In this package comes three fabulous dies: 2 peacocks and a feather to match the stamps. :) or you can purchase the die with the coordinating paper for a limited time (available through August 8, 2015, or while supplies last) for a 15% savings by following this link:


Peacock Paisley Bundle

15% Discount on Die and Matching Paper


For my project this week to showcase the new dies I created a Peacock Christmas Card.


The Peacock Paisley Dies cut the peacock and the feathers effortlessly and beautifully!


For more great inspiration from the Design Team, please visit the Heartfelt Creations Blog.


post signature

Peacock Christmas Card

Heartfelt Creations Products & Products Carried by HC:
HCPC 3680 Sparkling Poinsettia Cling Stamp Set
HCPC 3660 Peacock Swirls Cling Stamp Set
HCPC 3661 Feathery Peacock Cling Stamp Set
HCPC 3551 Holly Berry Cling Stamp Set
HCD1-766 Sparkling Poinsettia Die
HCD1-738 Ornamental Add On Die
HCD1-771 Peacock Paisley Die
HCD1-726 Delicate Asters Die
HCDP1-256 Sparkling Poinsettia Paper Collection
HCDP1-236 Christmas Card Paper Collection
TSMP900 Memento Dye Ink Pad - Tuxedo Black
HCST1-401 Deluxe Flower Shaping Kit
159723 Art Institute Glue - Dries Clear
352854 Metal Glue Tip - Art Institute
DDOTS Double Dots 100 pc. - 3D Foam Squares

Other Products:  Want2Scrap 72 Count - Cranberry Pearls; Want2Count - 72 Count - Silver/Clear Rhinestones; Want2Scrap - 72 Count - Navy Blue Rhinestones; Want2Scrap - 72 Count - Iridescent Rhinestones; Want2Scrap - 72 Count - Teardrop Bling - Silver;  Art Glitter Ultrafine Transparent Glitter - Antique White & Ensalada; Bazzill Cardstock; Curious Iridescent Cryogen White Paper; Copics - YG01, YG03, YG05, YG07, YG17, B34, B37, B39, Y17, R56; Brilliance Galaxy Gold Ink; Ranger Gold Embossing Powder;  Versamark Watermark Ink; Wow Embossing Powder - Vanilla Sparkle

Instructions:  Create a 5" x 7" cardbase out of burgundy Bazzill cardstock and then adhere a piece of of 5" x 7" Sparkling Poinsettia Paper to the card front. On burgundy and cream Poinsettia Paper and blue Christmas Card Paper with Galaxy Gold Ink stamp the Sparkling Poinsettia Stamp Set and then add Gold Embossing Powder.  Tap off excess and heat set.  Die cut poinsettias using the Sparkling Poinsettia Die.  On green Poinsettia Paper with Galaxy Gold Ink stamp the leaves from the Holly Berry Set and then add Gold Embossing Powder.  Tap off excess and heat set.  Die cut the leaves with the coordinating Ornamental Add On Die. Shape poinsettias and leaves with Deluxe Flower Shaping Kit and layer as shown.  For the center of the poinsettias use the die cut cream centers and then add Crystal Glitter with Dries Clear Adhesive. Add Cranberry Pearls to the Holly Berry Leaves.  On green, burgundy and blue paper stamp the peacock feather from the Feathery Peacock set with Versamark Ink and add Vanilla Sparkle Embossing Powder.  Tap off excess and heat set.  Die cut feather with coordinating Peacock Paisley Die and then add Teardrop Bling in Silver to the center of each feather.  Next on Cryogen White Paper with Memento Ink stamp the peacock image from the Peacock Swirls Set.  Color with Copics and then die cut with coordinating Peacock Paisley Die.  With Dries Clear Adhesive add Ensalada Glitter to the peacock.  Out of burgundy Poinsettia Paper die cut several small asters with the Delicate Asters Die, shape, layer and add rhinestones to the center.  Add asters to the Peacock image.  Matte "Merry Christmas" sentiment on burgundy paper.  Adhere peacock, feathers, poinsettias, holly leaves and sentiment to card front as shown.  In bottom right corner add Navy and Iridescent Rhinestones.
Pin It!

Monday, July 20, 2015

Christmas Card with Heartfelt Creations

I have a couple more cards to share with you using Heartfelt Creations Sparkling Poinsettia Collection.  For the first 5" x 7" card I used traditional red and green colors.


I colored the stamped image with Tim Holtz Distress Ink and and a Tim Holtz Water Brush.

For my next card I created an Elegant Poinsettia card featuring the elegantly embossed HCPC 3683 - Joy to the World Cling Stamp Set.


The beautiful trim and pearl and gold accents are from MonAmiGabby.


For more great projects from the other members of the HC Design Team, please visit the Heartfelt Creations Blog.

post signature


Traditional Red Christmas Card

Heartfelt Creations Products & Products Carried by HC:

Other Products: Ranger Embossing Powder - Gold; Tsukineko Archival Brilliance Galaxy Gold Pigment Ink Pad; Tattered Angels Glitter Mist - Iridescent Gold;  Neenah Classic Crest - Solar White; Tim Holtz Distress Inks - Black Soot, Barn Door, Mowed Lawn, Forest Moss; Tim Holtz Water Brush; Ranger Wendy Vecchi Archival Ink - Watering Can; Want2Scrap Swirls Finesse - White Pearls; May Arts Ribbon; X-mas Red Stickles; Posi-Bendr Bow Easy

Instructions:  Begin by creating a 5" x 7" card base.  Next wrap and secure a red ribbon around the center of a 5" x 7" card front cut from the Sparkling Poinsettia Paper Collection and then adhere the card front to the card base. Die cut a piece of  Neenah Solar White Paper with the Cut Mat Create 1A Die and then with Black Soot Distress Ink stamp the Sparkling Poinsettia Swirl stamp from the Sparkling Poinsettia Cling Stamp Set at the top left corner of the die cut paper, and then stamp the Holly Swirl stamp from the Joy to the World Cling Stamp Set in the top right corner of the paper and along the right side.  Color the image with a Tim Holtz Waterbrush and Tim Holtz Distress Inks in Barn Door, Mowed Lawn and Forest Moss.  Add Red Stickles to the holly berries.  With Watering Can Archival Ink stamp the sentiment from the Sparkling Poinsettia Swirl Cling Stamp Set on the Solar White Paper.  On Solar White Paper with Tuxedo Black Ink stamp the Sparkling Poinsettia stamp set and color poinsettias with Barn Door Distress Ink.  Die cut poinsettias with coordinating Sparkling Poinsettia Die, shape with Deluxe Flower Shaping Kit and then layer as shown.  Add Prills to the center of poinsettia with Dries Clear Adhesive.  Next on green Sparkling Poinsettia Paper stamp the leaves from the Holly Berry Cling Stamp Set with Galaxy Gold Ink and then add Gold Ranger Embossing Powder.  Tap off excess and then heat set.  Die cut leaves with coordinating Ornamental Add On die.  Add leaves and poinsettia to card front as shown.  Add Want2Scrap Swirls Finesse - White Pearls, as shown, cutting to fit as needed.  Create bow with Bow Easy and then adhere to right card front.

Elegant Poinsettia Card

Heartfelt Creations Products & Products Carried by HC:
HCPC 3684 - Sparkling Poinsettia Notes Cling Stamp Set
HCPC 3680 - Sparkling Poinsettia Cling Stamp Set
HCPC 3679 - Large Sparkling Poinsettia Cling Stamp Set
HCD1-766 Sparkling Poinsettia Die
HCD1-765 Large Sparkling Poinsettia Die
HCPC 3551 - Holly Berry Cling Stamp Set
HCD1-738 Ornamental Add On Die
HCD1-745 Luggage and Tags Die
HCDP1-256 Sparkling Poinsettia Paper Collection
HCST401 Deluxe Flower Shaping Kit
159723 Art Institute Glue - Dries Clear Adhesive
352854 Metal Glue Tip - Art Institute
85-glitter Crystal Ultrafine Transparent Glitter 

Other Products:  Spellbinder Floral Assortment Die; Green and Burgundy Bazzill Cardstock; Ranger Embossing Powder - Gold; Tsukineko Archival Brilliance Galaxy Gold Pigment Ink Pad; Tattered Angels Glitter Mist - Iridescent Gold; Want2Scrap 72 Count - Cranberry Pearls; MonAmiGabby Diamond Mesh Collection - GoldMonAmiGabby - Pearl and Gold Accents

Instructions:  Begin by Creating a 5" x 7" card base and then adhere a 5" x 7" piece of Sparkling Poinsettia Paper to the card base.  With Dries Clear Adhesive and the Metal Glue Tip add Crystal Glitter to the swirls on the left side of the design paper.  On cream and burgundy colored Poinsettia Paper with Galaxy Gold Ink stamp the large poinsettia from the Large Sparkling Poinsettia Stamp Set and the poinsettias from the Sparkling Poinsettias Stamp Set and on green Poinsettia paper stamp the leaves from the Large Sparkling Poinsettia Stamp Set and from the Holly Berry Cling Stamp Set and add Gold Ranger Embossing Powder to all. Tap off excess and heat set.  Die cut  the poinsettias and leaves with the coordinating Sparkling Poinsettia Die, Large Sparkling Poinsettia Die and Ornamental Add On Die.  Spray the burgundy centers with Tattered Angels Glitter Mist in Iridescent Gold and then with Dries Clear Adhesive add Crystal Glitter.  With the Deluxe Flower Shaping Kit, shape the leaves and poinsettias, layering cream poinsettias as shown and using the centers from the burgundy die cuts.  With Dries Clear Adhesive add Crystal Glitter to the poinsettias.  On a piece of burgundy Bazzill cardstock stamp the Sparkling Poinsettia Notes Cling Stamp Set with Galaxy Gold Ink and add Gold Ranger Embossing Powder.  Tap off excess and heat set.  Take green Bazzill paper and die cut it with the largest Spellbinders Floral Assortment Die and cut it diagonally in half.  Then cut another piece of design paper to match the card front approximately 5" x 5" to support the upper part of the card, adhering it to the card base as shown. Adhere the Floral Assortment die cut at upper right and bottom left corners to card front, then add the embossed Sparkling Poinsettia Notes image and around that with Dries Clear Adhesive add two strips, cutting to fit, of MonAmiGabby Diamond Mesh.  Add Poinsettias and leaves as shown, finishing by adding Cranberry Pearls to the Holly Berry Leaves with Dries Clear Adhesive.  Tuck and adhere  MonAmiGabby - Pearl and Gold Accents behind the large poinsettia.  Die cut the "Believe" tag using the Luggage and Tags Die from the Poinsettia Paper Collection and then add it to the top right corner of the card and finish by adding a Cranberry Pearl to the hole on the tag.
Pin It!

Wednesday, July 8, 2015

Heartfelt Creations Sparkling Poinsettia Collection

Heartfelt Creations is pleased to present its Sparkling Poinsettia Collection!  I created my Sweet Baby Jesus Card with the beautiful HCPC 3683 - Joy to the World Cling Stamp Set


and colored the stamped image with Copics.

For more beautiful inspiration from the Design Team, visit the Heartfelt Creations Blog.  Have a great day!

post signature

Sweet Baby Jesus Card

Heartfelt Creations Products & Products Carried by HC:
HCPC 3683 - Joy to the World Cling Stamp Set
HCPC 3680 - Sparkling Poinsettia Cling Stamp Set
HCPC 3679 - Large Sparkling Poinsettia Cling Stamp Set (leaves)
HCD1-765 Large Sparkling Poinsettia Die
HCD1-766 Sparkling Poinsettia Die
HCD1-747 Arianna Lace Die
HCD2-751 Cut Mat Create 2A Die
HCD2-752-Cut Mat Create 2B Die
HCD1-745 Luggage and Tags Die
HCDP1-256 Sparkling Poinsettia Paper Collection
HCDP1-231 Posy Patch Paper Collection
242174 Vellum Paper
HCST401 Deluxe Flower Shaping Kit
TSMP900 Memento Dye Ink Pad - Tuxedo Black
159723 Art Institute Glue - Dries Clear Adhesive
352854 Metal Glue Tip - Art Institute
85-glitter Crystal Ultrafine Transparent Glitter 
ANC851 Rock n' Roll Prills

Other Products: Spellbinder Floral Assortment Die; Curious Iridescent - Cryogen White Paper; Copics;Ranger Embossing Powder - Gold; Tsukineko Archival Brilliance Galaxy Gold Pigment Ink Pad; Tattered Angels Glitter Mist - Iridescent Gold;  Want2Scrap 72 Count LeCreme PearlsWant2Scrap 72 Count - Sage Green PearlsWant2Scrap 72 Count Steel Blue PearlsWant2Scrap 72 Count - Amber Rhinestones; Art Glitter Ultrafine Transparent Glitter - Flax; Art Glitter Ultrafine Transparent Glitter - Mellow Yellow; Art Anthology Sorbet Dimensional Paint - Dazzle; Art Anthology Sorbet Dimensional Paint - Leaf

Instructions:  Begin by creating a 6" x 6" card base and then adhere a 6" x 6" card front cut from the Sparkling Poinsettia Paper Collection.  Next cut a piece of burgundy paper from the Poinsettia paper using the Cut Mat Create 2B Die and adhere it to the center of the card front.  Then take a navy piece of paper from the Posy Patch Paper Collection and die cut it with the Spellbinders Floral Assortment Die and adhere it to the card front with the Dries Clear Adhesive using the Metal Glue Tip.  With Tuxedo Black Ink on Cryogen White Paper stamp the image from the Joy to the World Set and then die cut it with the Cut Mat Create 2A Die.  Color image with Copics.  With Dries Clear Adhesive add Mellow Yellow Glitter to the star, Flax Glitter to the hay and Dazzle Art Anthology Sorbet Paint to the blanket.  Next add a Yellow Rhinestones to the center of the star.  Adhere colored image to the card front.  On burgundy and cream Poinsettia Paper with Galaxy Gold Ink stamp the Sparkling Poinsettia Stamp Set and then add Gold Embossing Powder.  Tap off excess and heat set.  Die cut poinsettias using the Sparkling Poinsettia Die.  On green Poinsettia Paper with Galaxy Gold Ink stamp the leaves from the Large Sparkling Poinsettia Set and then add Gold Embossing Powder.  Tap off excess and heat set.  Die cut the leaves with the coordinating Large Sparkling Poinsettia Die. Using Vellum, die cut a lace flower using the Arianna Lace Die and then paint the lace flower with Leaf Art Anthology Sorbet Paint.  Shape poinsettias and leaves with Deluxe Flower Shaping Kit and layer as shown.  For the center of the small burgundy poinsettia add golden Rock n' Roll Prills with Dries Clear Adhesive and on the larger cream poinsettia use the die cut burgundy centers, spraying them with Tattered Angels Gold Glitter Mist and then adding Crystal Glitter with Dries Clear Adhesive.  Layered vellum Arianna Lace Flower behind larger cream flower and add leaves and poinsettias to card as shown.  Using the Luggage and Tags Die, die cut the "Oh Holy Night" tag and then add to left of card with a pop dot and add a Steel Blue Pearl to the hole in the tag.  Finally, add LeCreme Pearls and a Sage Green Pearl to the upper right corner of the card front.
Pin It!

Tuesday, July 7, 2015

More Poppy Cards

Just a few more poppy cards to share with you today!  Can you tell I absolutely love the Heartfelt Creations Blazing Poppy Collection!

Just for You Poppy Step Card


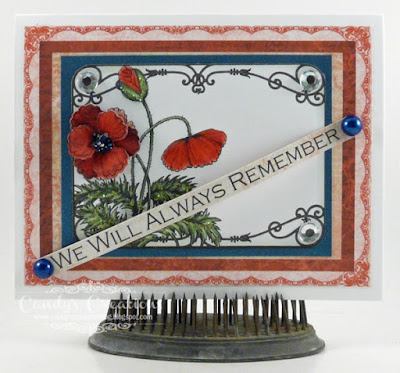
4th of July - Always Remember Card 


For more inspirations, please visit the Heartfelt Creations Blog!
post signature


Just for You Poppy Step Card


Heartfelt Creation Products & Products Carried by HC:

Other Products:  Cream Bazzill Paper; Curious Iridescent - Cryogen White; Spellbinders Filigree Vase; R20, R22, R24, YG91, YG93, YG95, YG97, E40) Curious Iridescent - Cryogen White; Copics; Art Glitter Ultrafine Transparent - Ensalada; Martha Steward Black Licorice Glitter; Tim Holtz Memo Pin

Instructions:  To create a 6" x 6" step card begin with a 12" x 6" piece of cream Bazzill cardstock. Line cardstock up in paper trimmer so that top edge of (6" side) is at top in paper trimmer and (12") side of cardstock is at the 1 1/4" mark and position cutting blade at 1 1/4" mark. Cut from 1 1/4" mark to 7 1/4" mark. Flip card over and cut the same on the other side. Place card sideways in Scor-Pal and score on the 1 1/4" cut side at 1 1/4", 2 1/2" and 7 1/4" marks. Repeat on opposite 1 1/4" cut side of card. On the 3 3/8" center between cuts score at the 6" mark. Fold at the score lines to create a 6" Center Step Card. For the side panels cut 2 pieces of Blazing Poppy Paper 1 1/4" x 4 3/4". For center panel trace the shape on the desired Blazing Poppy Paper and then cut out and adhere to the center panel.  Cut out the red lace trim from the design paper and adhere it to the bottom of the center panel.  With Memento Ink on Cryogen White Paper stamp the blazing poppy cluster image from the Blazing Poppy Vase Stamp Set and color with Copics.  Detail cut out the bouquet and with Dries Clear Adhesive add Crystal Glitter to the leaves and Black Gala Glitz to the center of the poppy. Using the red and black design paper from the Blazing Poppy Paper Collection die cut with the Spellbinders Filigree Vase and adhere together to create a vase.  Add colored bouquet to die cut vase and adhere to center of step card with pop dots.  Die cut the tag using the Luggage and Tags Die, add Black Licorice Glitter to the center of the poppy on the tag and add to the bouquet with a Tim Holtz Memo Pin.  Then on Cryogen White Paper with Tuxedo Black Ink stamp two poppy clusters from the Blazing Poppy Fillers Stamp Set.  Color with Copics and detail cut out.  Add Black Gala Glitz to the center of the poppies and adhere one to each side of the bottom of the card front with Dries Clear Adhesive.


4th of July - Always Remember Card 


Heartfelt Creations Products & Products Carried by HC:

Other Products:  Recollections Blue and White Cardstock; Art Glitter Ultrafine Transparent - Ensalada; Want2Scrap 72 Count - Royal Blue Pearls - Self Adhesive; Want2Scrap 72 Count - Silver/Clear Rhinestones - Self Adhesive; Art Anthology Velvet Dimensional Paint - Desire


Instructions:  Begin by creating a A2 card base out of white cardstock.  Next take the A2 card front cut from the Blazing Poppy Paper Collection and die cut the center image using the coordinating Cut Mat Create 1A Die.  Adhere the A2 Blazing Poppy card front to the white card base.  Adhere die cut image to blue cardstock and then adhere to card front.  On red design paper from the Blazing Poppy Paper with Tuxedo Black Memento Ink stamp the Blazing Poppy Petals Stamp and die cut with the coordinating Blazing Poppy die.  Paint poppies with Desire Art Anthology Velvet Dimensional Paint. With flower shaping tools and a mat, shape the poppies.  Layer three poppies together to create one flower and add Blue Gala Glitz to center of poppy with Dries Clear Adhesive.  Add Art Glitter Ensalada Glitter to leaves on design paper with Dries Clear Adhesive.  Add the sentiment across the image as shown, adhering the ends of the sentiment only and then add a Blue Want2Scrap Pearl with Dries Clear Adhesive to each end.  With Dries Clear Adhesive add Silver Want2Scrap Rhinestones to three of the corners as shown.


Pin It!

Wednesday, July 1, 2015

Blazing Poppy Vase Cards

Today on the Heartfelt Creations blog a couple of my cards feature the HCPC-3676 Blazing Poppy Vase Cling Stamp Set.  For this first card I simply stamped the Blazing Poppy Vase image, colored it with Copics and added a stamped, heat embossed and die cut Blazing Poppy Flower and Delightful Daisy leaf.


For my next project again I stamped the Blazing Poppy Vase image and then I created a mask, before stamping the flower cluster and baby's breathe images from the HCPC-3678 Blazing Poppy Fillers Cling Stamp Set to create a larger bouquet.


I added Hint of Violet Glitter Frosting Flower Soft to the baby's breathe with Dries Clear Adhesive.


Later this week I will share a couple more of my creations using the Blazing Poppy Collection.  For more inspiration and ideas from the other Design Team Members, please visit the Heartfelt Creations Blog.

post signature


Bold Poppy Vase Card

Heartfelt Creation Products & Products Carried by HC:

Other Products:  Spellbinders Grand Ovals; DCWV Cardstock; Curious Iridescent - Cryogen White; Versamark Watermark Ink; Tim Holtz Distress Ink - Spun Sugar; Copics E40, E42, E43, E44, R37, YG91, YG93, YG95, YG97;  Art Glitter Ultrafine Transparent - Ensalada; Wow Embossing Powder Black Glint; Want2Scrap 72 Count - Black Rhinestones - Self Adhesive

Instructions:  To begin create a 5" x 7" card base out of black DCWV cardstock.  Next adhere a 4 3/4" x 6 3/4" piece of Blazing Poppy Paper to the card base.  Add Crystal Glitter with Dries Clear Adhesive to the poppies on the design paper.  Die cut a piece of the black Blazing Poppy Paper with the Decorative Oval Die and adhere to the card front with the Dries Clear Adhesive using the Metal Glue Tip.  Then on Cryogen White Paper that has been die cut with a Spellbinders Grand Ovals Die, stamp the Blazing Poppy Vase image with Tuxedo Black Memento Ink.  Color with Copics.  Distress edges with Spun Sugar Distress Ink.  With Dries Clear Adhesive add Ensalada Glitter to leaves on colored image and then adhere image to Decorative Oval die cut on card front.  Next add a Black Rhinestone to the top and bottom of the Grand Oval colored image.  Then using Watermark Ink stamp the Blazing Poppy Petals Stamp on red Blazing Poppy Paper and add Black Glint Embossing Powder.  Tap off excess and heat set.  Shape poppy with the Deluxe Flower Shaping Kit and layer as shown. Then with Dries Clear Adhesive add Black Gala glitz to the flower center.  Next on green Blazing Poppy Paper stamp a leaf from the Delightful Daisies Stamp Set with Tuxedo Black Memento Ink and then die cut with the coordinating die from the Delightful Daisy Die set.  Shape leaf and then add Ensalada Glitter to the leaf.  Add leaf and poppy to the colored image on the card front.

Large Bouquet with Baby's Breathe Card

Heartfelt Creation Products & Products Carried by HC:
159723 Art Institute Glue - Dries Clear

Other Products:  Spellbinders Grand Ovals & Grand Decorative Ovals; Curious Iridescent - Cryogen White Paper; Copics R24, R27, R29,G20, G24, G28, E40, E42, E43, BG0000; Flower Soft - Hint of Violet Glitter Frosting; Want2Scrap 72 Count - Red Rhinestones - Self AdhesiveWant2Scrap 72 Count - Silver/Clear Rhinestones - Self AdhesiveWant2Scrap Swirls Finesse - Black Rhinestones

Instructions:  Begin by creating a 5" x 7" card base.  Next adhere a piece of striped design paper from the Blazing Poppy Paper Collection to the card base.  Then using the Spellbinders Grand Decorative Ovals die, cut a piece of the green design paper and using the Grand Ovals die cut a piece of the black design paper from the Blazing Poppy Paper.  Using the next smallest Grand Ovals die, cut a piece of Cryogen White Paper and stamp the vase image from the Blazing Poppy Vase Set with Tuxedo Black Memento Ink.  Then create a mask, covering the image you just stamped, and then with Tuxedo Black Memento Ink stamp the Baby's Breathe and flower cluster from the Blazing Poppy Fillers Cling Stamp Set to create a larger bouquet.  Color image with Copics.  For the Baby's Breathe, add Hint of Violet Glitter Frosting Flower Soft with Dries Clear Adhesive.  Add Crystal Glitter with Dries Clear Adhesive to the leaves in the image. Matte colored image to the black die cut oval and then matte that to the green die cut decorative oval, adding entire image to the card front with pop dots.  On Cryogen White Paper with Tuxedo Black Ink stamp the Blazing Poppy Petals, color with red Copics and die cut with coordinating the Blazing Poppy Die.  Shape petals with Deluxe Flower Shaping Kit and then layer petals to create a large poppy.  Adhere to colored image.  With Dries Clear Adhesive add Black Gala Glitz to the center of the 3D poppy and also the poppy in the colored image.  Die cut the oval tag from the Design Paper with the Luggage and Tags Die.  Add oval tag to card front and add a Silver Rhinestone to the hole on the tag.   Finally at the top of the colored image add Black Rhinestones - Swirls Finesse and some Red Rhinestones, cutting the Swirls as needed.
Pin It!
Related Posts Plugin for WordPress, Blogger...