Wednesday, February 29, 2012

HEARTFELT CREATIONS - FEBRUARY 29, 2012

HAPPY LEAP DAY and its Wednesday too so it is time for another Heartfelt Creations project.  Today I am sharing an easel card I made using the city scene from HCPC 3444 - Scenic Vista PreCut Set.  I used some paper from 7 Gypsies and I coordinated my Copics to match the paper. The sentiment is from HCPC 3449 - Door to My Heart PreCut Set.  To finish the card I used a Lemon Spica pen to give the windows in the building a subtle glow.

CITY SCENE CARD

Make sure and visit the Heartfelt Creations blog to see what other cards and projects the Design Team has been busy making this week!
CITY SCENE CARD
Heartfelt Creations Products:
  • HCPC 3444 - Scenic Vista PreCut Set
  • HCPC 3449 - Door to My Heart PreCut Set
Other Products:
  • Paper:  Curious Iridenscent - Cryogen White, Bazzill, 7 Gypsies - Venice
  • Ink:  Memento - Tuxedo Black, Ranger Distress Ink - Walnut Stain & Old Paper
  • Copics:  G21, G40, G94, BG000, BG0000, BG10, Y06, C00, C1, C3, C5, C7, E09, E15, E18, E43, E44, E47, E53, E57, E59, Spica - Lemon
  • Embellishments:  Grossgrain Ribbon
Instructions:
Card size 4 1/4" x 4 1/4"
Cut one 4 1/4” x 4 1/4” piece of cardstock out of kraft cardstock and one 4 1/4"” x 8 1/2” piece of kraft cardstock. Score the 4 1/4” x 8 1/2” cardstock at the 4 1/4” and the 6 3/8” measurement lines on the Scor-Pal or other scoring tool. Prefold all score lines. First fold the card in half, then at the second score line (6 3/8”) fold the opposite direction. Place the card on the table with the 4 1/4” side down. Add double sided tape to the 2 1/8” x 4 1/4” section cardstock facing up. Now attach the precut 4 1/4” x 4 1/4” piece of cardstock to the base, lining it up to make a perfect square. This creates the easel card base. Next from the 7 Gypsies patterned paper cut a 4 1/4" x 4 1/4" piece of cardstock and adhere to card front/top.  Cut a 3 1/2" square from beige cardstock and a 3" square from brown cardstock.  Adhere to card front.  Then on Cryogen White paper stamp the city scene using Memento Tuxedo Black Ink and color with Copics.  Cut out around image to form a 2 1/2" square and mount to card front.  On card base adhere a 4 1/4" x 1 3/4" piece of patterned paper.  Next with 1/4" Scor-Tape adhere beige grossgrain ribbon.  Then on Cryogen White paper with Walnut Stain Distress Ink stamp the "Congratulations" and "on your new home" sentiments.  With straight edge trimmer cut out sentiment 2 1/4" x 1" and distress edges with Old Paper Distress Ink.  Attach to 2 1/2" x 1 1/4" brown cardstock and adhere to card base with pop dots.

Pin It!

Monday, February 27, 2012

OCL - ART OF NATURE CARD

Happy Monday, Our Craft Lounge friends!  Today is my last post as February Artist of the Month.  I have had a great time creating projects for OCL and sharing them with you each week this month.  Today I am sharing a card I created using the OCL Crafty Cling Rubber Stamps set - The Art of Nature.

This set has some great sentiments along with some beautiful images that are wonderful to color with Copics.  I started with an A2 card base and attached some Jillibean Soup patterned paper that reminded me of a quilt.  I then stamped the barn image on Curious Iridescent - Cryogen White paper with Walnut Stain Ranger Distresss Ink.  Next I colored the image with Copics.  I used OCL Sparkly Fluff in Breezy Blue on the blue flowers in the picture and added Ranger Liquid Pearls in Buttercup to the center of the larger flowers.

I matted the image on yellow Bazzill paper and attached it to the card front with pop dots.  Then I stamped the "Nature" sentiment and cut it out using an oval Spellbinders.  I distressed the edges using Antique Linen Ranger Distress Ink.  Next I adhered it to a pink scalloped oval.

Finally I added buttons and some gingham ribbon to finish giving the card a country feel.

Thank you for letting me share some of my OCL projects with you this month.  I hope you have a wonderful week!

Paper:  Bazzill, Curious Iridescent - Cryogen White, Jillibean Soup - Homemade 6 Bean Soup
Ink:  Ranger Distress Ink - Walnut Stain & Antique Linen
Copics:  R22, R24, R27, R29, R83, R85, R89, B45, Y38, C1, C3, C5, C7, V05, V06, BG000, BG0000, G94, G99, YG01, YG03, YG17, YG67, YG91, YG99, YG95, YG97, E15, E18, E23, E25, E27, E29, E31, E33, E35, E37, E42
Spellbinders:  Classic Ovals LG, Classic Scalloped Ovals LG
Embelishments:  Ribbon, Buttons, Twine, OCL Sparkly Fluff - Breezy Blue, Ranger Liquid Pearls - Buttercup
Pin It!

Wednesday, February 22, 2012

HEARTFELT CREATIONS - FEBRUARY 22, 2012

I just fell in love with this 8" x 8" paper pad by Prima called the Madeline Collection when I found it at the store. So for my Heartfelt Creations project this week I stamped the bell from the HC Bella Rose Wedding PreCut Set on Curious Iridescent - Cryogen White paper with Ranger Distress Ink in Walnut Stain and colored it with Copics. 

BELLA ROSE BELL CARD

I carefully selected my Copic marker colors to coordinate with the paper. I think this really added a nice touch. 


I then matted the colored bell on Bazzill cardstock before attaching it to the card base. I used cream organza ribbon to add an elegant touch. This would make a perfect wedding, anniversary or just thinking of you card.
 
 
Heartfelt Creations Products:

Other Products:
  • Paper: Curious Iridescent - Cryogen White, Prima - Madeline Collection, Bazzill
  • Ink:  Ranger Distress Ink - Walnut Stain
  • Copics:  R59, R81, R83, R85, R89, BG70, BG72, BG75, BG78, YG95, YG97, YG99, E40, E42, E43, E44, E47
  • Embellishments:  Ribbon, Stickles - Burgundy 
Instructions:
5 1/2" x 4 1/4" Card
Start with a 8 1/2" x 5 1/2" piece of Kraft cardstock and score at the 4 1/4" mark to create an A2 card base.  Next attach 5 1/4" x 4" piece of patterned paper on card base.  Apply organza ribbon around top of card and finish with a simple knot bow.  Then with Walnut Stain Ink stamp the bell on Cryogen White and color with Copics.  With a straight edge trimmer cut Bell out and matte on a piece of coordinating Bazzill cardstock and apply to card front with pop dots.  Apply Burgundy Stickles to flower centers.

Make sure to stop by the Heartfelt Creations Blog this week to check out the other great projects by the Design Team!


Pin It!

Monday, February 20, 2012

OCL - JUST MY TYPE

Happy Monday!  I have another OCL card to share with you today.  I used the OCL Crafty Cling Rubber Stamp Set - Years Gone By for my card.


I just love the vintage look of this set.  I stamped the typewriter with Ranger Distress Ink in Black Soot on some graph paper from a paper pad by October Afternoon called 5 & Dime.  Then I matted it on black cardstock and then on some cool vintage looking black star and cream paper from the same paper pad and then finally on some more black cardstock.  I then added a binder clip by Tim Holtz for an extra accent.


On the kraft card base I stamped the gears from the Years Gone By set with Black Soot Distress Ink.  I stamped the "Just My Type" sentiment on cream cardstock and matted it on an embellishment cut out of black cardstock from the Spellbinders Shapeabilities set Fleur De Lis Accents.  To finish off the card I used Graphic 45 Trim that contains the definition of vintage, which is very fitting for this old typewriter.


This was a really fun card to create!  I will be back next Monday with my final card as OCL's February Artist of the Month.


Stamp:  OCL - Years Gone By
Paper:  Bazzill, October Afternoon - 5 & Dime
Ink:  Ranger Distress Ink - Black Soot
Embellishments:  Tim Holtz, Graphic 45
Pin It!

Wednesday, February 15, 2012

HEARTFELT CREATIONS - FEBRUARY 15, 2012

This week in celebration of Valentine's Day I used the color scheme red, black and silver to make my card for the Heartfelt Creations Design Team.  I used the Bella Rose Wedding stamp set.  This stamp can be used to make cards for Valentine's Day, anniversaries, weddings or just a special thinking of you card for your spouse.  Of course, I had to add Silver Stickles to make the diamond sparkle!

RED ROSE WITH SILVER RINGS CARD

Heartfelt Creations Products:
HCPC 3398 - Bella Rose Wedding PreCut Set

Other Products:
Paper:  DCWV, Curious Iridescent - Cryogen White
Ink:  Memento - Tuxedo Black
Copics:  R27, R24, R22, YG67, YG63, YG61, C00, C01
Punch:  EK Success - Scalloped Scallop
Embellishments:  Stickles - Silver, Ribbon, Candi - Mr. & Mrs.

Instructions:
5 1/2" x 4 1/4" Card
Start with a 8 1/2" x 5 1/2" piece of black cardstock and score on the 4 1/4" line to create an A2 size card base.  Next cut 2 pieces of gray patterned paper 5 1/4" x 4" and adhere 1 piece to card front and 1 piece to the inside of the card to create an area to write a handwritten note.  Next cut a piece of 2" x 4" piece of black cardstock and use the scalloped punch on both sides.  Tie a silver ribbon around the scalloped piece finishing it with a knot and then adhere it to the card front.  For the inside of the card cut a 1" x 4" piece of black cardstock and use the scalloped punch on one side and adhere to left side of inside of card. Next attach a 3 1/2" x 2 1/2" piece of red cardstock to card front and a 2 1/2" x 3 1/4" piece of black cardstock and attach it on top of the red cardstock on an angle.  Cut out a 2 1/2" x 2" rectangle out of the Cryogen White paper and with Memento ink stamp the Red Rose with Rings.  Color with Copics.  Attach to card front and add Silver Stickles to diamond on ring.  Add black and white Candi with pop dots to upper right hand corner.

I decorated the inside of the card so the sender could include a handwritten note for the appropriate occasion.

Inside View

Make sure and check out the other great projects created by the other Design Team members this week on the Heartfelt Creations Blog.  Have a good week!


Pin It!

Monday, February 13, 2012

OCL - YOU MAKE ME HAPPY

Happy Monday, Our Craft Lounge friends!  I am back to share my second project as February Artist of the Month.  This week I am working with the OCL Crafty Cling Rubber Stamp Set You Make Me Happy.  I just love this set because it features one of my favorite flowers, Echinacea, more commonly known as Coneflowers.


I have a large perennial flower garden in my back yard and I collect Coneflowers.  I now have twenty-four different Coneflowers in all different colors and heights.  What I also love about this OCL stamp set is it comes with several wonderful sentiments that can be used for many occasions.  So this set is not only fun to color, but very versatile!
To make my card I started with paper from My Mind's Eye - Lost & Found Market Street and I created a 6" x 6" card base.  I stamped the Coneflower with Memento Ink in Tuxedo Black on Cryogen White paper and colored it with Copics.  I then stamped the sentiment with Memento in Rich Cocoa and distressed the edges with Ranger Distress Ink in Victorian Velvet and Antique Linen.  I used Spellbinders Lattice Rectangles and embellishments cut from Spellbinders Fleur De Lis Accents.  I added a bow made out of antique gold organza ribbon and I attached it with a pearl brad.  To finish the card I added Candi with pop dots.

Have a good week and I hope you take time to create a card with your favorite OCL stamp set this week!
  • Stamps:  You Make Me Happy
  • Paper:  My Minds Eye - Lost & Found Market Street
  • Ink:  Memento - Tuxedo Black & Rich Cocoa, Ranger Distress Ink - Victorian Velvet & Antique Linen
  • Copics:  RV32, RV34, YG95, YG97, Y28, E39, BG0000, BG000, BG10
  • Spellbinders:  Lattice Rectangles, Fleur De Lis Accents
  • Embellishments:  Ribbon, Pearl Brad, Candi
Pin It!

Wednesday, February 8, 2012

HEARTFELT CREATIONS - FEBRUARY 8, 2012


Heartfelt Creations is pleased to release the Floral Cross Collection. This collection is as fresh as a blooming yellow lily on a sunny spring day: intricate flowers compliment the typographical, linear, and wooden crosses. There are 6 new PreCut Stamp Sets and one beautiful new exclusive Spellbinders die designed for Heartfelt Creations.

Leave a comment on the HC blog by February 14 to be eligible to win the entire release valued at $125.93. The winner will be announced on February 15 on the HC Blog.

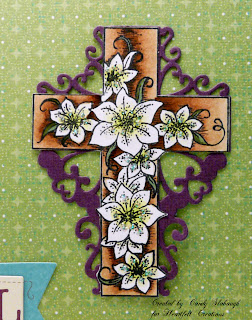
This week I used the cross and die from the new Floral Cross Collection to decorate the title page of a prayer journal.  I also used a HC praying hands stamp and colored it with Copics.  The chipboard album and coordinating cardstock is made by Little Yellow Bicycle.  In the coming weeks I will show you more pages of my prayer journal decorated with Heartfelt Creations stamps and dies.

MY PRAYER JOURNAL


Heartfelt Creations Products:
HCPC 3450 - Cross & Lilies PreCut Set
HCD 719 - Cross & Lillies
1342C - Small Praying Hands
452073 - Spellbinders Beaded Ovals Decorative Elements Dies
354804 - Spellbinders Oval Small

Other Products:
Little Yellow Bicycle Chipboard Album
Little Yellow Bicycle Paper Pad - pages sized to fit on LYB chipboard album
Little Yellow Bicycle Family Tree Page Kit - die cuts & letters used for title
Other Paper:  Curious Iridescent - Cryogen White, Bazzill
Ink:  Memento - Tuxedo Black, Ranger Distress Ink - Peeled Paint
Copics:  Praying Hands - E000, E00, E01, E11, BG70, BG72, BG75.  Cross - E31, E33, E35, E37, C00, G94, G99, YG0000, YG00, YG01
Embellishments:  Stickles - Crystal, Ribbon

Instructions:
6" x 12" Chipboard Album
First adhere cardstock paper from Little Yellow Bicycle Paper Pad to Chipboard Album front.  Punch holes in the paper where the holes are in the album to insert the rings.  Create your title using the die cuts and letters from the Little Yellow Bicycle Family Tree Page Kit and attach to album front.  Next with Memento ink stamp cross from HCPC 3450 - Cross & Lilies set and color with Copics.  Detail cut cross out and add Crystal Stickles to center of lilies.  Using the HCD 719 Cross die, cut out the cross with purple Bazzill paper.  Adhere Copic colored cross to die cut and then adhere to album front.  Next with Memento ink stamp the praying hands and color with Copics.  Cut out with small oval Spellbinders and then distress edges with Peeled Paint Distress Ink.  Out of purple Bazzill cardstock cut out coordinating Spellbinders beaded oval and adhere praying hands oval to beaded oval and then adhere to album front.  Tie ribbons onto rings.


LYB Album &
Paper Pad
Pin It!

Monday, February 6, 2012

OUR CRAFT LOUNGE - ARTIST OF THE MONTH

I have exciting news! I am Our Craft Lounge's Artist of the Month for February. That means every Monday in February I get to share a project with you using Our Craft Lounge Stamps!


I am so excited to be Our Craft Lounge's Artist of the Month for February.  OCL stamps were the first stamps I ever stamped with and actually Kendra is the one who introduced me to stamping and coloring with Copics.  It has been my new passion ever since.  So I was thrilled when Kendra asked me to join OCL for the month. 


Another one of my hobbies is sewing and I also love the vintage look so I definitely fell in love with OCL's Crafty Cling Rubber Stamp Set - Years Gone By.  I stamped the sewing machine and sentiment with Ranger Distress Ink in Black Soot and distressed the edges with Ranger Distress Ink in Antique Linen.  I also found this cardstock by October Afternoon called 5 & Dime, that had some great nostalgia looking paper.  I used some antique looking lace and created button stick-pins by hot gluing buttons on to flat flower head sewing pins.  To finish off the card I found some spool buttons in my stash and just cut off the shank and attached them with a glue dot.  I also found this cute little hanger by Tim Holtz.  I am sure anyone who enjoys sewing, would love to receive this card.


I look forward to sharing another one of my OCL creations with you next week.
Ink:  Ranger Distress Ink - Black Soot & Antique Linen
Paper:  October Afternoon - 5 & Dime

Pin It!

Wednesday, February 1, 2012

HEARTFELT CREATIONS - FEBRUARY 1, 2012

Heartfelt Creations will debut The Floral Cross Collection on their website on February 7th at 12 Midnight EST.  There will be 6 new PreCut Stamp Sets and one beautiful new exclusive Spellbinders die designed for Heartfelt Creations. It is a beautiful new set and I can't wait to share my projects with you next week.

I really like the card I created this week with the Heartfelt Creations Daisy Patch Stamps and Die.  It has a really vintage feel and look.  Please check out all the great cards and projects created by the Heartfelt Creations Design Team on the Heartfelt Creations Blog this week.

DAISY CARD


Heartfelt Creations Products:
HCPC 3376 - Distressed Leaves PreCut Set
HCPC 3324 - Daisy Patch Swirls PreCut Set
HCPC 3318 - Daisy Patch Flowers PreCut Set
HCD 703 - Daisy Patch Die
Nested Leaves Nestabilities
Bark Elements
Art Institute Glue - Dries Clear Adhesive


Other Products:
Paper:  K&Company, Curious Iridescent - Cryogen White
Ink:  Ranger Distress Ink - Walnut Stain, Tea Die & Old Paper
Copics:  E37, YR12, YR14, YR18, YR21, YR23, YR24, YG91, YG95, YG97
Embellishments:  Recollections Adhesive Faux Pearls, Tattered Angels - Yellow Daisy & Tiger Lily


Instructions:
5" x 7" Card
Start with  a 10" x 7" piece of kraft cardstock and score on the 5" mark to create a 5" x 7" card base.  Next cut a piece of patterned paper 5" x 7" and adhere to card front.  Then cut a 4 3/4" x 6 3/4" piece of Cryogen White and stamp the 3 stamps from the Daisy Patch Swirls set as shown.  Color with Copics.  Next stamp 2 smallest and 4 small Daisy Patch Flowers and color yellow with Copics.  Cut out with Daisy Patch Die and spray with Tattered Angels - Yellow Daisy.  Heat set.  Next stamp 6 smallest, 1 small, 1 medium and 2 medium large Daisy Patch Flowers and color orange with Copics.  Cut out with Daisy Patch Die and spray with Tattered Angels - Tiger Lily.  Heat set.  Then stamp 2 smallest and 1 small leaves from the Distressed Leaves set, color with Copics and cut out with Nested Leaves Nestabilities.  Next distress the Cryogen White paper with Tea Die and Old Paper Distress Ink.  Using pop dots attach the daisies as shown, adding the large flower and leaves you created to the bottom left corner of the card.  Add Bark Elements with Dries Clear Adhesive to the center of each daisy.  Add Adhesive Faux Pearls.

Pin It!
Related Posts Plugin for WordPress, Blogger...