Wednesday, April 25, 2012

Joan's Weekly Challenge #15


This week Joan's Gardens Weekly Challenge #15  is to make a card or project which includes flowers using dies or punches.  From the entries in this challenge six Guest Designers will be chosen for a blog hop on May 15th.  You may enter more than once so I also entered my Clematis/Church card that I made for my Heartfelt Creations post today too.

I usually always color everything with Copics, but today I branched out and stamped Metallic Vellum paper with Heartfelt Creations Stamps HCPC 3406 - Botanical Floral 1 PreCut Set and HCPC 3407 - Botanical Floral 2 PreCut Set and cut them out with Spellbinders Rose Creations Shapeabilities Dies.  I used a Paper Blossom Tool Kit and Molding Mat to shape the flowers.  I added brads and brown Gala Glitz to the flower centers.  I added Ranger Diamond Stickles to some of the flower edges for some sparkle.  The sentiment is from HCPC 3308 - Agape Love PreCut Set.  I distressed the edges with Tim Holtz Distress Ink in Antique Linen and Tattered Rose and adhered it on a Spellbinders Lattice Rectangle.  The paper is Prima - Madeline Collection and I finished the card by adding some Recollection Faux Adhesive Pearls.


I am really happy how this card turned out.  I love all the dimension these handmade flowers have added.  I am definitely going to be creating more of these flowers!


Pin It!

HEARTFELT CREATIONS - APRIL 25, 2012


Good morning!  It's Wednesday again and that means I get to share some more cards I created for Heartfelt Creations.  I also have some great news to share with you this morning.  I will be continuing for another six months on the HC Design Team.  I want to thank everyone who voted for me.   I also want to thank Linda and Emma Lou from HC for giving me the opportunity to design for them for another six month term.  HC is a wonderful company to work for and I can't say enough about the kindness and generosity shown to each of us on the Design Team. You can check out the HC Blog to see the ten members continuing on the Design Team and to meet the ten new members of the Design Team.

For my first card this week I used the Heartfelt Creations Bella Rose Vintage Background stamp and I colored it with Copics and added some extra bling with adhesive faux pearls and rhinestones.
BEAUTIFUL ROSE CARD

For my next card I used the Heartfelt Creations Cross & Lilies Die to make the Clematis 3D.  I also made the doors open on the Palace Entry to reveal a picture of a church inside the card.  This week I am entering this card in Joan's Gardens Weekly Challenge #15. The Challenge is to make a card or project which includes flowers using dies or punches.
CLEMATIS / CHURCH CARD

Front View

Inside View

Please make sure and check out the Heartfelt Creations Blog this week to see the other great project from the Design Team. 

BEAUTIFUL ROSE CARD

Heartfelt Creations Products:
  • HCPC 3397 - Bella Rose Vintage Background PreCut Set
Other Products:
  • Paper: Curious Iridescent - Cryogen White; Bazzil
  • Ink: Ranger Distress Ink - Walnut Stain
  • Copics: YG01, YG03, YG17, YG67, V22, V25, V28, Y32, Y35, Y38, E40, E42, E43
  • Embellishments: Recollections Adhesive Faux Pearls; Zva Creative Self Adhesive Crystals
Instructions:
5" x 7" Card
Start with a 10" x 7" piece of beige cardstock and score at the 5" mark to create a 5" x 7" card base. Next adhere a 5" x 6" piece of yellow cardstock to the card front, then on top of that a 4 3/4" x 5 3/4" piece of violet cardstock and then on top of that a 4 1/2" x 5 1/2" piece of pink cardstock. Next with Walnut Stain Distress Ink on Cryogen White paper stamp the Bella Rose Vintage Background. Color with Copics. Cut image to 4 1/4" x 5 1/4" and matte on pink cardstock. Add pink Zva Crystals to center of flowers. Add Faux Pearls and Pink Crystals to top of card front.


CLIMATIS CHURCH CARD

 Heartfelt Creations Products:
  • HCPC 3443 - Palace Entry PreCut Set
  • HCPC 3442 - Grand Portal PreCut Set
  • HCPC 3449 - Door to My Heart PreCut Set
  • HCPC 3451 - Going to the Chapel PreCut Set
  • HCPC 3454 - Twining Clematis PreCut Set
  • HCPC 3453 - Malabar Clematis PreCut Set
  • HCD 719 - Cross & Lillies Die
  • HCD 718 - Decorative Chateau Gate Die
  • Product ID 414749 - Blue / Brown Flower Centers
  • Product ID 12wht - White Gala Glitz
  • Art Glitter Dries Clear Adhesive
Other Products:
  • Paper: Curious Iridescent - Cryogen White; DCWV; Echo Park
  • Spellbinders: Classic Square LG & Classic Scalloped Square LG
  • Ink: Memento - Tuxedo Black; VersaMark Dazzle - Champagne
  • Copics: B60, B63, B66, B69, RV63, RV66, RV69, E40, E42, E43, E44, C00, C1, C3, C5, C7, W1, W3, W5, W7, BG000, G21, G24, G28, YG17, YG21, YG23, YG25
Instructions:
6" x 6" Card
Start with a 6" x 12" piece of gray cardstock and score at the 6" mark to create a 6" x 6" card base. Next adhere a 6" x 6" piece of Echo Park cardstock to card base and then stamp the flourish from the Palace Entry Set with Champagne VersaMark Dazzle Ink on the bottom left hand corner. Then with Tuxedo Black Memento Ink on Cryogen White paper stamp the church from the Going to the Chapel Set, the palace entry from the Palace Entry Set, the door from the Grand Portal Set, both clematis images from the Twining Clematis Set, and stamp 1 small, 1 med-small, 3 medium and 1 med-large clematis from the Malabar Clematis Set. Color all with Copics.  Next to cut out the individual clematis flowers use the HC Cross & Lillies Die and to cut out the grand portal door use the HC Decorative Chateau Gate Die. Detail cut both Twining Clematis and the Palace Entry. Cut the church image out using the Classic Square LG Spellbinder and then matte on lavender cardstock cut with the Classic Scalloped Square LG Spellbinder Die. Adhere church image to inside of card. With x-acto knife cut out center of Palace Entry Door and then with x-acto knife cut opening for door on card front to align with picture of church inside. Adhere Palace Entry Door and then Grand Portal Door. Next adhere both colored images of Twining Clematis to lower left of Palace Entry Door. With pop dots add individual clematis for dimension. With Dries Clear Adhesive add White Gala Glitz to center of each flower. Stamp "You are invited" sentiment from Door to My Heart Set to upper left corner of card front. Add adhesive sticker embellishment to upper right corner.
Pin It!

Wednesday, April 18, 2012

HEARTFELT CREATIONS

MOREL MUSHROOM
Good morning! It is Heartfelt Creations Wednesday again and I have two more cards to share with you this week. The first one is a scene of one of my absolute favorite things about Spring here in Indiana. MOREL MUSHROOMS! They are so yummy! My husband John has already found some a couple of weeks ago in his family's woods and I fried them up for us - what a treat!   It has been too cold and dry to find any more lately, but hopefully soon the weather will cooperate and our whole family can go out hunting again.  I am not very good at finding them like John is, but it sure is fun trying!


MOREL MUSHROOM CARD


 MYSTIC HIDEAWAY CARD
Please check out the other great projects this week by the HC Design Team on the Heartfelt Creations Blog. You can also go to each Designers Blog by clicking on their name on my side bar.  Have a great week!


MOREL MUSHROOM CARD


Heartfelt Creations Products:
  • HCPC 3466 - Alpine Bungalow PreCut Set
  • HCPC 3467 - Woodland Growth PreCut Set
  • HCPC 3457 - Birch Tree PreCut Set
  • Product ID 354802 - Classic Oval LG
  • Product ID 354803 - Scallop Oval LG
Other Products:
  • Paper:  Curious Iridescent - Cryogen White; 7 Gypsies - Conservatory; The Paper Studio - Metallic; Bazzill
  • Ink:  Memento - Tuxedo Black
  • Copics:  BG0000, BG000, BG10, W00, W1, W3, W5, C1, C3, C5, BV20, YG01, YG03, YG17, YG61, YG63, YG67, G94, Y26, Y28, E31, E33, E35, E53, E57, E59
  • Embellishments:  Flower Soft - Fuchsia & Earth; Candi - Metallique - Tungsten
Instructions:
5" x 7" Card
Start with a 10" x 7" piece of cardstock and score at the 5" mark to create a 5" x 7" card base.  Next cover the card front with 7 Gypsies patterned paper.  Create scene on Cryogen White paper with Memento Ink by stamping left to right beginning with flowers from Woodland Growth Set, next birch trees from Birch Tree Set, then small morel mushrooms from Woodland Growth Set, then Sign from Alpine Bungalow Set, and finally more small morel mushrooms from Woodland Growth Set.  Color with Copics.  Add Fuchsia Flower Soft to flowers and Earth Flower Soft to ground beneath trees.  Attach scene to card front.  On Cryogen White paper cut with Classic Oval LG Spellbinder stamp large morel mushroom from Alpine Bungalow Set and color with Copics.  Matte on brown metallic cardstock cut from Scallop Oval LG Spellbinder and attach to card front with pop dots.  Add Metallique Candi with pop dots to upper left corner of scene.


MYSTIC HIDEAWAY CARD


Heartfelt Creations Products:
  • HCPC 3363 - Inspire Me Sentiments PreCut Set
  • HCPC 3445 - Mystic Hideaway PreCut Set
  • HCD 710 - Decorative Oval Window Die
  • Product ID 354802 - Classic Oval LG
  • Product ID 354803 - Scallop Oval LG
Other Products:
  • Paper:  Curious Iridescent - Cryogen White; Bazzill; My Mind's Eye - Vanity Fair
  • Ink:  Memento - Tuxedo Black; Ranger Distress Ink - Iced Spruce
  • Copics:  W1, W3, W5, W7, W9, BG0000, BG72, BG75, BG78, BG99, YG17, YG21, YG23, YG25, YG67, E23, E25, E27, E29, E31, E33, E35, E37
  • Embellishments:  Buttons; Twine
Instructions:
4 1/4" x 5 1/2" Card
Start with a 5 1/2" x 8 1/2" piece of kraft cardstock and score on the 4 1/4" mark to create an A2 size card base.  Next cut a 4 1/4" x 5 1/2" piece of My Mind's Eye patterned paper and adhere to card front.  On Cryogen White paper with Memento Ink stamp archway scene from Mystic Hideaway Set and color with Copics.  Out of coordinating cardstock cut out a Decorative Oval Window with the HC die.  Cut archway scene to fit inside Decorative Oval Window and adhere scene and window to card front.  Stamp "I thank God . . . " sentiment from Inspire Me Sentiments on Cryogen White paper and distress edges with Iced Spruce Distress Ink.  Matte on cardstock cut from Spellbinders Scallop Oval.  Attach to card front with pop dots.  Add twine to button holes and attach buttons to card front with glue dots.

Pin It!

Wednesday, April 11, 2012

HEARTFELT CREATIONS - April 11, 2012

Escape to the western plains with the Western Elements Collection. Featuring Grandpa's antique wooden carriage and super-sized mushrooms, this set will delight with a brand-new twist on a traditional theme. There are 5 new PreCut Stamp Sets and one beautiful new exclusive Spellbinders die designed for Heartfelt Creations. Leave a comment on the HC blog by April 17 to be eligible to win the entire release valued at $109.99. The winner will be announced on April 18 on the HC Blog.

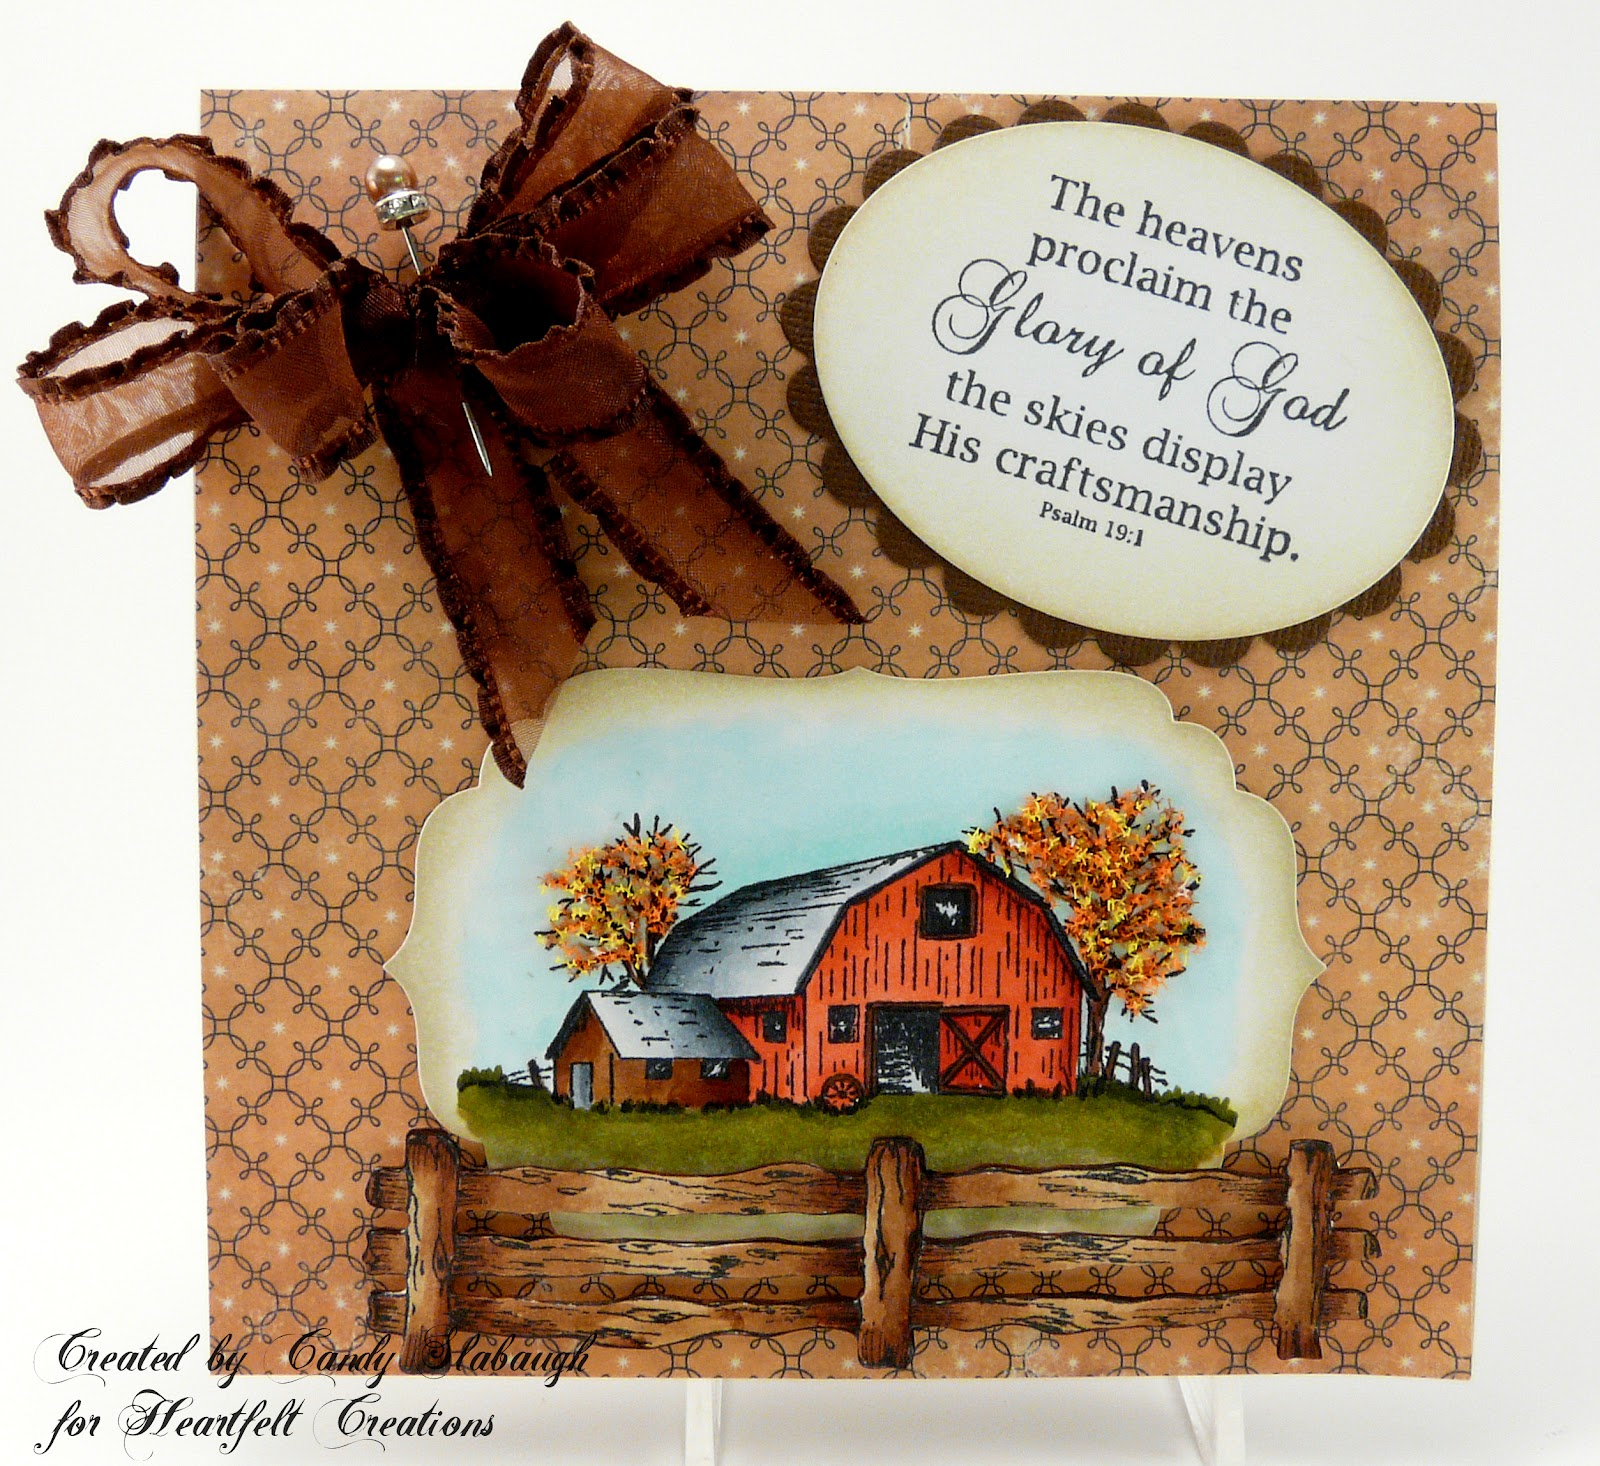
This week I created three cards using the new Western Elements Collection.  I decided to make the first card a Fall country scene.

FALL BARN SCENE CARD


The trees on the stamp have no leaves on them so I decided to add Autumn Flower Soft to make this a Fall scene.  This scene is very versatile - you could leave the image as is and it would be a winter scene or you could add Spring or Summer Flower Soft for the other seasons.


The next stamp from the new release I colored is a beautiful fishing cabin.  Doesn't it just make you want to grab your fishing pole and take that little row boat out for a relaxing day on the lake!

FISHING CABIN CARD


The final card I created I simply stamped the images on kraft paper using Ranger Distress Inks.  It was a very simple card to create, but it also turned out very elegant!
 
CARRIAGE CARD
Please head on over to the Heartfelt Creations Blog to check out all the creations by the other Design Team member this week.  While you are there don't forget to vote for your favorite Semi-Finalist to be on the HC Design Team and for your favorite Designers to continue for the next HC Design Team term from May - October 2012.
 
If you would like me to continue on the Heartfelt Creations Design Team, please vote by Friday, April 13, 2012!


FALL BARN SCENE CARD

Heartfelt Creations Products:
  • HCPC 3464 - Barnyard Elements PreCut Set
  • HCPC 3465 - Palisade Farmstead PreCut Set
  • HCPC 3312 - Uplifting Scripture PreCut Set
  • HCD  721 - Rustic Western Elements Die
  • Product ID 393386 - Spellbinders Labels 4
  • Product ID 354802 - Classic Ovals LG
  • Product ID 354803 - Scallop Ovals LG
Other Products:
  • Paper: Curious Iridescent - Cryogen White; Bazzill; 7 Gypsies - Venice
  • Ink:  Memento - Tuxedo Black; Ranger Distress Ink - Antique Linen & Frayed Burlap
  • Copics:  C00, C1, C3, C5, C7, BG000, BG10, BG11, R22, R24, R29, YG91, YG95, YG97, YG99, G99, E15, E19, E25, E27, E29, E31, E33, E35, E37
  • Embellishments:  May Arts Ribbon; Flower Soft - Autumn; Jenni Bowlin Stick Pin
Instructions:
6" x 6" Card
Start with a piece of 6" x 12" beige cardstock and score at the 6" mark to create a 6"x 6" card base. Next adhere a 6" x 6" piece of patterned 7 Gypsies cardstock to card front.  On Cryogen White paper with Memento Ink stamp the Psalm 19:1 sentiment from the Uplifting Scripture Set.  Cut out with the appropriate Classic Ovals Spellbinder and distress edges with Antique Linen Distress Ink and matte on brown cardstock cut from the coordinating Scalloped Ovals Spellbinder.  Stamp the Barn image from the Barnyard Elements Set on Cryogen Paper cut out with the Spellbinders Label 4 Die.  Color image with Copics.  Distress edges with Frayed Burlap Distress Ink and add Autumn Flower Soft to trees.  Stamp Fence image from Palisade Farmstead on Cryogen White paper, color with Copics and cut out with Rustic Western Elements Die.  Make bow with brown ribbon adding a stick pin to center for embellishment.  Assemble card as shown adding small pop dots to fence for dimension.
 
FISHING CABIN CARD

Heartfelt Creations Products:
  • HCPC 3466 - Alpine Bungalow PreCut Set
  • HCPC 3363 - Inspire Me Sentiments PreCut Set
  • HCD 720 - Western Broncos Die
Other Products:
  • Paper:  Curious Iridescent - Cryogen White; Bazzill; Echo Park - This & That
  • Ink:  Memento - Tuxedo Black; Ranger Distress Ink - Walnut Stain & Brushed Corduroy
  • Copics:  YG01, YG03, YG17, YG67, YG95, YG97, YG99, G46, G85, G94, G99, W00, W1, W3, W5, C00, C1, C3, YR12, YR14, YR18, BG0000, BG000, BG10, Y06, E23, E25, E27, E31, E33, E35, E37, E53, Spica - Lemon
  • Spellbinders:  Labels 15 & Petite Scalloped Ovals LG
  • Embellishments:   BoBunny Brads - Et Cetra & Darice Hemp Cord
Instructions:
6" x 6" Card
Start with a piece of 6" x 12" brown cardstock and score at the 6" mark to create a 6"x 6" card base. Next adhere a 5 1/2" square piece of patterned Echo Park cardstock to card front.  Then at an angle adhere a 4 1/4" square piece of light green cardstock at an angle on top.  Next stamp the Cabin image with Memento Ink on Cryogen Paper cut out with the Labels 15 Spellbinder Die.  Color with Copics and distress edges with Brushed Corduroy Distress Ink.  Matte on a 4 1/4" piece of orange cardstock and adhere to card front.  Out of green cardstock using the Western Broncos Die cut out the leaves and adhere to right lower corner.  Next out of kraft cardstock cut a Spellbinders Petite Scalloped Oval and with Walnut Stain Ink stamp the "Have a Special Day" sentiment from the Inspire Me Sentiment Set.  Adhere to card front with pop dots.  Wrap twine around the top of card front and add brad.
  
CARRIAGE CARD

Heartfelt Creations Products:
  • HCPC 3454 - Barnyard Elements PreCut Set
  • HCPC 3456 - Western Bronco PreCut Set
  • HCPC 3432 - Magnificent Spruce Trees PreCut Set
  • Product ID 386265 - Getaway Dew Drops
  • Product ID 159723 - Art Institute Glue - Dries Clear
 
Other Products:
  • Paper:  Curious Iridescent - Cryogen White; Recollections; Bazzill, 7 Gypsies - Venice
  • Ink:  Ranger Distress Ink - Walnut Stain, Forest Moss, Brushed Corduroy & Black Soot
  • Embellishments:  Twine; BoBunny Brads - Et Cetra
Instructions:
5 1/2" x 4 1/4"
Start with a 4 1/4" x 11" piece of cardstock and score on the 5 1/2" mark to create a A2 card base.  Next cut the striped 7 Gypsies paper to  4" x 5 1/4" and adhere to card base.  On kraft colored cardstock in Walnut Stain Ink stamp the Carriage from the Barnyard Elements Set, in Forest Moss Ink stamp the small Spruce Trees from the Magnificent Spruce Trees Set and in Black Soot Ink stamp the Sentiment from the Western Bronco Set.  Cut image to 3" x 5 1/8" and distress edges with Brushed Corduroy Distress Ink.  Adhere to card base.  Add twine around the top of the card and finish with decorative brad.  Add Getaway Dew Drops to bottom left of card adhering with Dries Clear Glue.
Pin It!

Wednesday, April 4, 2012

HEARTFELT CREATIONS - APRIL 4, 2012

Happy Spring!  Here in Northern Indiana we have had beautiful weather.  I have been working in my flower beds and my kitty, Muffin, has been helping me.  The birds are busy making nests and Muffin keeps a close eye on the birds.   I just love the feeling of new beginnings and new life in Spring!
Elements Chiquita Banana Muffin
"Muffin"
The stamp set I used to create the first two cards, HCPC 3385 - Spring Birdies and Roses PreCut Set, is being retired at the end of April.  It is a beautiful set to make Spring cards with, so make sure you purchase yours before it is gone for good!

BIRDIE WITH BABIES CARD

I colored the image with Copics and I added Bark Elements to the nest.

I am entering my Blue Jay Card this week in Flourishes' Timeless Tuesday #163 - Birthday Card Challenge.
BLUE JAY CARD

For my last card I used HCPC - Outside My Window PreCut Set and I used really bright colored Copics to create a Spring looking scene.  I am entering this card this week in Ribbon Carousel's Challenge RCC47-Spring is in the Air.
PINK ENCOURAGEMENT CARD

I added Peony Pink Flower Soft to a few flowers in the forefront to give the scene a more dimensional look.


As always make sure and check out the other great projects created by the other Designers this week on the Heartfelt Creations Blog.  Also, while you are there don't forget to vote for your favorite Semi-Finalist for the new HC Design Team and also vote for your favorite current HC Design Team Members to continue.  If you would like me to continue on the HC Design Team I would appreciate your vote!

Next week HC will be releasing the new Western Elements Collection and I have some fun new projects to share with you.  Have a great week and a Happy Easter!


BIRDIE WITH BABIES CARD
Heartfelt Creations Products:
  • HCPC 3385 - Spring Birdies & Roses PreCut Set
  • HCPC 3312 - Uplifting Scriptures PreCut Set
  • Product ID 430940 - Spellbinders Label 10
  • Product ID 354802 - Spellbinders Classic Ovals LG
  • Product ID 354803 - Spellbinders Scalloped Ovals LG
  • Product ID 311070 - Water Dewdrops
  • Product ID 311059 - Island Blossom Dewdrops
  • Product ID 28bark - Bark Elements
  • Product ID 159723 - Art Institute Glue - Dries Clear
Other Products:
  • Paper: Curious Iridescent - Cryogen White; My Mind's Eye - Vanity Fair; Bazzill
  • Ink: Memento - Tuxedo Black; Ranger Distress Ink - Antique Linen & Spun Sugar
  • Copics: RV52, RV55, YG03, YG17, YG67, BG000, Y02, E000, E01, E15, E19, E29, E31, E33, E35, E42, E43, E44, E47
  • Embellishments: Kaser Craft Pearl Brads; May Arts Ribbon
Instructions:
6" x 6" Card
Begin with a 12" x 6" piece of beige cardstock and score on the 6" mark to create a 6" x 6" card base. Next adhere a 6" square piece of My Mind's Eye printed paper on card base. Then wind the ribbon around the top of the card front and attach a bow with a brad. Next with Memento ink stamp the sentiment on an oval cut with the Spellbinders Classic ovals and distress the edges with Spun Sugar Distress Ink. Attach to brown scalloped oval cut with the Spellbinders Scalloped Ovals LG. Attach to card front with pop dot. Cut the largest Label 10 from Cryogen White paper and stamp the Birdie with Babies with Memento Ink and color with Copics. Distress edges with Antique Linen Distress Ink. With Dries Clear Glue add Bark Element to nest. Add Dewdrops to edge of Label 10 and when all dry attach Label to card front as shown.


BLUE JAY CARD
Heartfelt Creations Products:
  • HCPC 3385 - Spring Birdies & Roses PreCut Set
  • HCPC 3354 - Classic Message PreCut Set
  • Product ID 472181 - Floral Doily Motif Shapeabilities
  • Product ID 354806 - Standard Circles LG
  • Product ID 311070 - Water Dewdrops
  • Product ID 159723 - Art Institute Glue - Dries Clear
Other Products:
  • Paper: Curious Iridescent - Cryogen White; Prima - Madeline Collection; Bazzill
  • Ink: Memento - Tuxedo Black; Ranger Distress Ink - Frayed Burlap
  • Copics: R83, R56, R59, YG61, YG63, YG67, Y26, E25, E31, B32, B34, B37, B39
  • Spellbinders: Beaded Circles
  • Embellishments: Ribbon
Instructions:
6" x 6" Card
Begin with a 12" x 6" piece of brown cardstock and score on the 6" mark to create a 6" x 6" card base. Next cut a piece of the Prima patterned paper to 6" x 6" and wind a ribbon around the edge and adhere to back. Attach patterned paper to card front. Cut a small circle and a large circle out of the Spellbinders die and on the small circle with Memento Ink stamp the sentiment and on the large circle stamp the Blue Jay. Color with copics. Distress both edges with Frayed Burlap Distress Ink. Using blue cardstock cut out a Beaded Circles with the Spellbinder die and mount the colored Blue Jay. Using pop dots attach to card front. Next using rose cardstock cut out a motif from the Spellbinder Floral Doily Motif die and mount the sentiment. Attach to upper left corner of card front. Finally attach Water Dewdrops with Dries Clear Glue to bottom right corner.


PINK ENCOURAGEMENT CARD
Heartfelt Creations Products:
  • HCPC 3369 - Outside My Window PreCut Set
  • HCPC 3363 - Inspire Me Sentiments PreCut Set
  • Product ID  414898 - Metallic Pearl Brads
Other Products:
  • Paper:  Curious Iridescent - Cryogen White; Echo Park; Bazzill
  • Ink:  Memento - Tuxedo Black; Ranger Distress Ink - Spun Sugar
  • Copics:  BG000, BG10, BG11, BG15, RV21, RV25, G14, G40, G43, G46, E23, E25, W1, W3, W5 YG01, YG03, YG17, YG23, YG67
  • Spellbinders:  Lacey Squares, Classic Circles LG; Petite Scalloped Circles LG
  • Embellishments:  The Twinery Twine; Flower Soft - Peony Pink
Instructions:
6" x 6"  Card
Begin with a 12" x 6" piece of green cardstock and score on the 6" mark to create a 6" x 6" card base. Next adhere a 5 3/4" square piece of Echo Park printed paper on card base. Then wind the twine around the side of the card front several time and finish with a bow. Next with Memento ink stamp the sentiment on an circle cut with the Spellbinders Classic Circles and distress the edges with Spun Sugar Distress Ink. Attached to scalloped circle cut from green cardstock cut out with Spellbinder die.  Insert brad in top of circle and attach with pop dot below twine bow.  Next stamp river scene image with Memento Ink on Cryogen White paper and color with copics.  Cut image down to 3 1/4" square and then matte on a 3 1/2" square of pink cardstock.  Add Peony Pink Flower Soft to a few flowers in the front of the colored image to add dimension.  Out of green cardstock cut a large Spellbinder Lacey Square and matte image.  Adhere to card front.

Pin It!
Related Posts Plugin for WordPress, Blogger...