Saturday, August 19, 2017

Joy to the World Card

Today I am sharing my Joy to the World card using stamps and dies from Heartfelt Creations Festive Holly Collection, Winter's Eve Collection and Snow Kissed Collection.


For moire inspiration, please visit Heartfelt Creations Blog.  Have a great day!
post signature

JOY TO THE WORLD CARD

Heartfelt Creations Products & Products Carried by HC:

Other Products:  Memento Dye Ink Pad - Love Letters; Art Glitter Yuletide Dazzlers; Art Glitter Ultrafine Transparent - Green Briar; Want2Scrap 72 Count - Red Rhinestones; Want2Scrap 72 Count - Green Rhinestones; Ranger Stickles - Yellow

Instructions:   Create a 6" x 6" card base out of White Cardstock. Next cut a 6" x 6" card front from the Winter's Eve Paper Collection and then die cut the center image using the coordinating Cut Mat Create 2A Die.  Sponge the outer edge of the 6" square card front with Cottage Ivy Memento Ink and then adhere to the card base with pop dots.  Next adhere the die cut square directly to the card base with Dries Clear Adhesive.  Cut the sentiment from the design paper and sponge edges with Teal Zeal Memento Ink and adhere to card with pop dots.  On White Cardstock with Tuxedo Black Ink stamp the cardinal image from the Festive Holly and Cardinals Stamp Set, with Olive Grove Memento Ink stamp a small and  a large tree image from the Snow Kissed Spruce Set and with Tuxedo Black Memento Ink stamp the twig image from the Window Box Fillers Stamp Set and die cut all with their coordinating dies. Using Stack and Store Daubers, Fantastix and the Dove Blender Pen as needed, color the cardinal and berries with Rhubarb Stalk, Lady Bug and Love Letters Memento Inks, the cardinal's beak and feet with Cantaloupe Memento Ink, the tree trunks and the branch with Rich Cocoa Memento Ink and the holly leaves with New Sprout and Bamboo Leaves Memento Inks.  Shape cardinal and holly, the branch and the trees (lightly) with the Deluxe Flower Shaping tools. Cut apart the cardinal image as needed and adhere to card front as shown with Dries Clear Adhesive and pop dots. With Dries Clear Adhesive add Art Glitter Yuletide Dazzlers to the holly on the design paper, add Green Briar Glitter to the trees and Crystal Glitter to the cardinal.  Using Dries White Adhesive add Rajni Chawla's Crystal Clear to create a snowy affect, as desired. Add Yellow Stickles to the cardinals beak and to the flame in the lantern. Adhere the Green and Red Rhinestones as shown.
Pin It!

Friday, August 11, 2017

Celebrating 20 years of Heartfelt Creations with a Blog Hop


Happy Birthday, Heartfelt Creations! We are celebrating 20 years of Heartfelt Creations with a Blog Hop from August 11th - August 18th.  The order of the hop is: Candy Slabaugh (me)Tracey FehrSandra CareyTracy McLennonMonica EdwardsJanet Saieva and Marie Gamber. If you get lost at any point you can always start the hop at the beginning at the Heartfelt Creations Blog.  Comment on our blogs before 11.59pm EST on the 17th August 2017.

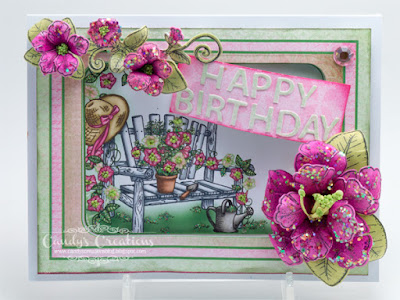
Heartfelt Creations is a wonderful company and I am excited to be a part of the celebration. In honor of Heartfelt Creations Birthday Celebration I created this special Birthday Card featuring Heartfelt Creations Classic Petunia Collection and the Happy Birthday Die from the Elegant Border Basic Die Set.


What would a Birthday Party be without some presents,  so as part of the celebration Heartfelt Creations is giving away some wonderful prizes along the way!  Please leave a comment on my blog for your chance to win.  The winner from my blog will receive two 6 packs of Daubers.  I love the Stack and Store Daubers and so I am excited that this is the prize that some lucky person will win from commenting on my blog!


There are more details in our Facebook event HERE. The Facebook event is from the 11th to he 18th August and will be filled full of tutorials, lots of family memories, photos, crafty tips, giveaways, the blog hop and some special savings for you!  

Don't forgot to leave a comment here on my blog for a chance to win the Daubers and to leave a comment on the Heartfelt Creations Blog for a chance to win the Winters Eve Creative Essentials. Comment on each of our blogs before 11.59 pm EST on the 17th August 2017, for even more great prizes.

CONGRATULATIONS the winner of the two 6 packs of Daubers from my blog is...... Ruth Pearman!!! 


post signature
Pin It!

Wednesday, August 9, 2017

Christmas Greenery Card

Today I am sharing my Christmas Greenery Card featuring Heartfelt Creations new Winter's Eve Collection.  This is what Heartfelt Creations has to say about its newest release:

"Celebrate the more simple side of the holiday season, and add a touch of nostalgia and wonder to all of your holiday themed greeting cards, scrapbook layouts and altered art pieces with the new Winter’s Eve Collection by Heartfelt Creations. Reminisce Christmas blessings from years gone by with a tranquil collection featuring an array of illustrations bringing back memories of silent nights by candlelight, choir voices resonating from the little church in the wildwood, woodland creatures foraging for food beneath the glistening snow, windows illuminated with the soft glow of a warming fireplace, and beautifully decorated Christmas trees ready to engage the imagination and excitement of little boys and girls eager to see what lies beneath them on Christmas morning! A charming and peaceful paper collection delivering a color palette of icy blues, pine greens, poinsettia pinks, berry reds and frosty whites filled with decorative elements including delicate swirls, subtle checks, bold stripes, dainty florals and lace like accents will whisk you away to a peaceful winter wonderland overwhelming your heart with the comfort and joy of the season! Three wintry themed cling stamp sets along with coordinating dies bring a further touch of simplicity to the season with bouquets of petite flowers and foliage, an old fashioned sled and a window frame with dimensional box ideal for creating warm and inviting scenes featuring a beautifully illustrated candle arrangement, Christmas tree or glowing fireplace. Three intricate and ornamental dies lend themselves beautifully to creating breathtaking decorative die cuts for accenting all of your winter wishes. Come along with us as we set the scene for a tranquil winter’s eve and a happy holiday season!"


I just love this candle stamp included in the Window Frame Stamp Set with its coordinating die.


For more inspiration please visit the Heartfelt Creations Blog.  Have a great day!

post signature

CHRISTMAS GREENERY CARD

HCPC -3794 Window Frame Stamp Set
HCD1-7148 Window Frame Die
HCPC-3745 Ornate Sleigh Cling Stamp Set
HCD1-7104 Ornate Sleigh and Presents Die
HCPC -3796 Winter's Eve Stamp Set
HCDP1-281 Winter's Eve Paper Collection
247027 Fantastix Blending Tools
HCDA-449 Stack and Store Daubers - Pack of 6
HCST401 Deluxe Flower Shaping Kit
ANC851 Rock N' Roll Prills - 12 Pack
85-glitter Crystal Ultrafine Transparent Glitter
159723 Art Institute Glue - Dries Clear Adhesive
352854 Metal Glue Tip - Art Institute
DDOTS Double Dots 100 pcs - 3D Foam Squares

Other Products:  Spellbinders Circles Die; Memento Dye Ink Pad - Love Letters; Want2Scrap 72 Count - Cranberry Pearls; Ranger Stickles - Yellow; Nuvo Crystal Drops - Gold; Art Glitter Ultrafine Transparent Glitter - Green Briar

Instructions:  Create an A2 size card out of white cardstock.  Next cut an A2 card front out of the Winter's Eve Paper Collection and die cut the center image using the Spellbinders Circles Die.  Sponge outer edge of A2 card front with Rhubarb Stalk Memento Ink and adhere to card base with pop dots.  On the die cut circle image with Olive Grove Memento Ink stamp the "Christmas Blessings" sentiment using the stamp from the Winter's Eve Stamp Set.  Line up the candle and greenery die from the Window Frame Die set and die cut the image from the design paper on the die cut circle.  With Dries Clear Adhesive adhere remaining circle image directly to the card base.  With small pop dots, cutting to fit as needed. adhere die cut candle image.  On White Cardstock with Tuxedo Black Ink stamp the candle image from the Window Frame Stamp Set and die cut with coordinating die.  Cut off the candle and discard.  Color the greenery using Fantastix and a Dove Blender Pen as needed with New Sprout, Bamboo Leaves and Olive Grove Memento Inks and the berries with Lady Bug, Love Letters and Rhubarb Stalk Memento Inks. Shape greenery with the Deluxe Flower Shaping Kit and add to image with pop dots.  On White Cardstock with Tuxedo Black Memento Ink stamp two small holly berry leaves using the stamp from the Ornate Sleigh Stamp Set and die cut with coordinating die.  Color holly berry leaves using the same ink combinations as the greenery with berries.  Shape holly berry leaves and adhere as shown.  With Dries Clear Adhesive add Berry Nice Prills to the holly berries on the design paper, Green Briar Glitter to all the greenery and Crystal Glitter to the yellow scrolls on the design paper.  Add Gold Nuvo Crystal Drops to the candle's wax and Yellow Stickles to the candle's flame.  Adhere Cranberry Pearl to the upper right hand corner.
Pin It!

Wednesday, August 2, 2017

Fancy Christmas Tag

It's Heartfelt Creations Wednesday and today I am sharing my Fancy Christmas Tag featuring the Decorative Medallion Die.


For more inspiration, please visit the Heartfelt Creations Blog.  Have a great day!
post signature


Fancy Christmas Tag

Heartfelt Creations Products and Products Carried by HC:


Other Products:  White Cardstock: Teal Seam Binding; Want2Scrap 72 Count - Turquoise Rhinestones


Instructions:  Begin by die cutting the Celebrate the Seasons tag using the Luggage and Tags Die and die cut the purple design paper using the Snow Kissed Flakes and Tags Die.  Matte tag onto purple design paper using pop dots.  Next add teal seam binding through hole in tag.  Using white cardstock die cut two decorative round medallion dies and adhere to back of tag with Dries Clear Adhesive.  Using the coordinating Ornate Sleight and Presents Die, die cut the package from the design paper and adhere to the tag with a pop dot.  Using Dries Clear Adhesive add Prills to the centers of the poinsettias on the design paper and add Crystal Glitter to the Medallion Die Cut and the design paper as desired.  Adhere Turquoise Rhinestone to corner as shown.
Pin It!
Related Posts Plugin for WordPress, Blogger...