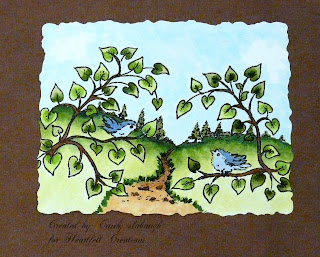
This week I made some more cards with the Heartfelt Creations Chateau Gate Collection. This is really a fun collection and very versatile. This cards makes me excited for Spring even though it is snowing and blowing here today.
PURPLE WINDOW CARD
 |
| Card Front |
 |
| Close-Up of Birdie Scene |
- HCPC 3448 - Dainty Blooms & Birdies PreCut Set
- HCPC 3449 - Door to My Heart PreCut Set
- HCD 718 - Decorative Chateau Gate Die
- Art Glitter Designer Dries Clear Adhesive
- Spellbinders: Deckled Rectangle LG
- Paper: Curious Iridescent - Cryogen White, DCWV
- Ink: Memento - Tuxedo Black, Tsukineko Brilliance - Pearlescent Purple
- Copics: E23, E25, E27, E40, E42, E53, B41, B45, B91, B95, B97, B99, BG000, W5, W00, C00, V01, V12, V15, V17, Y08, Y19, YG01, YG11, YG17, YG61, YG63, YG67, G20, G24, G28, G94, G99, Spica Lemon & Lavender
- Embellishments: Stickles - Yellow, Liquid Pearls - White Opal, Brads
6" x 6" Card
To make card base start with a 12" x 6" piece of brown cardstock and score at 6" mark to make a 6" x 6" card. Next cut a 6" square piece of striped paper and adhere to card front. Then cut a 4 1/2" square piece of brown cardstock and insert brads at each corner before adhering to center of card front. Cut two HCD 718 Decorative Chateau Gate Die pieces and remove doors. Stamp Dainty Blooms and Birdies on Cryogen White cardstock and color with Copics. Add Lemon Spica to candle flames, Lavender Spica to flower centers and Yellow Stickles to Cala Lilly centers. Detail cut Dainty Blooms out and cut out Birdies scene with appropriate Spellbinders Deckled Rectangle. On card front place window at appropriate place and trace where the opening should be. With an X-Acto knife cut opening. Glue windows on front and back with Dries Clear Adhesive. Add Liquid Pearls for accents. Attach Dainty Blooms with pop dots. Stamp sentiment under Dainty Blooms with Pearlescent Purple Ink. Attach Birdies scene to inside of card so that Birdies show through window.
 |
| Inside View |
I had fun making this next card. When I first made the wood grain background it just reminded me of a wall that was in my Grandma's living room so I decided of course it needed portraits hanging on the wall. I added Inkssentials Glossy Accents to the clear vases to make it look like water.
FLOWER PORTRAITS CARD
Heartfelt Creations Products:- HCPC 3447 - Window Accents PreCut Set
- HCPC 3446 - Doorway Trimmings PreCut Set
- 452073 - Spellbinders Beaded Ovals Decorative Elements Dies
- 354803 - Spellbinders Scallop Oval Large
- 354802 - Spellbinders Classic Oval Lg
- Paper: Curious Iridescent - Cryogen White, DCWV, Bazzill
- Ink: Memento - Tuxedo Black
- Copics: V20, V25, V93, V95, V99, YR21, YR24, BV02, BV04, E40, E42, E43, Y19, RV93, RV95, RV99, G20, G24, G28, BG10, BG000, BG0000
- Embellishments: Purple Brad, Purple Grossgrain Ribbon, Raffia Trim, We R Memory Keeper Sew Ribbon - Weave, Inkssentials Glossy Accents, Ranger Adirondack Color Wash - Espresso, Tattered Angels Glimmer Mist - Coffee Shop
5" x 7" Card
Start with a 10" x 7" piece of gray cardstock and score on the 5" mark to create a 5" x 7" card base. Next cut a 5" x 7" piece of patterned paper and adhere to card front. Then out of Cryogen White paper cut 3 oval with the spellbinder die and stamp a vase of flowers on each from the Doorway Trimmings set. Out of green cardstock cut 1 Beaded Oval and 2 Scalloped Ovals. Color flowers & vases with Copics and matte to Beaded Oval or Scalloped Ovals. Apply Glossy Accents to vases that have water and let dry thoroughly. On white paper with Memento Ink stamp wood grain from Window Accents set several times side by side. Spray with Espresso Color Wash, pressing with paper towel to remove excess. Heat set. Then spray with Coffee Shop Glimmer Mist and heat set. Cut wood grain piece down to 6 3/4" x 4 3/4" and adhere to card front. Make holes in top using We R Memory Keeper Sew Ribbon tool and then weave ribbon through. Add brads to card front and then tie raffia trim around brads to make it look like ovals are hanging from brads. Apply finished oval portraits with pop dots to card front.
Make sure and check out what the other HC Design Team member made this week. You can either click on their names at the left or check out all of our work at the Heartfelt Creations blog.


Both projects are beautiful. I love your wonderful use of color and attention to detail!
ReplyDeleteTwo lovely project! I especially like the window card with the candles.
ReplyDeleteAnother pair of beauties Candy.
ReplyDeleteYour work and color skills are amazing!!!
ReplyDeleteBoth of your projects are fabulous! I love how you created the window with the scene inside and how you used the woodgrain on the second card!
ReplyDeleteBoth cards are gorgeous! Your coloring is wonderful and the make me think of spring too!
ReplyDeletestunning cards, Candy!
ReplyDelete