Wednesday, January 23, 2019

Divinity Designs Guest Designer January Release Week 3

Today I am back with a couple more projects using Divinity Designs (formerly, Our Daily Bread Designs).  Both projects feature the new Festive Favors Die Set.

My "For You" Heart Favor would be a great gift for Valentines Day for a special someone.  


FOR YOU HEART FAVOR 
PAPER COLLECTIONS:  Heart and Soul; Fall Favorites

My Wedding Favor project would be a beautiful addition to any wedding or anniversary party.  On this project I also used the Flourishes embossing folder.


WEDDING FAVOR
PAPER COLLECTION:  Wedding Wishes
EMBOSSING FOLDER:  Flourishes

Please visit the Divinity Design Blog to see some other great projects.  Join me again next Wednesday for a couple more projects from Divinity Designs.
post signature

Pin It!

Wednesday, January 16, 2019

Divinity Designs Guest Designer January Release Week 2


Hello again!  I am back this week with another couple cards I created using Divinity Designs new January Release.

My Green Apple Card features the Apple Branch stamp set and the Petals Stencil.


GREEN APPLE CARD
STAMP SETS:  Apple Branch
CUSTOM DIES:  Rectangle Dies, Double Stitched Rectangle Dies, Ovals Dies, Pierced Ovals Dies
PAPER COLLECTIONS:  Fall Favorites, Rustic Beauty, Wedding Wishes
MIXED MEDIA STENCILS:  Petals Stencil

My second project for this week also features the Apple Branch stamp set along with the new Flourishes embossing folder.


HAPPY BIRTHDAY APPLE CARD
STAMP SET:  Apple Branch
CUSTOM DIES:  Ovals Dies, Layered Lacy Ovals Dies, Pierced Ovals Dies
PAPER COLLECTION:  Wedding Wishes
EMBOSSING FOLDER:  Flourishes

Please visit the Divinity Design Blog to see some other great projects.  Join me again next Wednesday for a couple more projects from Divinity Designs.


post signature
Pin It!

Wednesday, January 9, 2019

Guest Designer for Divinity Designs


Hello everyone!  I am happy to announce that I am a Guest Designer for Divinity Designs formerly Our Daily Bread Designs.   I will be creating and sharing my projects from January - March.  


January's Release has some great stamps featuring fruit, a couple new stencils, an embossing folder and some new 3D dies.  My first project uses the new Fruit of the Spirit stamp set.  


STAMP SET:  Fruit of the Spirit
CUSTOM DIES:  Ovals Dies, Layered Lacy Ovals Dies, Pierced Circle Dies
PAPER COLLECTION:  Fall Favorites, Rustic Beauty

My second card features the Peach Branch stamp set along with the new Circles Mixed Media Stencil.


STAMP SET:  Peach Branch
CUSTOM DIES:  Rectangle Dies, Double Stitched Rectangle Dies, Pierced Circle Dies
PAPER COLLECTION:  Fall Favorites
MIXED MEDIA STENCILS:  Circles

Please visit the Divinity Design Blog to see some other great projects.  Join me again next Wednesday for a couple more projects from Divinity Designs.

post signature

Pin It!

Wednesday, April 11, 2018

Pretty Butterflies Card

Today Heartfelt Creations is pleased to announce the release of its Butterfly Dreams Collection.  I just love the bright colors of this paper collection.


For more inspiration and ideas, please visit the Heartfelt Creations Blog.  Have a great day!


Heartfelt Creations Products and Products Carried by HC:

TSMP400 Memento Dye Ink Pad - Rose Bud
TSMP602 Memento Dye Ink Pad - Teal Zeal
TSMP200 Memento Dye Ink Pad - Tangelo
247027 Fantastix

Other Products:  Glue Gun;VersaColor Pigment Ink - Opera Pink;  Angel Pink Memento Ink; Art Glitter Ultrafine Transparent - Lettuce and Pink Azalea; Sunshine Yellow Flower Soft; Want2Scrap 72 Count Turquoise Rhinestones; Want2Scrap 72 Count Orange Rhinestones

Instructions:  Create a 6" x 6" card base out of white card stock. Cut a 6" x 6" card front from the Butterfly Dreams Paper Collection and sponge edge of card front with Teal Zeal Memento Ink.  Adhere 6” x 6” card front directly to card base with Dries Clear Adhesive. On White Cardstock with Opera Pink VersaMark Ink stamp the petals from the Small Sweet Peony Cling Stamp Set and stamp the small peony blossom from the Peony Bud and Blossom Cling Stamp Set.  On White Cardstock with Leaf Green Ranger Archival Ink  stamp the leaves from the Small Sweet Peony Cling Stamp Set; with Rose Bud Memento Ink stamp the butterfly from the Fluttering Butterfly Cling Stamp Set; and using Nautical Blue Memento Ink stamp the butterfly floral image from the Butterfly Dreams Border Cling Stamp Set. Cut all with coordinating dies. Using the Stack and Store Daubers color the leaves using New Sprout; color the peonies with Tangelo and Cantaloupe Memento Inks; color the large butterfly wings with Cantaloupe Memento Ink and add Angel Pink Memento Ink to the body; to color the small butterfly floral image use Danube Blue and Teal Zeal Memento Inks on the butterfly, New Sprout and Bamboo Leaves Memento Inks on the swirls and Rose Bud and Cantaloupe Inks on the flowers. Use the Deluxe Flower Shaping Kit to shape all. Assemble the peony as shown using hot glue gun and adhere to peony and leaves to card. Cut butterfly floral image and adhere it and large butterfly to card front with Dries Clear Adhesive.  With Dries Clear Adhesive add Pink Azalea Glitter to the large butterfly, to the die cut peony and the peonies on the design paper; Lettuce Glitter to the die cut leaves and swirls and leaves on the design paper and and Blue Rain Glitter to all the blue butterflies. With Dries Clear Adhesive add Sunshine Yellow Flower Soft to the flowers on the die cut and Go Man Go Prills to the center of the peony, as shown. Finally adhere the Turquoise and Orange Rhinestones to the upper right hand corner as shown.
SaveSave
Pin It!

Wednesday, April 4, 2018

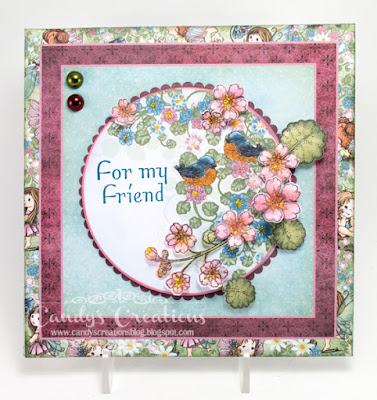
For My Friend Wildwood Cottage Card


Today I am sharing my For My Friend card featuring the Heartfelt Creations Wildwood Cottage Collection.

Have a great day!
post signature


Heartfelt Creations Products and Products Carried by HC:

Other Products:  Canvas Corp Navy on Ivory 12" x 12" Cardstock; VersaMagic Pink Petunia Chalk Ink; Ranger Stickles - Yellow; Flower Soft Ultrafine - Toffee; Want2Scrap 72 Count - Sage Green Pearls; Want2Scrap 72 Count - Cranberry Pearls

Instructions: Create a 6" x 6" card base out of the Navy on Ivory Cardstock.  Cut the 6" x 6" card front from the Wildwood Cottage Paper and die cut the center using the coordinating Circles Basic Large Die and sponge edges of die cut circle image with Pink Petunia Chalk Ink.  Using Nautical Blue Memento Ink stamp "For My Friend" from the Encourage You Stamp Set on the die cut circle image, as shown. Sponge outside of 6" x 6" card front with Olive Grove Memento Ink and adhere directly to card base with Dries Clear Adhesive.  Adhere die cut circle to card front using pop dots.   On White Cardstock with Tuxedo Black Ink stamp the floral image from Wildwood Cottage Accents Set and stamp the small blossom set, the large blossom set and a set of large leaves from the Wildwood Florals Set.  Die cut all using their coordinating dies.  Color the flowers using a sponge dauber with Pink Petunia Chalk Ink and add Cantaloupe Ink to the centers using a Fantastix.  Color the leaves with a sponge dauber with Pistachio Ink and add Olive Grove Ink to the stems and centers of leaves with a Fantastix.   Shape the flowers, blossoms and leaves with the Deluxe Flower Shaping Kit.  Adhere all to the card front as shown using Dries Clear Adhesive, cutting the leaves as needed.  With Dries Clear Adhesive add Baby's Breath Glitter to the die cut flowers and flowers on the design paper. Add Yellow Stickles to all the flower centers and to the beaks of the birds.  Add Toffee Flower Soft to the bird's bellies with Dries Clear Adhesive.  Adhere Sage Green and Cranberry Pearl to upper left corner, as shown.


Pin It!

Wednesday, March 28, 2018

Peony Treat Tin


Today I am sharing my Peony Treat Tin featuring Heartfelt Creations Sweet Peony Collection.  This 2 1/2" round tin would be perfect to fill with Easter candy for a special treat.


I decorated this the tin and design paper with bling from Want2Scrap!
 

For more ideas and inspiration, please visit the Heartfelt Creations Blog.  Have a great day!
post signature
PEONY TREAT TIN

Heartfelt Creations Products and Products Carried by HC:

Other Products:  White Cardstock; 2 1/2" round tin; Glue Gun; ; VersaColor Pigment Ink - Burgundy and Opera Pink; Memento Ink - Pink Angel; Art Glitter Ultrafine Transparent - Lettuce and Pink Azalea; Want2Scrap Nestabling Heart Circles - Hot Pink Rhinestones

Instructions:    Die cut dark pink Sweet Peony design paper using the eyelet circle die from the Eyelet Circle and Basics Small Die Set.  Die cut green Sweet Peony design paper using the Circles Basics Large Die, sponge edge with New Sprout Memento Ink.  Matte green die cut circle onto dark pink eyelet circle and then adhere round tin to center of circle. On White Cardstock with Burgundy VersaMark Ink stamp the largest and medium petals from the Small Sweet Peony Cling Stamp Set and stamp the smallest peony blossom from the Peony Bud and Blossom Cling Stamp Set, and stamp three of the small peony blossoms from the Peony Bud and Blossom Cling Stamp Set.  On White Cardstock with Leaf Green Ranger Archival Ink stamp the leaves from the Large Sweet Peony Cling Stamp Set. Cut all with coordinating dies. Cut additional slits in between the petals of the small peony blossoms to create more depth on the bottom layer of petals.  Using the Stack and Store Daubers color the leaves using New Sprout and add Bamboo Leaves Memento Ink to the edges of the leaves; color the peonies with Cantaloupe Memento Ink in the center of each petal, then add Angel Pink to the outer edges of each petal, and finish by adding Pink Opera VersaColor Ink to the tips of each petal. Lay the peony petals stamped side up in the Floral Basics Shaping Floral Mold. Mist lightly with water and run through the die cutting machine to shape petals quickly. Use the Deluxe Flower Shaping Kit to further shape the peony petals.  Assemble peony using hot glue gun and adhere peony and leaves to top of tin as shown. With Dries Clear Adhesive add Go Man Go Prills to the center of the peony; add  Pink Azalea Glitter to the peony petals; and add Lettuce Glitter to the leaves. Finally adhere a Hot Pink Rhinestones to die cut circle and tin as shown.
Pin It!

Wednesday, March 14, 2018

Praying for You Peony Card

Heartfelt Creations is pleased to announce its newest release, the Sweet Peony Collection.  Today I am sharing my Praying for You Peony Card.


For more inspiration and ideas, please visit the Heartfelt Creations Blog.  Have a great day!

post signature


Heartfelt Creations Products and Products Carried by HC:

Other Products:  Glue Gun; Green Cardstock; VersaColor Pigment Ink - Burgundy; ColorBox Chalk Ink - Dahlia; Art Glitter Ultrafine Transparent - Lettuce and Baby's Breath; Want2Scrap 72 Count Pink Pearls

Instructions:  Create a 6" x 6" card base out of white card stock. Cut a 6" x 6" card front from the Sweet Peony Paper Collection and sponge edge of card front with Toffee Crunch Memento Ink.  Die cut center using coordinating Die from the Circle Basics Large Die Set. Adhere 6” x 6” card front directly to card base with Dries Clear Adhesive. Die cut green cardstock using the eyelet circle die from the Eyelet Circle and Basics Small Die Set.  Matte die cut circle onto eyelet circle and adhere to card front with pop dots. On White Cardstock with Tuxedo Black Ink stamp the Praying for You image Banners of Love Cling Stamp Set.  On White Cardstock with Burgundy VersaMark Ink stamp the petals from the Small Sweet Peony Cling Stamp Set and stamp the small peony blossom from the Peony Bud and Blossom Cling Stamp Set.  On White Cardstock with Leaf Green Ranger Archival Ink and Olive Green StazOn Ink stamp the leaves in various sizes from the Small Sweet Peony Cling Stamp Set and Large Sweet Peony Cling Stamp Set. Cut all with coordinating dies. Using the Stack and Store Daubers color all the leaves using New Sprout and on the leaves that have been stamped with Olive Green Ink add a touch of Fern Green Ranger Archival Ink; color the peonies with a light touch of Dahlia Chalk Ink and add the Dahlia Ink to the tips of the petals also. Color the praying for you sentiment with Toffee Crunch Memento Ink. Lay the peony petals stamped side up in the Floral Basics Shaping Floral Mold. Mist lightly with water and run through the die cutting machine to shape petals quickly. Use the Deluxe Flower Shaping Kit to further shape the peony petals, also lightly shape the peony blossom, leaves and sentiment. Adhere the sentiment as shown with pop dots. Assemble peony as shown using hot glue gun and adhere to peony and leaves to card as shown. With Dries Clear Adhesive add Baby's Breath Glitter to all the peonies, Lettuce Glitter to all the leaves and Crystal Glitter to the sentiment. Finally adhere a Pink Pearl to upper right hand corner as shown.
Pin It!
Related Posts Plugin for WordPress, Blogger...